Tuesday, April 30, 2013

Quilting in Sections


It's finally spring here in Wisconsin.  It's harder to find time to sew in spring and summer, because there are so many things to do in the house and garden.  I've done a little spring cleaning in the house (besides the sewing room), and I'm working on problems with the main bathroom upstairs.  The sequential vortex strikes again!  Fixing a leaking toilet has turned into getting new vinyl and a new sub-floor, plus a new toilet to replace the 1970s blue one, and on and on.
In my small garden, the potatoes are planted and two rows of peas are up.  I always want to jump for joy when I see those first new seedlings.  I have LOTS of work I should be doing outside.
I do have time in the evening to sew, if I'm not too tired.  Sunday night I got my newest quilt ready for quilting.
These are all the things I needed for this job--the quilt top itself, pieced in 3 sections, the backing fabric (washed), cotton batting, and basting spray.  I have found that the basting spray doesn't hold very well if the fabric hasn't been washed.  Probably something to do with the sizing on the fabric.
Just a word about basting spray--I am really torn about using it.  It is wonderfully convenient, and saves me so much time.  I absolutely hate pinning quilts.  It's hard on my hands, and the pins always seem to be in the way.  The quilt shifts more when pinned than when spray basted, too.  On the other hand, the spray is expensive, I'm not sure I should be breathing it, and I'm concerned about the affects on the environment.  Right now I'm using it, but I'm thinking about alternatives.  (One thing I will NOT be doing is getting a long arm machine, even though you don't have to baste when using one!)


 For my own quilts, especially the reproductions, I use Mountain Mist 100% cotton batting.
 It gives the antique look I like.  Old fashioned, like me. 
 This batting requires close stitching to keep it from shifting and lumping.  (Someday I might show you my first quilt, when I didn't pay attention to this warning on the label.)  I bought a case of these online a few years ago.  They only cost $10.00 each (gotta love buying in bulk).
 The first thing I do with this kind of quilt is spray baste the top sections to the batting.  I lay them out on the floor, spray the batting (not the top), and press the top onto the batting.  These sections are almost as wide as the batting.  I don't have to leave a lot of extra batting around the edges when spray basting.  The top and batting are solidly glued together, and don't shift.
 This is all the batting I had left from this batt.  I did the smallest section last, in case I didn't have enough and needed to piece it.  (The toys in these pictures belong to my grandson.  He and Grandpa play with them in the basement sometimes.)
 After I have the batting securely basted (glued) to the top sections, I lay them with the batting side up, spray the other side of the batting with basting spray, and smooth down the backing.  These sections were just the right width to use the backing lengthwise.  The edges at the right and left are the selvedges.  I cut each section from the backing, pressed it, and then spray basted it down.
 Here are all 3 pieces, layered and basted with backing and batting, ready to quilt.  I had about a fat quarter of the backing left over.

I got one block quilted and another about half done before I had to pick up my grandson from school yesterday.
If at all possible, I like to leave everything ready to go for the next time, with the needle in the quilt.  Then all I have to do the next time is sit down and get to work!
Got any ideas for basting quilts?  Leave a comment!

Saturday, April 27, 2013

Pictures of the Last Two Hand Cranks

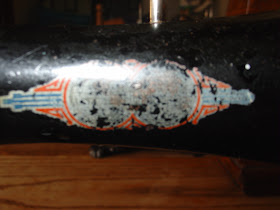
 This is the one I call the "globes" because of the decal below.  I have no idea who made this machine.  There is no badge on the pillar, and I can't make out a name.  As you can see, there is considerable damage to the paint on the bed.
 It is really hard to get a good picture of it.
 Here's a shot of the other decals.  Below, this is the hand crank.
 It could use a new bobbin tire.
And here's the back.
No cover to this machine, sadly.  The shuttle is in it, with one bobbin.  The slide plate is stuck shut.  I'm asking $20.

And now for the chainstitcher.
 I bought this on Ebay many years ago, when I was first collecting.  It looked old and cool.
 I really loved these feet!
 Sadly, several parts are missing, including whatever it had for tensioning.  And it looks like a previous owner spray painted the whole thing black.
Plus, the handle on the wheel is cracked and loose.
Maybe you'd like a nice doorstop?  Or you could clean her up and put her on a shelf.  The price is right (free!).
Now that's enough about the hand cranks!  Back to sewing!

Last Posts About Hand Cranks for Sale

These are my last posts about the hand cranks I'd like to sell.  First, an update--Christine took 2 off my hands, the Bradbury and the German TS (thanks, Christine!), and Leonore has claimed the Minnesota.
Here's what's left--
1.  The Kohler (see previous post).
2.  The Gritzner (see previous post).
3.  The Ideal (pictures in this post)
4.  A VS with globe decals (pictures in next post)
5.  A chainstitch door stop (pictures in next post).
All of these are original hand cranks.  All except the chainstitcher are VS machines.  And all except the chainstitcher will probably sew.  The Kohler and the Gritzner have sewn well for me, and the Ideal has a leaf tension which I never mastered.  I don't think I ever tried the one with the globe decals, and the chainstitcher is missing parts and definitely will not sew.
I'll leave them up here for a week, and if there's no interest I'll list them on Ebay.  The price is $20 each, except for the chainstitcher.  It's in worse shape than I remembered, so I'm offering it free to a good home.  As stated before, these are all pick up only.  I CANNOT ship them, sorry.  I will hold for a pony express, though.  Thanks for looking!

The Ideal:

 Nice decals.
 Some rust and wear.

 Hand crank in great shape, folds in to fit in the lid.

 The lid has been repaired, as you can see below, but it was done well.

 Lots of attachments, some rust.
 Fifteen bobbins!  Plus the one in the machine!  Three or four of them are rusty, the rest are okay.

Wednesday, April 24, 2013

Gritzner Hand Crank Sewing Machine For Sale

 She's a workhorse, not a show horse.  Definitely a Gritzner.  I tried to take a picture of the badge on the pillar, which says Gritzner, but it didn't turn out.  Some rust, and some missing decals.
 The decals that are there, though, are really something.
 Not sure what this R on the pillar means.  Model R?
 No slide plate.  Again with the missing slide plate.  No idea why.
 Two bobbins come with it, plus the one in the shuttle.  There's also a seam guide, a bolt of some kind? and something that looks like it belongs on the tension.

I used to sew with this machine a long time ago, so I know she works, but you may have to play with the tension a little.  She's been sitting on the shelf for years.

The case lid doesn't fit the base, but it will help keep the dust out.
Asking $20.00, pick up only.
Thanks for looking!

Kohler Hand Crank Sewing Machine for Sale

 Here's my Kohler hand crank, ready for a new home.  She's a vibrating shuttle machine.
 This is the original hand crank.  I've always loved that funky arrow.
 This is where the missing slide plate would go.  I have no idea why the slide plate is missing.  There is a tiny lever to push that pops the shuttle out.  The decals are not in perfect shape.
 This is the cubby hole in the base.  There is no cover for it.
 Why it came with the Dinselmann cover I don't know.  The lettering is really cool.
Here is a detail shot of the top of the cover.

Three bobbins come with it.  I used to sew with this machine a lot.  In those days, I put a flexible magnet over the place where the slide plate should be.
You will probably have to work with the tensions to get her sewing perfectly again.
I'm asking $20.00.  Pick up ONLY.
I hope she finds a good home where she'll be appreciated.  I have neglected her sadly.

Dusty Sisters For Sale List

I am so sorry I didn't get this done yesterday.  I was babysitting my sweet granddaughter part of the day.  The poor little babe was sick, nothing serious, but running a low fever.  We read books (lots of books!) and she fell asleep on my lap.  Later her brother and I played and colored while her mom looked after her.  By the time I got home I was too tired to even look at the machines.  Plus there was dinner to get, dishes to wash, and a grandson to help with homework.  I hope I don't sound like I'm complaining.  I know how lucky I am to be part of my grandchildren's lives.
Anyway, I went through the machines today, and identified which ones I am keeping and which ones are for sale.  I'll do a post on each one separately, with photos, but this is the list. 
All of these machines are original handcranks.  VS stands for vibrating shuttle.  TS stands for transverse shuttle.  I used to sew often with the Kohler and the Gritzer, but haven't for years.

1.  Kohler VS, works, missing a slide plate.  Some rust, cosmetically challenged.  Has a case that says Dinselmann on the side.  See the full post.

2.  Gritzner VS, works, missing a slide plate.  Has a case.  See the full post.

3.  Another Gritzner?  This one has a globe logo.  A VS.  No case, just a base.

4.  Ideal, might be New Home???  Leaf tension.

5.  Bradbury VS, British machine, broken base, some rust.

6.  TS machine, great base, probably German, some rust.

7.  Black painted chain stitch machine, I think some parts are missing, probably won't sew.

All of these machines are priced to sell at $20.00 each, cash and carry.  I also have some parts machines I would gladly give away (mostly Singers) and several sewing machine drawers.  Nice ones for $5.00 each, sadder ones for $2.00.  (The sad ones are from a very weathered White treadle.)
Let me know, either in the comments or through Facebook if you're interested.
Maybe I'll have room for the ones I'm keeping!

Monday, April 22, 2013

Minnesota D--One of the Dusty Sisters Sold!

Update:  This machine is spoken for.  More will be coming soon!

As part of my basement clean out, I'm trying to find new homes for some of my more neglected hand cranks.  I'll be posting them one at a time, with lots of photos.  If you're interested, let me know through the comments.  Please note:  I CANNOT SHIP THEM.  These will be for pick up only.  If no one is interested, I may offer them on Ebay.  I'd rather they went to dedicated people powered people, like you.
That said, here's a cute little Minnesota D.  She's an original hand crank, and according to Charles Law she was made by Davis and sold by Sears Roebuck from the early 1900s through the 1910s.  A very similar machine is on page 48 of Law's Third edition.
The decals are pretty good. 

Now for the problems.
The veneer around the machine is in terrible shape.
 Worse, the metal pieces holding the hand crank on are broken.  One side has been fixed with a modern looking screw.  It will still turn the handle.
I don't know if it sews well or not, because I have never learned to properly work a leaf tension.  The crank turns the machine freely, the bobbin moves freely, and it will stitch with very bad tension, probably because I don't know what I'm doing.
I did replace the bobbin tire, back when I bought it years ago.  And here's the stuff from the cubby that comes with it. There are a total of 3 bobbins, one in the machine and two extras.  The needle cases are empty.  There is a needle in the machine, but I'm not sure it's the right size.  All the other stuff is rusty--screw driver, hemming foot and seam guide.  The large screw is okay.

The case is solid wood, and pretty, but not perfect.

It's got some paint stains, and a big chip off the top of one end.
So there you have it.  Cute, but needs work.
I'm asking $20.00.
Thanks for looking!

Sunday, April 21, 2013

Charity Quilt Size Chart

I enjoy making quilts to give away.  Mostly the quilts are crib sized, or for people's laps on wheelchairs.  Some places that accept quilts set requirements for size, and most of them are roughly 3 feet by 4 feet, or 36 in. x 48 in..  Because I don't always make the same size blocks, I have developed this chart to help me plan.  I'm passing it along, hoping it might help you or your group.
I'm putting in some examples of the sizes.  These are quilts that have been on the blog before.  Hope you don't mind.
 The pinwheels are 4 in. blocks.  There are 63 blocks in the quilt (really!), but only 32 are pinwheels.  The 31 others are just squares of dinosaur fabric, or what's often called alternate squares.
 This quilt has 6 in. squares.  Again, not all are pieced.  In this case, half are four patches and half are alternate squares.

Although this looks like a checkerboard, these are really 8 in. 4 patches, set side by side.  The size block I use most often is 8 in.  The math is easy, the novelty fabrics show up well, and it doesn't take long to piece them.  This one has a 1 in. finished inner border, which adds 2 in. in each direction.  I didn't include measurements for more than one border in the chart.
 The blocks in this nine patch are actually 10.5 in. square, but the set is the same as if they were 10 in.  These are some of those squares I bought at a quilt show.
I don't have any photos of charity quilts with either 9 in. or 12 in. blocks, although I have done a few.  The 12 in. size tends to look large and clunky in this size quilt, so they're not my favorites.

Here's the actual chart.  It's probably found in a book somewhere, but I reinvented it to help me.  Maybe it can help you too.  All the measurements are in inches.

Block Size
# of Blocks
Set
Before Borders
3 in. borders
4 in. borders
4 in.
63
7 x 9
28 x 36
34 x 42
36 x 44
6 in.
30
5 x 6
30 x 36
36 x 42
38 x 44
8 in.
20
4 x 5
32 x 40
38 x 46
40 x 48
9 in.
12
3 x 4
27 x 36
33 x 42
35 x 44
10 in.
12
3 x 4
30 x 40
36 x 46
38 x 48
12 in.
9
3 x 3
36 x 36
42 x 42
44 x 44

 Happy quilting!