Thursday, February 28, 2013

Civil War Quilt finished!


Huzzah!  It feels so great to finish this quilt.  I hand sewed the last seam on Tuesday night while watching TV, and inked on the inscriptions yesterday afternoon.  It took a long time to decide what to write in each square.  I included things like names of battles, etc., quotes from the time period (especially from President Lincoln), and some lines from songs popular with the Union troops.  This is a Union quilt.  


As you can see, it's a small quilt.  The white area visible underneath it is another quilt with a purple binding.  I'd guess this size would be called a lap quilt.  If it was an antique, we might call it a hired man's quilt.  During the Civil War, this kind of quilt was made for the cots the soldiers used in camp and hospital.
I learned a lot making this quilt.  I was surprised that it feels like a "regular" quilt, even though it's actually 48 little quilts bound and sewn together.
Here's what I did on the back:

Each block is made separately, so I could choose whatever backing I wanted.  I chose to make each vertical row's backing the same.
Now for the real test--I need to wash it!  With all the antique fabric in the top, it will probably need to be washed by hand.
Some of my favorite quotes:
"Liberty and Union, Now and Forever, One and Inseparable!"  Daniel Webster, 1830.
"At the judgement day, I want to be with Wisconsin soldiers."  Gen. John Gibbon.
Now I get to pick a new project!  This day just gets better and better.


Wednesday, February 20, 2013

Evelyn's Quilt

 It seems only fair to write about Evelyn's quilt since I last wrote about her brother Henry's quilt.  I made Evelyn's before she was born, which is about 18 months ago.  It's a pattern I often made for children's charity quilts--easy to cut and easy to sew, plus the block is not that obvious if you have a random color scheme, so it looks more complicated than it is.
The center of each block is a 2.5 in square (finished size 2 inches).  Surrounding each square are four rectangles that are cut 2.5 in. x 4.5 in.
The first seam is a partial seam. I sew about halfway down on the square.  Then I add the rectangles one by one, until I get back to the beginning and finish the partial seam.
Like this:
 I chose these four pieces for the block.
 Here I'm sewing the partial seam--only about half way down.


Here's the next rectangle added to the first unit (the one with the parrot).
Now I've got the yellow piece added.
Here I'm adding the final rectangle, being careful to keep the red rectangle away from the seam.  (The purple triangle is one of my leaders and enders.)
Here's what the block looks like at this stage.  The seam between the red frogs on scooters and the green print is the last to be sewn.
And here's the finished block!
Sometimes, I just want to sew, without having an elaborate plan.  These blocks are easy and fun. I often use them for leaders and enders when making other quilts.

The blocks measure 6.5 in. (6 in. finished).  I make 30 of them for a baby quilt, set 5 across and 6 down.
For Evelyn's quilt, I added a 2.5 in. cut border in a light bird print.  Her room has an owl theme, and there were some cute owls in the print.  I then added a purple border, cut 3.5 in., and bound the quilt in a solid purple.  The backing is the owl print.  It needed about a yard and a half.
If I've done the math right, the quilt measures 40 in. x 46 in.  I don't always add the outer border for charity quilts, since it can make them bigger than the recommended size.  If I only had one border, I wouldn't use a light print.  I like to frame the quilt with a darker color, and then add a darker binding.  Just my own idiosyncrasies.
To make 30 blocks, you need to cut:
30 2.5 in. squares
120 2.5 in. x 4.5 in. rectangles.
This is a pretty easy quilt to make out of scraps.  I organize my scraps mostly following Bonnie Hunter's Scrap Users system (check it out at Quiltville.com if you haven't already).  I have a bin of 2.5 in. strips in bright colors.  I can just pull from that bin to make these blocks.  The hardest part is always having enough variety.  But it seems like the more charity quilts I made, the more scraps there are (magic?  scraps breeding?  I don't know!).  Plus sometimes people give me scraps (thanks, Debbie!)


The last time I was babysitting Evelyn, I took these photos.  She was helping me, but she seemed puzzled about why Grandma took her quilt out of her bed and was crawling around on the floor.  Grandmas are weird, huh.
What are you going to make today?


Thursday, February 14, 2013

Henry's Quilt

This is my Henry.  I have the best grandchildren in the world.  (Sorry, it's just true.)  Henry is posing here on his quilt, which I made in early December.  He's also posing with the "Ugly Doll" his mom made.  (Isn't she clever?  I also have the best children in the world.)
I pieced the blocks for Henry's quilt at a retreat with the Mad City Quilters in Madison.  I needed a simple project, because for some reason I get distracted when sewing with others and tend to make a lot of mistakes.  Henry needed a new quilt for his bigger bed.
He is a very special kid, very smart and interested in all sorts of things.  He loves robots and sea creatures and dinosaurs and bugs and just about any animals.  I picked out all kinds of fabulous novelty prints for the quilt.

Isn't this fun? There are so many wonderful novelty prints in the stores!
 The pattern for the quilt has several names.  It's often called Stretched Stars.  I made it in a larger size than I've ever seen published, just because some of these were large prints and I thought they'd be more fun if you could see more of the print.  I had to experiment with it a little to see what size the white triangles should be.  I didn't want to have any seams to match other than the edges of the blocks.
Here's a full picture of the finished quilt.  The green and blue borders are printed with robots.  (You can see one of the robot decals on Henry's wall.  He's a big fan of robots.)  I bound it with the green robot print, too.
If you'd like to make one of these, here's the recipe:
Cut 80 7.5 in. squares from novelty prints, to make 80 blocks.
Cut 160 white 3.5 in. squares.
Sew the small white squares to the corners of the novelty print squares.  You can draw a line across the white squares and sew on it.  Or, you can do like I do and simply press the squares in half diagonally, crease them with the iron, open them up, and sew on the fold line.  I hate drawing lines.  My way is a little less precise, but it doesn't really matter for this quilt.
Once you have the white squares sewn across the diagonal onto the novelty print squares, you trim away the extra, by putting the ruler on the seam line and rotary cutting a quarter of an inch away.  You'll be left with 2 triangles, one white and one novelty print, already right sides together. 
[You could set these aside for another project.  I used them as leaders and enders, sewing the white and novelty print triangles together.  Then I pressed them, and trimmed them to 2.5 in. square.  Later, I made them into the Pinwheel quilt for charity already mentioned on this blog.  See below.]
I set the blocks 8 across and 10 down, side by side.  The first border is cut 3.5 in., and the second border is cut 5.5 in.  When finished, the quilt should measure 72 in. x 96 in.
I quilted it on my Davis Vertical Feed treadle.  I just quilted diagonal lines across the squares and into the borders.
This is a nice easy quilt to make for charity.  If making a smaller quilt, I would make the blocks smaller, say 5.5 in. for the novelty prints and 2.5 in. for the white squares.
Happy Quilting!

(This is the Pinwheel quilt I made with the leftover triangles, some dinosaur print, and some leftover robot blue print.)


Friday, February 8, 2013

Potholder Quilt Progress

 Progress has been slow on the potholder quilt this week, due to me having a mild case of the flu.  I felt like I just had a cold last Sunday, and was able to finish making, quilting, and binding all the blocks.  It got worse all week til yesterday, when I started finally feeling better.  I'm still taking it easy today.
I'm at the point of hand sewing the rows together.  I have six of the eight rows sewn together as of this morning.  Once I finish the other two rows I'll start sewing the rows to each other.  When that's done, that's it!  The sewing will be done!
If you're wondering about that weird roll of brown thread, I'm using up some thread that had a serious problem--the spool broke apart, I have no idea why.  I've been saving it for hand sewing.
Here are the finished rows, laid out on the floor.  It's not going to be a very big quilt.  There are no borders, of course, and the blocks are about 9" finished.


You can see I still have the row markers pinned to the first block in each row.  You can also see that I have used two fabrics for binding.  I ran out of the first one, and just used another from my stash.  This is what the ladies would have done during the Civil War (and even during the Depression).  "Use what you have" wasn't just a good idea, it was a way of life.
The last detail of this quilt will be the inscriptions I will write in the center of each block.  I'm doing research now, and thinking about what I want.  Here's my idea for the first block:
This quilt is dedicated to the memory of the loyal hearts that saved the Union.
Overall, I'm happy with this quilt, although I've learned that I never want to go into the potholder making business.  The chain stitching worked well, no problems, and of course the Davis VF made the quilting and all that binding lay flat.  There's quite a lot of hand sewing, which I don't mind at all, especially as I recover from being sick.
I think I'll actually enter this quilt in the Sun Prairie show, instead of the Debbie's Challenge.  Debbie isn't finished yet, and we have this idea of them hanging side by side. (Hi Debbie!)
What are you working on?

Friday, February 1, 2013

Civil War Style Potholder Quilt


 Today I'm sharing details of my latest project (#6 on the list), a Civil War Style Potholder Quilt.  I was inspired to make this quilt by an exhibit at the New England Quilt Museum in Lowell, Massachusetts, a couple of years ago.  The quilts in the exhibit were made in a unique way--each block was quilted and bound, and then joined with the other blocks.  Kind of like making a bunch of potholders, and putting them together.  Many of the quilts on display were made for Union soldiers during the Civil War, by ladies' groups.  I have always loved history, especially the Civil War, and combining that with quilt history was a dream come true.  My poor husband was very patient while I poured over the exhibit, and even while I shopped in the gift shop.  (He just took a book with him, and sat on a bench to read.  Am I lucky or what?)
Below is the recent book that chronicles the known Union Civil War soldiers' quilts.  If you are interested in quilt history, you will have heard of the authors Pam Weeks and Don Beld.  Don also heads a group that makes quilts to honor fallen soldiers in our current wars.
I knew when I saw the exhibit that I wanted to try this potholder technique.  Getting the book at Quilt Expo in September really reinforced that.  Plus I bought two bags of old fabric at the New England Quilt Museum that day.  They were in the consignment section.  Some were pieces from old clothes or quilts, others were just scrap bag remnants.  I separated them into late 19th-early 20th century and 1930s-1950s.  I knew I wanted to use the oldest fabrics to make a potholder quilt.
My friend Debbie and I had a two-person retreat last weekend, while her husband was at a conference.  We had a lovely time, sewing and visiting.  Before I went, I had to decide what project to bring.   The potholder idea popped up in my head again.
 Most of my projects were at the quilting stage, and I didn't want to drag my quilting treadle to Madison.  It probably wouldn't fit in the Mustang anyway.  I knew I wanted to take a hand crank sewing machine, just because I hadn't done that for a while.  My first thought was my Singer model 12, which would be appropriate for the time period of the fabrics and the design.  The only problem with the model 12 (and with most hand cranks) is winding the bobbin.  I enjoy sewing with the hand cranks, but winding bobbins is a pain.  And if we were going to be sewing all weekend, I would need a lot of bobbins.  I have a model 12 treadle, and I don't mind winding the bobbins on it, but I haven't used it for a while and it isn't running very smoothly yet.
My next thought--what about a hand crank that doesn't need a bobbin?  What about my little Willcox and Gibbs?
I bought her several years ago on Ebay.  The hand crank actually came from a guy in England.  I got her up and running right away, but I had never made a project with her.  Plus this was a chain stitch machine.  Can you even make quilt blocks with a chain stitch machine?  Would the seams pull out?
I thought about it for a while.  Willcox and Gibbs sold sewing machines for over 100 years in this basic design.  Most people made clothes with them.  If the clothes didn't come apart, why would the quilt blocks?  The seams would actually be protected inside the quilt, rather than rubbing against other clothes or skin.
In the end, I decided to live dangerously.  Not only did I use the Willcox and Gibbs, I cut the pieces for the blocks from the old fabric I bought at the museum, plus other old fabrics in my collection.  And I used some of my collection of old thread to sew with--the little wooden spools fit very well on the machine.  I combined lots of old stuff that I love--sewing machine, fabric, thread, and quilt style.
I can't believe how well it all worked.  The machine was easy to carry, and it was wonderful not having to worry about running out of bobbin.  I bonded with the machine as I made the blocks.  I even learned how to thread it without running for my copy of Charles Law.  It was so quiet, we had no trouble talking over it or hearing Downton Abbey on the DVD player.  I was almost sorry when I finished making the blocks.
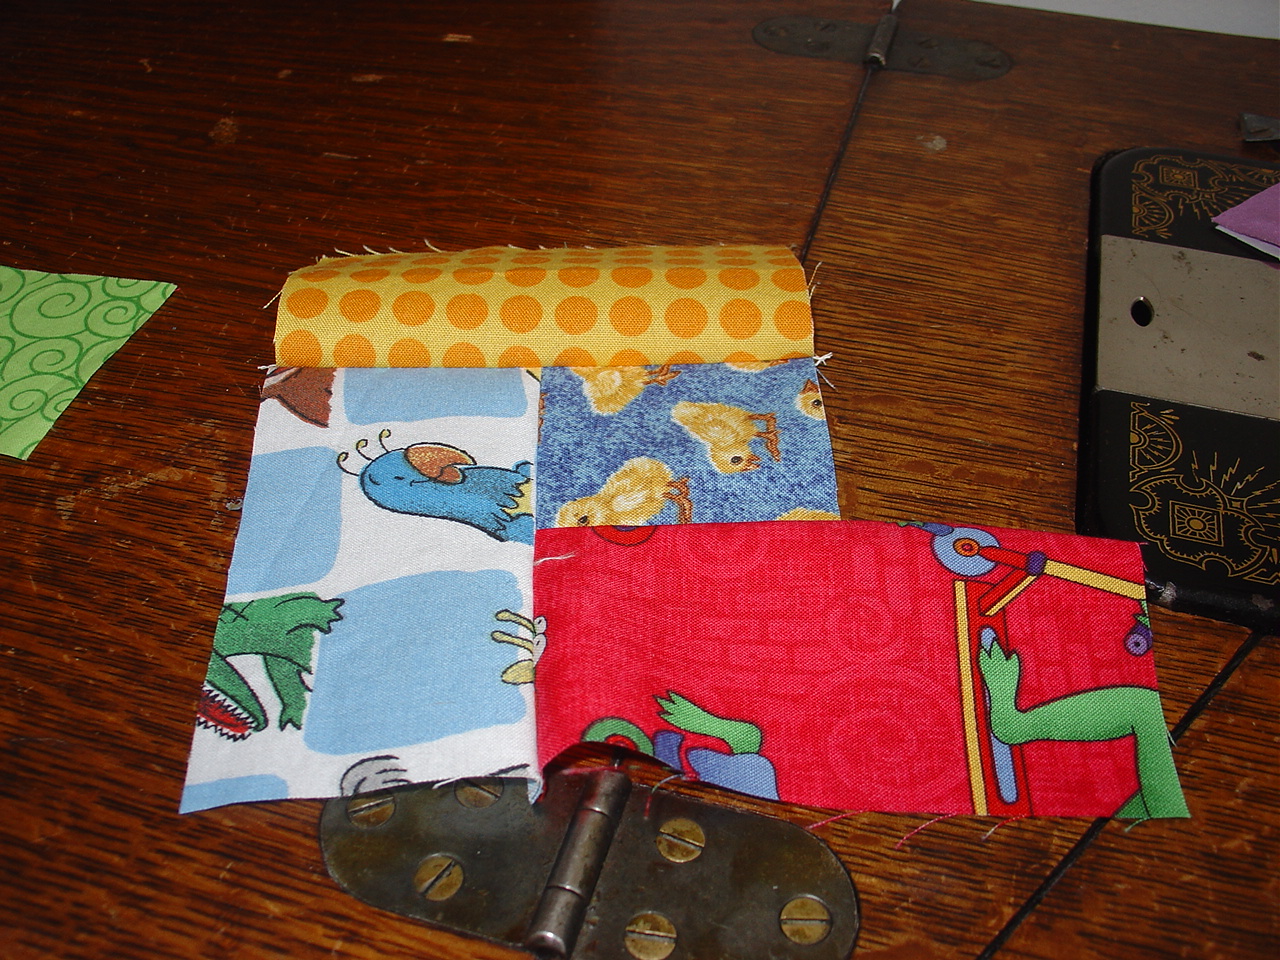
Here's what I've got done so far:


The stack on the left is layered with a backing square and cotton batting (I'm using up the batting scraps!), ready to be quilted.  The center stack is quilted, and just needs to be bound.  I'm binding each side separately.  According to the book, the blocks will be more square this way than if I bound all of it at once.  We'll see how it turns out.  The last stack is the finished blocks. It really does look like a stack of potholders.
I'm quilting and binding the blocks on the Davis Vertical Feed treadle, which works like a built-in walking foot.  So far I have 12 blocks completely finished, out of an eventual 48.
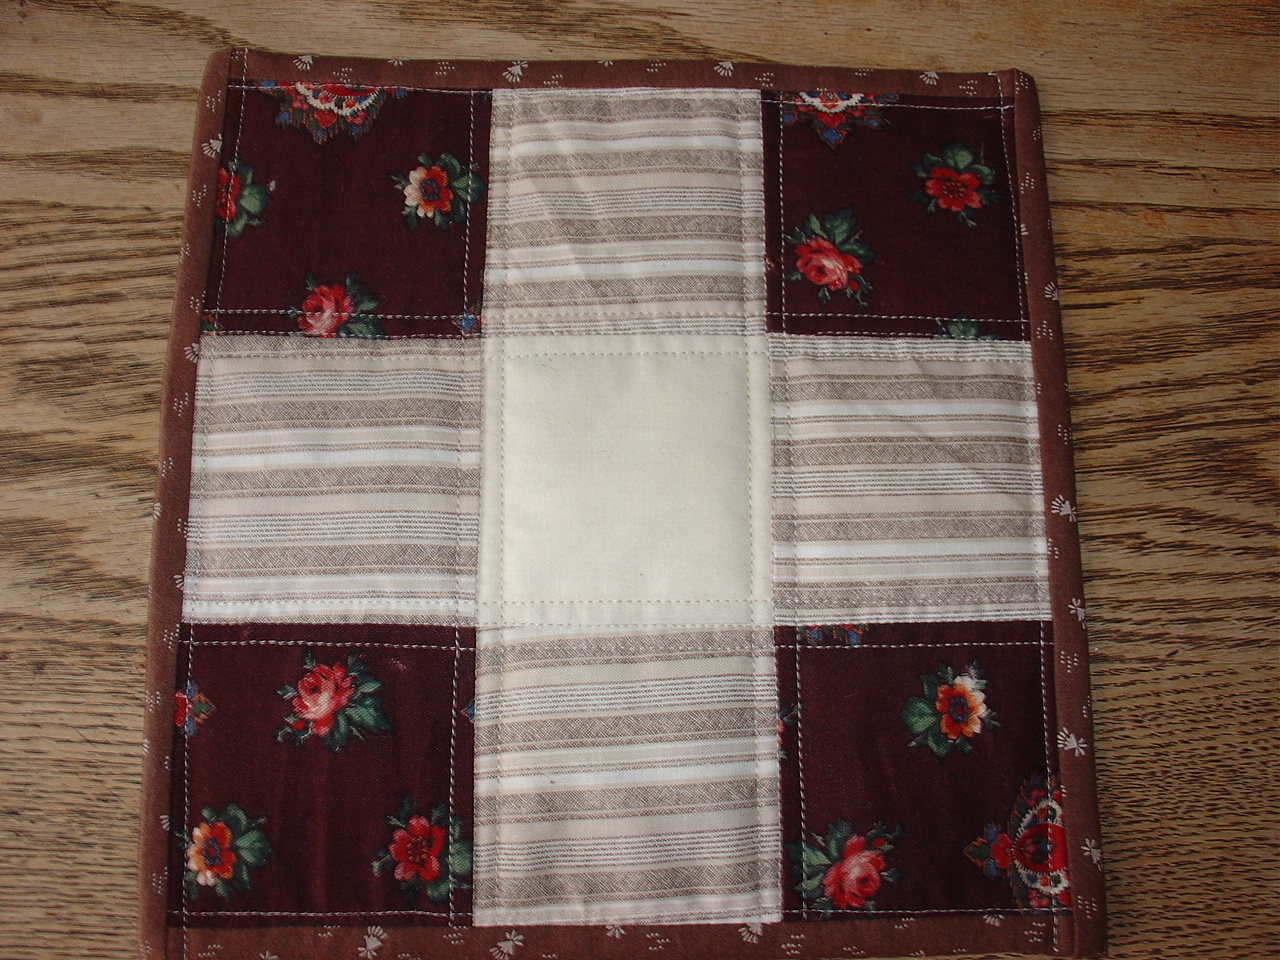
Here are the 12, side by side.  When I have them all done, I'll slip stitch them together by hand.  Then I'll figure out what sort of inscription to put in the plain center squares of each block.
The slowest part is binding each square.
I started out by sewing the binding strips to the back and folding them to the front to stitch them down, like I do with charity quilts.  There was no way I was doing all this binding by hand.  I tried doing it the opposite way (front first, then back), and actually liked it better:
You can see the stitching, but it looks like the quilting.
This is definitely an unusual project, but I am having lots of fun with it.
Happy Sewing!
P.S.  Click on the number of comments to leave your own comment.