Tuesday, March 31, 2015

Half Log Cabin Quilt Block Tutorial

So much strippy fun this week!  I'm making half log cabin quilt blocks, from 1.5 in. strips.  I started these as leaders and enders, but they have a way of breaking out and becoming the main project.
In the last blog post, I showed a picture of the overflowing drawer these strips usually live in.  Since then, I have divided them into dark and light strips, and put them in baskets.  The strips on the desk are shorter ones, to use first.
Think I'll have enough strips?  When I took this picture, I had already made 75 blocks.
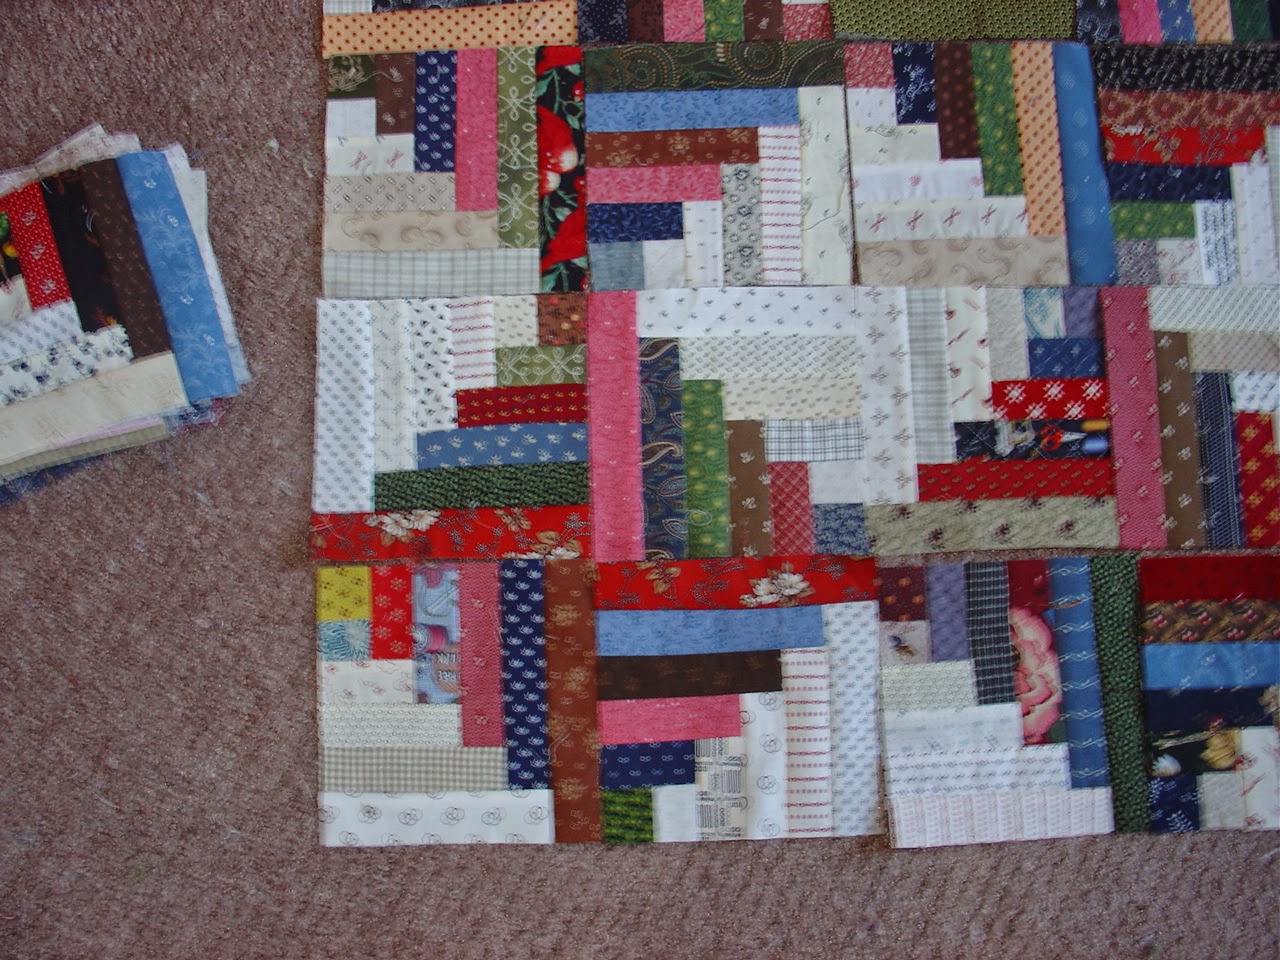
This is what the blocks look like.  There are 5 light strips and 6 dark strips.  The blocks measure 6.5 in. if you sew them perfectly.  Mine are not all perfect, so I'm trimming them all to 6.25 in. to match the smallest ones.
Here's the layout I decided on--Sunshine and Shadows.  There is not much seam matching in this layout, and I've always wanted to make one like this.
This is a closeup.  I will probably move these around a lot before I finally settle on which block goes where.  Just looking at this photo makes me want to switch some of them.   Right now I see a lot of pink in the blocks, which kind of surprised me.
I consulted a couple of books before deciding how to sew these.  My method is a lot like how I sew string blocks, and is a fun way to work if you like scraps.
Okay, here we go.
Half Log Cabin Block Tutorial
Step 1:  Sew two 1.5 in squares together.  One square is light, and the other is dark.  Easy peasy.
You can sew strip sets if you want to have several blocks with the same centers.  I didn't, so I cut squares.  Press toward the darker square.  Press after each addition.

Step 2:  Add a dark strip to the side of this unit.  Put the pieced unit face down on the dark strip, with the light square at the top, and sew.  Press toward the new strip.

Trim the strip even with the pieced unit.  I use (gasp) scissors and eyeball it.  You could use a rotary cutter if you like.  You will be doing this with each strip added from now on.

Step 3.  Now add a light strip to the pieced section.  Lay it out like this, put the pieced section down on top of the strip, and stitch.  Press and trim.

You will be repeating these steps over and over.  Be careful, and keep the seam ripper handy--it is very easy to get mixed up.
Step 4:  Add another dark strip.
Here's how the block should look each time you add a dark strip.  Notice where the first dark square is. (It's the one with the dots.)

Step 5:  Adding a light strip.  Notice where the beginning square is here?  The blocks should always be in this position when adding a light strip.


Naturally, I'm chain sewing the blocks, but I like to have ten or so of them going at a time, at different stages.  I don't want any of my blocks to be exactly the same, so I don't add them to the same strips of light and dark.   I take the blocks to the iron after each round, and I add in new ones to replace ones I've finished.


When I trim a strip, if there is only enough left for a 1.5 in. square, I put those pieces in this little basket on the treadle cabinet.  Then I can pull pieces from here to cut for the center squares.  (If the trimmed piece is smaller than a 1.5 in. square, I actually throw it away!)

Here's our block, all finished.  I have pressed it, and trimmed it to size.
And here's the back, with the seams all pressed toward each new strip as added.
You could just keep going, if you wanted larger blocks.  I kind of like these little ones.  I think I'll need at least 120 of them for a twin sized quilt.

In other news, UFO#4 is pin basted and ready to quilt.  If I could just stop sewing these half log cabin blocks...

Spring is trying to break through today, and the dog and I need a walk.
Have a wonderful week!




Tuesday, March 24, 2015

Why Do I Have So Many UFOs?


 This is UFO #4.  Not a space ship, an Un-Finished Object.  Sadly, the number does not mean I only have 4 UFOs (insert maniacal laughter here).  It's just the number on the list for our quilt group's UFO challenge.

Just about every year or two, Colleen finds a UFO challenge for us, to help reduce the giant pile of neglected projects gathering dust in our homes.  (I'm just speaking from my personal experience here.  Not everybody has a giant pile.  Probably.)
This year's challenge is pretty simple.  Make a list of a maximum of 8 UFOs.  Number them.  Then come to the quilt group meeting, where Colleen will pick a number from a hat.  Work on the project with that number.
There are of course a few rules.  The project has to have been already started to get on the list.  And the project must be completely finished to count towards the prize at the end.  (Of course there's a prize!)  For each completed project, the quilt maker gets one chance toward the prize drawing.  More completed projects, more chances to win.
This started at the March meeting last week, where the #4 was drawn.  My #4 was a group of blocks that I called Four Patch Cross.  I started this project in an antique mall.  In my defense, it was already a UFO when I found it.
Here is a close up of one of the blocks.  The four patches in the corners were in a bag at the antique mall, along with cut squares.  They were mostly sewn by hand with black thread.  I added reproduction fabrics for the cross and the square in the center.  When I ran out of four patches I made more from the squares in the bag.
Sometimes I had enough for all 4 of the four patches, and sometimes I didn't.  I just did the best I could with what I had, like the previous quilt maker had done.
I am setting the blocks with a wide sashing made of shirting print, and red cornerstones.  It's sort of clunky, but I like it.
Check out my row labels--post its, pinned on.  I use these for several quilts, until they wear out.

So as I'm sewing the sashing strips for ufo#4, I realize I don't have a current leaders and enders project. 
For more on Leaders and Enders, check out books by Bonnie Hunter.  Here's a link to the latest one:
  More Adventures with Leaders and Enders

So what would be a good Leaders and Enders project?  Let's look in the scrap drawers in the closet.
Maybe I shouldn't have opened this drawer.  I am not sure I can get it shut again.  These are my 1.5 in. wide strips.  I haven't done anything with them in a long time, but  I've kind of been thinking about a log cabin quilt.
This book was in my quilt book collection; The Ultimate Half Log Cabin Book, by Sharyn Craig.  Hmm.
It wouldn't hurt to try out a block, would it?
This was fun!  I can use up lots of short strips and pieces!  I have great fabrics!
There are all sorts of interesting ways to set these blocks together.  This one is straight furrows.
Here's sunshine and shadow.

Or what about this one?

Wait a second ... What just happened?
I have 10 of these little blocks made, and I still haven't finished the sashing for UFO #4!

I am really having a good time, though.

Have a good time this week.


Monday, March 9, 2015

Binding Quilts Completely By Machine: A Tutorial

When I make quilts for my home or for special occasions, I like to finish the binding by hand.  But when I made quilts for children or for charities or that I expect to get hard use, I bind the quilts totally by machine.
Here's how I do it:
I trim up the edges of the quilt, cutting off extra backing and batting.  (Just like always.)
I turn the quilt over to the BACK.  On this quilt, the little doggies are on the back of the green I Spy quilt.
I cut the binding strips 2 in. wide by the width of the fabric.  For this quilt, I needed 5 strips.
I sew the strips into one long strip, using diagonal seams, like this.

So far, this is an ordinary way to get ready to bind a quilt.  Stay with me here, it's about to get different.

There are two unusual things going on here.  First, I'm sewing the binding to the BACK of the quilt first.  Second, (and this can be hard to wrap your head around), I'm NOT doubling the binding.  I'm NOT folding the binding at all.  I'm just sewing one raw edge of the binding to the edge of the quilt.
You can also see a corner here.  I'm sewing them the standard way--stitch to within 1/4 in. of the edge, back stitch, take the quilt out of the machine, reposition the quilt and binding, and start sewing again 1/4 in. from the corner.

Do you know this trick for joining the binding?  When I get back near where I started, I stop sewing at least 12 in. from the beginning.  I take one end of the binding, and cut it off straight, in about the middle of the unsewn section, as above.
Then I take the other end of the binding and overlap it.  I cut the second end to overlap the first by the cut width of the binding.  In this example, I cut the second end of the binding 2 in. from the overlap, because the binding is cut 2 in. wide.
Here's what that looks like.  Now I put these strips right sides together, and sew on the diagonal.  When finished, it will fit the quilt perfectly.
It looks like this, before it's trimmed.  Then I finish the seam, and the binding is sewn to the back of the quilt.
Now I go to the ironing board, and lay the quilt on it right side up. (The colors in the background are my ironing board cover.)  Remember, our binding is just a single piece of fabric.  I bring the binding to the front, folding it once against the edge of the quilt, and once more to cover the raw edges.  I press as I do each of these folds, usually one side of the quilt at a time.
When I've got it good and pressed, I pin it every six inches or so.
I fiddle with the corners until I have a folded miter.  (I tried to take a picture of this, but it didn't turn out.)  I make sure to press it well, and secure it with pins.
Now all that's left to do is topstitch the binding.  I use my presser foot as a guide, and sew along the edge.
When I get to the corners, I just pivot and keep sewing.  All the corners are mitered, on the front and on the back.
Doing the binding this way helps me finish more quilts.  Plus it's nice and sturdy.
These are the corners of the kitty cat quilt.

And these corners are on the charity quilt I finished early last week.
So, 3 done last week, one for our guild's charity stack and two for Quilts for Kids.

The snow is starting to melt here, but I'm not sure I believe in spring yet.  I'm going to enjoy it anyway.
Enjoy your week!


Monday, March 2, 2015

Getting Carried Away

I love piecing quilt blocks.  I never cut out a whole quilt at once.  I like to cut three or four blocks, piece them together, press them, and cut some more.  Since I'm almost always making scrap quilts, I love to see how the fabrics work together.  I love the little jolt of happy I get when I press it and it's even better than I hoped.
As you can see, I've been getting carried away.  This is my closet, filled with tops needing to be quilted.  And this is only the recent stuff.  The rest of the tops are in the basement, in bins.  I have run out of hangers big enough for the tops.
There are several sensible things I could do to solve this problem.  I could get some more hangers.  There are probably some in my husband's side of our closet.  (After all, he's retired, what does he need with neat unwrinkled clothes?)  Or I could send some of these quilts, especially the large ones, out to be quilted by a longarmer.  Or I could buckle down and get some quilting done.
Buckling down is the mature answer.  Plus it's cheap.  I already have everything I need to quilt at least a few of these.
This one will be pretty easy to quilt.  It's a small quilt, made from a pattern on the Quilts for Kids web site.
It's called I Spy.  Here's a link to their pattern page, which currently has 4 quilts.  If you click on the I Spy quilt, a pdf will come up that you can print.  As you probably know, Quilts for Kids is a charity that gives quilts to kids in hospitals.
Quilts for Kids Patterns
The pattern calls for 1.5 in. cut strips (the ones that look like sashing), which are usually either black or white.  I don't like black for kids' quilts very much, so I chose a green polka dot.  You also need 6 strips 3.5 in. cut of 6 different novelty prints.  I used some that more or less went with the green.  You can use one-way prints in this pattern, like the frogs or the Eric Carle children.  It really helps to lay this one out on the floor to separate the prints.  The directions call for strip piecing, but it would be fun to make this with lots of rectangles of different novelty fabrics.  They would be cut 3.5 in. x 5.5 in.  The blocks finish at 5 in., and there are 42 of them (7 rows of 6). 
As with all the Quilts for Kids patterns, the directions are very clear.  If you follow the directions, you won't need to piece either the borders or the backing.
I got carried away again!  When I pulled the fabrics for the green quilt, I also pulled some for a yellow/pink one.  This time I used 3 one way prints--purses, cupcakes, and giraffes.
I still have to add the borders.  Oh, AND QUILT IT.
Honestly, I like quilting.  Really.  Piecing just seems to lure me away.
I got this one pinned up last night, and will work on it this afternoon.  It was made by Joan D., a fellow quilt guild member, and it even has her signature piano keys border.  It's for charity.

When I quilt these smaller quilts, I like to use a package of Queen Sized Warm and Natural batting.  It will usually make 4 quilts.  It's nice and flat, easy to quilt, and I can quilt a little further apart than with 100% cotton.  When it's on sale (which is a lot of the time) I usually buy a couple packages.  I ran out of the Soft Touch batting, and I don't know if I can get any more. 
More novelty prints!  I made this top a couple of weeks ago.  Just because.  That's why I made it, and that's actually the name of it.
The pattern came from this magazine. It's made from squares and rectangles (no triangles).  There are lots of other good patterns in here, too.
I had to show this detail today.  Happy Dr. Seuss' birthday!  The wacky world of Dr. Seuss has done a lot to make kids (and adults!) love books and reading.
I get a little carried away when it comes to things I love, like books and quilts.  So every once in while I have to calm things down a little--take some books to the library for the book sale.  Or finish a few quilts.  Putting in the last stitches is very rewarding.
And then I'll be ready to get carried away again.
Have a wonderful quilty week, whatever you do.