Friday, October 30, 2015

Signed, Sealed, and (Soon to Be) Delivered

The Star Blossoms quilt is done!  It's pieced, quilted, bound, and ready for its new home.
My version is bigger than the pattern in the book.  The original had 12 blocks.  I made 20.  The quilting was done quilt-as-you-go style.
Orange is my oldest grandson's favorite color.  It's becoming one of my favorite colors, too.  I used lots of orange prints in the blocks, and the binding is a mottled orange.


This is an easy pattern, and I would recommend it, even though I changed a few things, like the size, plus I used my Easy Angle ruler to make the half square triangles.  The blocks finish at 18 in. square, and they use up lots of scraps.  What looks like sashing here is actually part of the block.  There are 14 rectangles surrounding the center section.  It's a great pattern for using up a wide variety of scraps.
Here's the book the pattern came from:  Scrap-Basket Beauties, by Kim Brackett.


This quilt will be mailed to my sister in Florida.  She has had some health concerns in the last several years.  I hope the quilt will be a cheerful reminder that we care about her.

Here's why I didn't post last week:
I went on a quilt history retreat!  It was absolutely wonderful.  Our special guest/teacher was Sue Reich, author of many great books on quilt history.
The ladies above are examining a new find by one of our members.  From left to right, they are Maribeth, Bonnie, Laurie, Carol, Pat, and Nancy.
Sue Reich shared her quilts with us, not only in slides but "in person".
Here's an amazing quilt from the early 20th century.  It's hard to tell from the photo, but this quilt was quilted by machine, most probably a treadle.
Here's another different way to make a signature quilt;  an embroidered wreath of leaves.
This is Sue's book on signature quilts.  The title is Quiltings, Frolicks & Bees:  100 Years of Signature Quilts.  Many of the quilts in the books are in Sue's personal collection, and she has researched several of them to find where the quilts were made and what the lives of the individual signers were.  It's an absolutely wonderful book, full of glorious color photos.

Through my volunteer work with quilt documentation, I know the importance of signing and dating my quilts.  But I can't say I always follow through! Being at this retreat reminded me to label my quilts.
So here's the label for my sister's quilt.  It's a commercial label I've had for years, with details added with a Pigma pen.  I'll sew it on (by hand), and then get the quilt ready to mail.

We also learned about World War I and World War II quilts at the retreat.  I'll write more about that in the coming weeks.

I'm linking up with Crazy Mom this week at Finish It Up Friday.

I wish good and happy sewing for you this week!


Friday, October 16, 2015

Sew Everyday

I'm making good progress this week on Evie's quilt.  Evie is my adorable four year old granddaughter.  Her favorite color is pink, and she needs a warm flannel quilt for her big bed.
When last seen on this blog, her quilt looked like this.  All the pieces were cut, and it was stored in a basket, waiting for its turn to be pieced together.
As you can see from the first photo, it's a Bricks quilt.  In order to work out how many pieces I needed from each fabric, I had to make myself a chart.  I had to be careful working this out, because some of the fabrics were just scraps.
Once I had it graphed out, I made this color chart.  The fabrics are labeled A through N.  I cut a small scrap from the leftovers of each fabric and taped them to the page.  (Not an original idea, of course;  Eleanor Burns had this is in all her books.)
As you can see, I alternated light and dark fabrics.  I had to repeat one of the lights.  Fabrics F and N are actually the same.
Once I had the charts done, I laid the piles of rectangles out on an old card table so I could keep things straight.  Then it was just pick up and sew.  This quilt is done in rows, instead of blocks.  I made 18 rows.  Odd numbered rows have 14 rectangles each.  Even numbered rows start and end with a smaller rectangle.  If I had planned it out differently, the smaller rectangles would actually be squares.
I cut my pieces 4.5 in. wide and 6.5 in. long.  Before borders, the quilt will be 72 in. wide by 84 in. long.  There is nearly an equal amount of fabric used for each print.
All of the rows are pieced, and I only have 4 more to sew onto the top.  Then it's time for borders (probably only one).
You are not going to believe me, but I only had to buy ONE of these fabrics in the store.  The rest were in my stash.  Which just says how ridiculously huge my stash is.

So that's the main event in the sewing room this week.  In other news, I'm binding the Star Blossoms quilt.  I'll be sending it to its new home by the end of November.

One of my favorite modern quilting blogs is Crazy Mom Quilts Crazy Mom Quilts Blog.  She has a regular feature she calls Finish It Up Friday.  I don't have any quilts finished today, but here are some things I actually got done this week.
I knitted a hat for the Mittens and More project of Milwaukee Public Television.  I still have to knit the mittens to go with it.  I knit for this project every year, and I feel it is really worthwhile.  I can't stand the idea of kids enduring the Wisconsin winter without mittens or hats.  The deadline is fast approaching:  Oct 23rd is the last day this year.  For more information, click here:  Milwaukee Public Television Mittens and More 2015

Yesterday, I canned six pints of beets.  My husband won't eat them, but I'm fond of them, and six jars will be about all I need this winter.
I had to dig out the pressure canner instructions, since I mostly use the water bath canner for fruits and jams.
Here's what  I should be working on right now!  It's a half bushel of Cortland apples, destined to be pies and crisps this winter.

In spite of all the fall things to do this time of year, like canning and baking and going out to Holy Hill to look at the leaves, I am trying to make time to sew every day.  It really shows in how much I can get done, and how happy and productive I feel.

What are you working on this week?  I hope you have time to sew every day.


Tuesday, October 6, 2015

Focus!

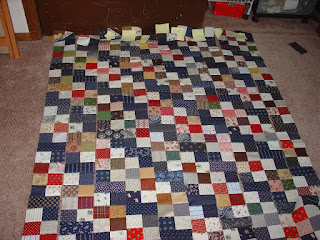
This was my sewing room last Friday.  At first glance, I counted 4 projects in progress scattered around the room.  Two of them were laid out on the floor.
Walking through the room, pieces stuck to my socks.  There wasn't even room for my chair.  Anything resembling progress had ground to a halt.
How did this happen?
The room started out clean after I finished the wedding quilt.  With all the craziness of the wedding and a quick trip to New York City with my husband and grandson, I just didn't do any quilting.  Then all the company went home, and I went a little crazy.  I cut out quilts, tried out blocks, and took a class.  It was all good fun. 

I know this dates me, but I can remember watching movies at school on a projector like this one above.  If the opening shots were blurry, we all shouted "Focus!" until some hapless teacher adjusted the knob. 
I was thinking about that this week.  If I'm going to get any quilts finished, I need to adjust myself, and focus.

First things first.  Which projects are closest to being done?
 I had 35 of these flannel blocks sewn before I realized I didn't want to use them in my granddaughter's new winter quilt.  They would make a nice sized baby quilt for charity.
 Here's how I laid them out (after clearing the floor of the other quilt parts).
And here's the finished quilt!  I call this one Flannel Boxes.  The blocks are 6 in. finished, and are mostly made from scraps of flannels I've picked up at flea markets over the years.  The backing is flannel, and the batting is needlepunched cotton.  I did mostly ditch quilting, which should hold it together very well.
Some of the prints are kind of weird.  Check out the purple cats!

So, one done!  What's next?
This one is called Star Blossom.  There are 5 rows of 4 blocks each, and I'm quilting them one at a time, quilt as you go style.  Fifteen of these blocks are done, which only leaves 5.  I also need to join the rows.
Star Blossoms comes from this book, Scrap Basket Beauties, by Kim Brackett.  I love this book!  This is the second quilt I've made from it.

Here's what the block looks like.  It's a great scrap buster.  You need 18 different rectangles for each block.
It was easy to quilt these blocks on my lovely Pfaff.
The rows are quilted!  Now I'm just joining them on the machine, and sewing the backs down by hand.  When that's done, I'll bind it, and Bob's your uncle.
I thought there were only 2 more projects in the mix, but I found a third one!  This is kind of ridiculous.
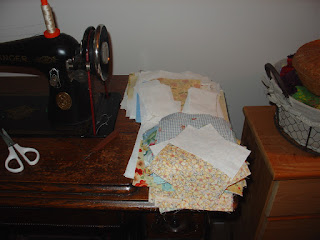
This one is at least nice and neat.  It's all the pieces, cut out and ready to sew, for my granddaughter's quilt.  I think she'll like this one.  For now, I'll set it aside until I can get the rest of this stuff under control.


This is my project from the class I took.  It's called Upstairs Downstairs, and it was taught by my friend and neighbor Nancy P.  The rows are all sewn and labeled, so they can come up off the floor and go in a basket.   I'll be able to work on sewing them together as time permits.
These pieces are for a Falling Charms quilt, made from white strips and 5 in. squares cut from scraps.  It will be a charity quilt when it's done.  I'll use it as my leaders and enders project while piecing the Upstairs Downstairs top together.  When choosing projects for leaders and enders, I try to use something simple, especially when I'm putting a top together.  It's just not a good idea for me to try to do two complicated things at once.
Here are the pieces for the Falling Charms quilt, ready for action.
By the way, here's a link to a tutorial on Falling Charms, from the Missouri Star Quilt Company:
Falling Charms Tutorial

I've also got some 5 in. strips plus other pieces of the scrap fabric ready to cut as needed.

It's taken a couple of days, but order has been restored.
 My objective is always to leave the sewing room ready for action, with a plan in mind for the next time I can be there.  This way, I can make the best use of my time.
So what are you sewing this week?
Keep calm, and keep quilting!