Monday, December 30, 2013

Celtic Solstice Mystery Quilt Part 5

[I'm doing Bonnie Hunter's Celtic Solstice Mystery.  If you'd like to join us, here's the link:
Celtic Solstice Mystery Quilt ]

Part 5 is done!  It's nice to have the blue fabric to work with again, and to use up those little half square triangles.  I was able to get all the blue pieces from my 3.5 in. strip drawer.
I don't usually keep 2 in. strips as part of my scrap users system (based of course on Bonnie's system), because I don't tend to use them in quilts.  I like easy math, the easier the better, so I keep strips whose finished sizes are whole numbers (1.5 in., 2.5 in., 3.5 in., 4.5 in., etc.).  A friend gave me a few 2 in. strips, and now I'm cutting some for this quilt, so I'll have some left over.  It'll be a chance to expand my thinking.  Or I could use them in string quilts.
These units were easy and fun to make.  I've often thought I'd like to make a whole quilt of them.

So, five parts done!  Wonder how many more parts there are?  Will we be making blocks soon?  I love seeing everyone's guesses and the way they have arranged the blocks.

I have them here with a stack of wool I just washed, ready to make another wool quilt.  It's really cold here, and I have lots of warm wonderful wool.

Stay warm, and stay in stitches!

To go back to the link up page, click here:  Mystery Monday Link Up Part 5


Monday, December 23, 2013

Celtic Solstice Mystery Quilt Part 4

Part 4 is four patches!  This has been one of my favorite clues, mainly because I have a real thing for this simple block unit.  I arranged all 120 of them with my Davis Vertical Feed (nicknamed Angela--anybody else remember the '70s?).  Angela and I do the machine quilting, after I've done the piecing on other machines.  That is, when she's not acting up.  I think she just needs a vacation, I've been working her hard for years.

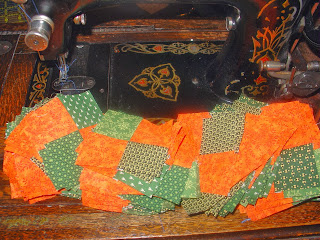
I don't know if you can tell from the photo, but I ran out of orange!  I only had one piece left, and this clue finished it.  I used 5 different greens for the blocks, but all the same orange.  Not very scrappy.  If we have more orange in the next clue, I'll have to break down and buy some.

Now my basket is completely full: half square triangles, pinwheels, chevrons, triangles in a square.  Good thing I'm only making the smaller size.

While I wait for the next clue (and get ready for our family gatherings), Lorena and I started a string quilt.  Lorena is my nickname for the machine pictured below, a Singer model 12 made in 1876.


I'm using muslin foundations cut in squares. I could use paper foundations, but I don't like tearing the paper off, plus this is poor quality muslin that I need to get rid of.  It's been well washed so it won't shrink, and cut bigger than I need.  I'll trim it down as I finish each block.

The strips are having an avalanche out of the hat box they're supposed to be kept in.  It's fun to use up these pieces.  I'm even using some of the strings cut from making this mystery quilt--see the yellow and the orange in the block on the left?
Happy Holidays to All!
To  return to the link up, click here:  Part 4 Link Up
To go to the Celtic Solstice Mystery site, click here:  Celtic Solstice Mystery Quilt


Monday, December 16, 2013

Celtic Solstice Mystery Part 3

It's time for Part 3 of Bonnie Hunter's Mystery Quilt, the Celtic Solstice Mystery.  Here's the link if you'd like to get all the parts:
Celtic Solstice Mystery
Here we go again!  This time, orange and yellow triangles to make pinwheels and triangle squares.
Mine are posing with my Singer Model 12 dated 1876.  She still works, but I sewed these on the Domestic/White.  I've been neglecting the model 12 for a couple of years, and I'm still getting her back to sewing smoothly.  Oil and practice, that's what works.


 This was one of the easier steps.  The hardest part was counting all those little squares!  I finally started putting pins in each group of 10 (duh!).  The tray was a handy place to put them while in progress.

Here are all 3 steps, posing with the Model 12 (her name is Lorena, by the way).  The hat box behind them holds my string scraps.  When you can't get the lid on anymore, it might be time to make a string quilt.

Wonder what we'll be doing next?  I might have to get a bigger basket!

Piece and love to all.

Now, back to see all the great link ups!
Part 3 Monday Link Up


Friday, December 13, 2013

Real Civil War Women


Over the last 150 years, there have been at least 60,000 books written about the American Civil War.  Some of them are very good, some are terrible, most are somewhere in between.  This is one of the good ones.
Its title is Wisconsin Women in the War between the States, and it was first published in 1911.  A facsimile edition was issued this year by the Wisconsin Historical Society Press.  The author was Ethel Alice Hurn, a female graduate student at the University of Wisconsin (Madison) at the time.  It is well organized, well written, and relies for the most part on primary sources, including interviews with surviving women who participated in the war effort.
Southern women tend to get all the glory, and it's really no wonder.  Their states and even their homes were invaded and their lives were changed dramatically.  Even during the war itself, Northern women were often criticized in the press for not being as patriotic as their sisters in the South.  Their efforts have been consistently under reported and underrated. 
Ms. Hurn sets the record straight, at least for Wisconsin women, who contributed by sending supplies, caring for wounded soldiers in hospitals North and South, raising funds to help soldiers' families, and even setting up the Milwaukee Soldiers Home after the war.
The lady on the cover is Jane (or Janet) Jennings, from Green County, who served as a nurse.

Naturally, I was most interested in the quilts sent by the ladies for the soldiers.  In October 1861, the women of Berlin sent 32 quilts and blankets to a cavalry regiment stationed at Ripon.  And the Milwaukee Telegraph reported in 1884 on a quilt found in Bentonville, Georgia that had been sent from the women of Green Bay to the army in 1864.  Most of the quilt was worn out, but there were still signatures and verses visible.  Here's one verse:

'Twas made for brave boys, who went from the West;
And swiftly the fair fingers flew,
While each stitch, as it went to its place in the quilt,
Was a smothered "God bless you, boys," too.

(By the way, Wisconsin was considered part of the West in those days.)  All of us who have made quilts for soldiers can relate to this message.  I wish there was a picture!

To my mind, the best stories from history are the true ones, because they show how real people lived.  I checked this book out of the Germantown library.  If you want to read it, just ask at your library, or you can order it from the Wisconsin Historical Society. 

And since I dragged these old quilts out as backgrounds for the book, I thought you might like to see them in their entirety.
 
This old girl is from New Hampshire, and came to me from Ebay.  I love all the wonderful print fabrics.

The edge is pretty cool, too--side triangles of different scraps fill in between the blocks.  There are two alternating pieced blocks in the quilt--nine patch and a square in a square variation.  About that binding--it's a repair, probably done during the 1970s.  The fabric doesn't go AT ALL.  Every now and then I think about replacing it.  (Then I lie down, and the feeling goes away.)

The second quilt combines pink, yellow, red, and green in the pieced blocks.  Who would do that today?  I bought this one in an antique store in Indiana.  The indigo flying geese border is what caught my attention first.  It's hard to tell from this picture, but the triangles are a blue/white print.

The red fabric has deteriorated badly, but the rest of the fabrics have held up pretty well.

The main thing that is holding this quilt together is the wonderful quilting--thousands and thousands of tiny hand stitches.  I just could not leave it there, it had to come home with me.

Judging from the fabrics, both of these quilts were probably made before the Civil War, and may have been in use then in their homes in the North.  Neither was kept aside for best, as you can tell from the wear.  Touching them touches the history of our country, and especially the history of real women.


Tuesday, December 10, 2013

Endless Stairs--Free Pattern

Winter has really come here, now.  I have never understood why the calendar doesn't say "winter" until Dec. 21st, especially in this part of the country.  Harvest has come and gone, Thanksgiving is over, there is snow on the ground and more than a nip in the air, especially in the morning.
When it's winter, I can't help but think about utility quilts, made from clothing scraps to keep families warm.  I have the wool quilt I made last year on our bed again, and am darn glad of it.  We had a few heavy quilts on our beds when I was a child, and if it was really cold, there was a scratchy green wool army blanket to go on top.  And that's with central heating! 
This quilt is a very easy pattern, made from scraps, that would be good for charity projects.  It would also work well for Quilts of Honor, if made in red, white, and blue.
A friend (hi, Debbie!) gave me a whole box of scraps, mostly plaids left over from a quilt she made for her son.  When I was taming down the scraps, I decided to make a simple quilt with them, and Endless Stairs was the result.  It's an old pattern, no. 1110 in the Barbara Brackman encyclopedia.  It's also called London Stairs or Winding Stairway.
Because I wanted it to chain across the quilt, I just made quarter sections of the block, and then laid them out on my "design floor".  Most sections are a plaid paired with a print.  When I ran out of one fabric, I substituted another of the same color.
Sometimes I had enough fabric to go all the way across the quilt.  Sometimes I had to use lots of different fabrics.  I could have used the same light throughout, or for two adjoining rows, to make things stand out more, but I was just using up scraps.


You can see how the sections alternate between vertical and horizontal.  It's just like a rail fence, but with only two "rails".
Here's how to make it:
For each block, cut one 3.5 in. x 6.5 in plaid rectangle and one 3.5 in. x 6.5 in print rectangle.  Sew together on the long edges.  The sections finish 6 in. square.
How easy is that?  My quilt has 120 of these blocks--10 across and 12 down.  It makes a slightly small twin quilt. 
I'm not planning on adding a border.  I want those stairs to just step right off the quilt.
For quilting, I'm thinking of something simple and quick.  And maybe a wool batting.  For wintertime.

Stay warm!

Monday, December 9, 2013

Celtice Solstice Mystery, Part Deux

These cute little chevrons are the second step in Bonnie Hunter's Celtic Solstice Mystery Quilt.
If you'd like to join in, click on the link below:
Celtice Solstice Mystery

I have to admit, making these units was not as much fun as the first step.  This is not a method I use very often, and I'm not particularly good at it.  (Actually, that's wildly exaggerated.  If I was assigned to make these in a factory, Quality Control would have me escorted out of the building by Security with my belongings in a cardboard box.)

But my trusty treadle and I kept at it, and the last ten were better than the first ten.  I guess I should be perfect after making 100 units.  Not going to happen, I'm afraid.
By the way, the machine is a Domestic, made by the White Sewing Machine Company of Cleveland, Ohio, probably in the 1920s.  She's in a homemade base I bought from a lady on Ebay.  I can put either a White or a Singer in the base.

Here she is, with all the units made so far.  I can't believe how long the bobbins last on this machine.

I had to get a bigger basket to put the units in.

Ready for the next step!  I'm kind of hoping it uses 2.5 in. strips, since my scrap drawer is overflowing with them.
Have a pieceful day!

Follow the link back to the link up below.

Back to the Link Up!


Monday, December 2, 2013

Celtic Solstice Mystery Quilt--Accuquilt Style

I am loving the new mystery quilt by Bonnie Hunter, Celtic Solstice.  Here's the link if you'd like to join in:
Celtic Solstice Mystery
Above is a photo I snapped while making the orange/blue sets.  I stacked them in groups of ten to stay on track.
I'm using reproduction fabrics from my stash for this quilt.  I'm hoping not to buy anything, but the orange is running out fast.  Maybe I'll go to the fabric store this week, after the Black Friday shopping storm is over.

Bonnie gives great directions for making these units with the Tri-Recs rulers, but I just prefer the Accuquilt cutter.  And since it makes the same size we need for the mystery, I'm using the Triangles in Squares die.
I love the accuracy of the die cut pieces, especially the way all the corners are pre-trimmed, but in the past I have struggled with the way the Accuquilt cutter can waste fabric.  As a confirmed fabric miser, this was upsetting.  I figured out a way to minimize it, by subcutting the fabric before running it through the cutter.
Here's a quick tutorial on how to make these units.
Here's the die I'm using.  On the left, you can see the cuts for the center triangles.  On the right are the cuts for the side triangles.
I'm cutting side triangles here, so I measured the area on the die that cuts the side triangles, and added a smidge for insurance.  Then I cut my fabric pieces to that measurement, which in this case was 4.5 in. x 6 in.  It's easy to use scraps for this, or to cut yardage into 4.5 in. strips and sub cut them.  Notice the selvedge?  It will be cut away by the die, no need to trim it off.
This is the amount of wasted fabric I have from each cut.  It's a lot like making cookies with a cookie cutter.  I'm okay with this amount of waste.
VERY IMPORTANT--If you stack your pieces right side up before cutting, you'll only make the right side triangles.  If you stack them wrong sides up, you'll only make the left side triangles.  It worked best for me to do 4 layers at a time (less shifting), and to do all right sides on one pass and all wrong sides on the next pass.  This made them easy to sort into piles.
The center triangles are symmetrical, so you can stack them either right or wrong sides up, it doesn't matter.


Sometimes I save these little triangles on the ends of the waste pieces for string quilts.
Pieces cut, directions handy.


Now for the sewing!
The blunted corners make it easy to line the pieces up.  (Don't know why my dark orange looks yellow here.)


First side done, and finger pressed.
Then add the second side:
And that's that!
By the way, the triangle on the left is made from Liberty of London fabric I bought on a trip to London in the 1990s.  It was just too precious to cut for years.  I finally broke down and cut it, and I am loving it.
All these units are finished!  What's next, Miss Bonnie?