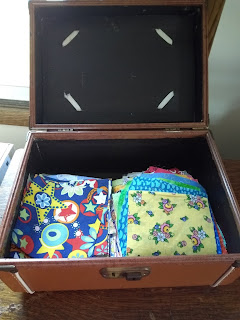
This might look like a small suitcase. Or a vintage overnight bag.
But when you look inside, you can see it's a treasure chest. The treasures here are 5 in. squares of bright fabrics, mostly novelty prints. (I love this stuff!)That's where most of this quilt top came from. It's the I Spy quilt top I finished two months ago.
With a little help from Little Buddy's nap times and his parents picking him up early a couple days, I finally got it quilted.
It's been cold and rainy this week, so outdoor photos have not been ideal. Here's the little quilt laid out on my kitchen table.
In my never-ending quest for better ways to mark a quilt for quilting, I returned to Golden Threads paper this week to quilt the wide white border. (By the way, I have no affiliation with the company that makes this product.)
The first time I used Golden Threads paper, I made a big mistake. Everything was going fine, I cut a strip of paper the size of the border I was quilting, and then traced a stencil onto the paper. BUT, at that time I used a pencil. (Cue ominous music.) I happily machine quilted that border, and ripped off the paper, only to discover that THE PENCIL MARKS HAD TRANSFERRED TO THE QUILT!!!
Boy, was I mad. The next time I saw a vendor demonstrating Golden Threads paper, I talked to them about it (I had cooled off by then and was unhappy but polite). They knew about the problem, and told me to only use permanent pens to mark on the paper.
This made me nervous. If pencil marks transfer to a quilt, I can get a fabric eraser and work on them. What if permanent ink transferred to the quilt? (I have not gotten to this ripe old age without a healthy skepticism for what salespeople tell me.) But I had a huge roll of this stuff and lots of quilts to mark, so I tried it on a quilt that really didn't matter that much (badly pieced, etc.)
It actually worked!
Here's how to use it.
1. Trace your design (stencil, quilting diagram from a book or magazine, etc.) with a permanent pen onto the paper. See photo above. This works well for borders, alternate blocks, sashings, and so on, but I don't think I would use it for an overall design.
2. Pin the paper in place, as in this blurry photo below. Try to have the points of the pins facing away from you as you sew. (Ask me how I know that!)
3. Quilt through the paper. (Note to self: try to quilt on the lines.)
4. Once the quilting is done, you have to pull the paper off. It's basically tissue paper, so tears easily, but watch out for little pieces that get stuck in the stitches. Here's the pile I had after quilting one of the borders.
And that's it. The permanent ink lines DON'T transfer, and there are no marks to wash out or erase.
I may use this more often, especially on borders.
The rest of the quilting was very simple, just lines a presser foot away from the seams.
Here's the backing, a cute alphabet print with hearts. The border is another novelty print, a light red with white anchors.
I'm not sure what's going to happen to this little quilt. I think my Little Buddy will enjoy playing with it, and finding the matches. Each novelty square in the center has a matching square in the border, and some of the squares are his favorite things, like cats and dinosaurs and Thomas the tank engine. I may keep it here for him. If he's not interested, I'll donate it.
What's going on in your world this week?
I'm wishing you lots of time with whatever you treasure.
Cheers for reading,
Sylvia@Treadlestitches
Linking up today with:
Angela at soscrappy
Sarah at Confessions of a Fabric Addict (Can I Get A Whoop Whoop)
Myra at Busy Hands Quilts
Cynthia at Oh Scrap
Can't wait to see what everybody else is up to!


