Monday, September 23, 2013

Around My Kitchen Table

I had a wonderful weekend.  It started on Friday, with a visit from a friend.  She brought a lovely old hand crank sewing machine, which had been cleaned and oiled beautifully by her husband.  In short order we got it sewing and winding bobbins.  It made a wonderful stitch.  Not bad for something over a hundred years old.
I sewed along with my Jones handcrank (made in the 1920s, I think), making 4 patches from feedsack squares.
I started out using up scraps from my last feedsack project, the flying squares quilt.  In that quilt, all four squares were different.  In this quilt, I'm using two each of two prints.  It was fun figuring out the combinations.  Some are pretty and some are, well, not.
Here's the block the 4 patches will be part of.  It's a pinwheel block, #1121 in Barbara Brackman's Encyclopedia of Pieced Quilt Patterns.  I changed it a little, to make fewer seams.  Doing so made it another block that needs a partial seam.  If you'd like the pattern, leave a comment, and I'll write it up.

The most fun was just spending the day sewing together, catching up and chatting.  We worked in the kitchen, because I'm not really set up to work in the basement with anybody else.  I need to change that, I think.  Although it was very convenient being near the food and beverages.

That evening we ate supper at the kitchen table and visited together.  Then my husband and grandson watched a movie and my friend and I just talked.  And laughed.

On Saturday we had a family birthday party for my youngest daughter.  We brought in lots of chairs and packed around the table, and I bet they heard the laughing in Milwaukee.  We did this at lunch and again at dinner, with a changing cast of characters.  After dinner we played a charades game.  More laughing, more fun, more sharing, around the kitchen table.

Sunday was a quieter day.  Since I already had everything I needed for sewing handy, I set up again on the kitchen table, and finished the 4 patches.  Then I started working on a charity quilt.  My friend had given me a huge batch of 2.5 in. strips, cut from pillow panels.  She had sewn lots of the strips into sets of 3, so it was easy for me to press, cut, and assemble 9 patch blocks.  I'm wondering how many quilts I can make out of these strips.

I learned so much this weekend.  My friend's insight into how to solve some of my quilting problems has made me think.  I learned more about her life and the place quilting has in it.  I learned that I can happily let go of stuff I've kept for years if it goes to a good place.  And I'm trying not to worry so much about having the house "perfect" before I invite anyone over.  Getting older is teaching me that life is NOW.

So thanks for coming over this weekend, family and friends.  You are more than welcome here.  I love to see you around my kitchen table.

Isn't this a great quilt top?  Thanks, Joey!


Tuesday, September 17, 2013

Flying Feedsack Squares--Block by Block Quilting Tutorial

I am having so much fun making this feedsack quilt.  I finished all 42 blocks on Thursday, and Friday I started washing feed and flour sacks for the backing.  Here they are on the clothesline.

I decided to quilt this one block by block.  It's my favorite way to quilt.  It may not be very efficient, but I actually like the process, and it goes pretty quickly.  Many people don't like all the hand work necessary, but I actually enjoy it.  For this project I will have six seams on the back to sew down by hand.  Each seam will be the width of the quilt.
 I cut squares of cotton batting, one for each block.  I keep a (large) bag of batting scraps and these squares were cut from the scraps.  Did you know you can rotary cut batting?  I use a different rotary cutter for this, so I won't dull the blade for cutting fabric.


 I cut the batting squares slightly smaller than the quilt blocks, since I really don't need the batting in the seam.
 Next I ironed the clean flour sacks, and cut them into rectangles for the backing.  I cut them 10.5 in. wide and 11.5 in. tall.  This gives me more fabric to work with on the back when I'm doing the hand sewing.


 Here are all 3 pieces, block, backing and batting.  For the first block of a row, I just layer the pieces together and quilt.  It's like making a pot holder.
When I add the second block, I sew a five layer seam--the top, batting, and backing of the first block plus the second block (on top, right sides together) and the backing for the second block (on the bottom, right side up).   (Note, no batting for the second block yet).  Here it is lined up and ready to sew.
 Sewing the seam on my Davis VF treadle.
 I press the seam at this point.
 Then I open it up like a page in a book and add the batting square.
 Then I smooth it over and press it again.  You could baste at this point, but I don't.  The cotton batting stays put as I quilt.  Plus I like to live dangerously.  And I hate to baste.
What I'm doing here is often called outline quilting.  I'm sewing along the seams, using my presser foot for a guide.  I do all the seams in one direction, and then all the seams in the other direction.  I've worked out a system for this block so I don't have to break the thread until the block is quilted.
WARNING:  Don't quilt close to the top and bottom of the block.  This is where you'll join the rows, and you need to have at least half an inch of space so you can pull the backing out of the way.  See below.
(You can quilt close to the SIDES of the block, because you'll be sewing a 5 layer seam and you won't need to pull the backing out of the way.)
 I've got 2 rows done so far.  The yellow post it notes are my row markers.
 When I sew the rows together, I pull the backing and batting out of the way, and sew a 2 layer seam, matching the seams between the blocks.
 Above, the seam is sewn.  Now I'll trim it carefully, pin, and hand stitch it down.
 Here I've started pinning the seam.
After the seam is sewn down on the back, I'll do more machine quilting where the rows come together.

Only 5 more rows to go!  I like doing this so much, it's hard to stop.  I'll add borders when I have more rows together.

Have a lovely quilty day.

Monday, September 9, 2013

Feed Sack Challenge

 I love feed sacks!  I've been collecting vintage feed sacks for at least 25 years.  The first ones I bought were in a cardboard box in an antique store in Waynesville, Ohio.  They cost 50 cents each.  Seriously.  And for some reason I didn't buy all of them.
At first, I wasn't sure how to work them into my quilts.  Lots of the patterns and prints were not what I would call pretty.  So for a long time I just saved them.
When I started finishing old quilt blocks into quilts, the feed sacks came in handy to make extra blocks.  I also used them for sashing, borders, and backing.  They fit in perfectly with 1930s and 1940s quilts.
 I started buying more of them, at flea markets and antique stores.  Some of them actually were pretty.  Others had fun novelty prints, like animals, children, fruits, trees, etc.  And, to be honest, some of them were actually ugly.  But in a sort of interesting way.
Before long I had 4 big bins full of feed sacks. I loved to get them out and look at them.  But they weren't very handy, especially for making scrap quilts, which of course are my favorites.
So I started selling them.  I sold a few whole sacks on Ebay, and then I started cutting up the sacks and selling pieces, like 6 in. or 8 in. squares.  At first I only cut up the sacks that were torn or stained.  I would rotary cut strips for the squares, and then cut a few strips in other sizes for me, for piecing.
Having these strips already cut has made it so much easier to use the feed sacks.  It's a lot like the system I use for my other scraps, which I adapted from Bonnie Hunter (see www.quiltville.com)
The small bin in the picture above has my collection of feed sack strips, in sizes from 2 in. to 4.5 in.  These change with time, depending on what I'm working on.

For my current project, I'm challenging myself to use only feed sacks for the whole quilt--top, border, backing, binding.  In the past I've added solid cottons, but not this time.  The background is white sacking, mostly from flour or sugar sacks.
As a further challenge, I decided to use a newspaper pattern from the era when feed sacks were at their height in American quilts, the 1930s and 1940s.
I got the pattern from this great old scrap book.


The original owner of the scrap book pasted the newspaper patterns into the book.  The one I'm using is called Flying Squares.  It's a traditional pattern, first published in the Ladies Art Company catalog no later than 1928.
I'm piecing the blocks on my faithful White Domestic treadle sewing machine.  All I need is a housedress and Glenn Miller on the radio.
Here's what it looks like made up in my feed sacks:

Because this is a traditional pattern, I can give you the directions for it without violating anybody's copyright.  You can make it in feed sacks, of course, or in your favorite scraps.

Flying Squares: (makes a 10 in. block)
Cutting
Cut 8 squares 2.5 x 2.5 of feed sack material (or any other scraps).  All 8 should be different.
Cut 5 squares 2.5 x 2.5 of white flour sack material (or any other background).
Cut 4 rectangles 2.5 x 6.5 of white flour sack material (or any other background).
Sewing
Make a 9 patch block with 4 of the printed squares and 5 of the background squares, as shown below.  Press toward the printed squares.  Press the long seams toward the center of the block.

 Add the remaining 4 print squares to the ends of the background rectangles, as shown below.  Press toward the print squares.
 Arrange the block as shown below.  This block requires a partial seam.  I sew the top section to the nine patch first, with a very short partial seam, usually only an inch or so.  Then I add the section to the right of the nine patch, and proceed around the square.  When all the other seams are sewn, I finish the partial seam, which finishes the block.  Press these seams toward the outside of the block.
 Careful sewing and pressing makes the back nice and neat and makes the block lie flat.
As of today, I have 24 of these made.  I think I need 42 for a good sized quilt.  Sew back to work!

May all your days be pieceful.

Thursday, August 8, 2013

Back to Work!


Slowly but surely, I am getting back to normal.  Never has normal seemed so wonderful.
This is the charity quilt I was working on just before I fell.  All it needed was to have the binding sewn down by machine.  So I pinned it, and made myself sew it day before yesterday.  It wasn't as much fun as it used to be, but I did it, and that's what counts, right?  I washed it this morning, and hung it on the clothesline to dry.

The pattern is a basic framed square, made from flannels.  Some of the cute prints were given to one of our members by a lady who is giving up quilting for other crafts, and who knew we would make good use of them for kids in need.  Some of the flannel print scraps are from our members' stashes, and several are from my enormous flannel hoard.
To make this quilt, you need 4.5 in. squares for the centers and 2.5 in strips for the sides.  The blocks are 8 in. square finished.  I made 20 blocks.
For each block, cut:
1 square, 4.5 in. x 4.5 in.
2 rectangles, 2.5 in. x 4.5 in.
2 rectangles, 2.5 in. x 8.5 in.
The borders are cut 1.5 in. wide (yellow inner border) and 3.5 in. wide (monkey print).
The final measurements for the quilt are approximately 40 in. wide and 48 in. long.
I machine quilted in the ditch, plus on all 4 sides of the 4 in. squares.  I used Warm and Natural batting.
It might seem silly to make flannel quilts in August, but in Wisconsin we always know winter is coming.
Ohio Rose update--I now have 8 blocks finished!  Only 4 more to go!
Here they are laid out on the table.  The 3 blocks I did last summer have a different green fabric than the ones I'm doing now.  I have no idea what happened to the rest of that fabric.  It's going to be obvious in the finished quilt.  On the whole, I don't think I'm going to worry about it.
I'm too busy worrying about how I'm going to set and quilt it!
Enjoy the summer days!


Saturday, July 27, 2013

Where have I been?

Twenty days ago I wrote my last post on this blog.  After a very eventful busy June, I was catching up with an overview of our Documentation Days.
The next day, Saturday July 8, I went to the Farmers Market in West Bend, and came home with this wonderful haul.


Fruits (strawberries, blueberries, two kinds of cherries), vegetables (broccoli, garden peas, new potatoes, green beans), chicken, pork roast, eggs, smoked salmon, and even a few flowers.
I spent the rest of the day Saturday cleaning strawberries to eat, freezing blueberries, blanching and freezing peas and broccoli, and making cherry jam.  It was a wonderful day, just my kind of summer Saturday.  
To round things off, I spent the evening finishing a baby quilt for charity.  I got as far as starting to sew the binding on before I went to bed.
The next day, on Sunday, I was happily working in the yard and garden, when I fell backwards over a short fence.  I shattered a bone in my back.  So I had some new experiences.  I was carried out of my house on a backboard, and rode in an ambulance to the hospital.  I had a Cat Scan, the kind where you go inside the machine.  And I had to stay in the hospital, which I had not done since my youngest child was born 28 years ago.
It turns out I had osteoporosis, and never knew it.  Thanks to the staff at Community Memorial Hospital, and especially Dr. Braun, I am on the mend.  I had a procedure (not thankfully an operation) where a special kind of glue was injected into the bone.  It was amazing.  An hour later the pain was gone.  The day after the procedure I was able to come home.
My husband has been wonderful, taking over the work and looking out for me.  As I get better, I've been adding more chores as I feel able to do them.  I had a cane to walk with when I came home, but I hardly use it at all now.  My worst problem is not being able to sit for very long at a time.  My back gets sore, and I have to lie down.
After only being home a couple of days, I was really itching to work on a quilt project.  But sitting at the machine was just not possible yet.  My only hand work project on my Pick Six list was hand quilting my great grandmother's top, but it was just too hot for that, and the angle I had to sit at wasn't right for nice small stitches.
So, having broken my back, I decided it was okay to break my rule, and work on projects that were not on the Pick Six list. One afternoon I went down to the basement and hunted up some hand projects that were already started.  

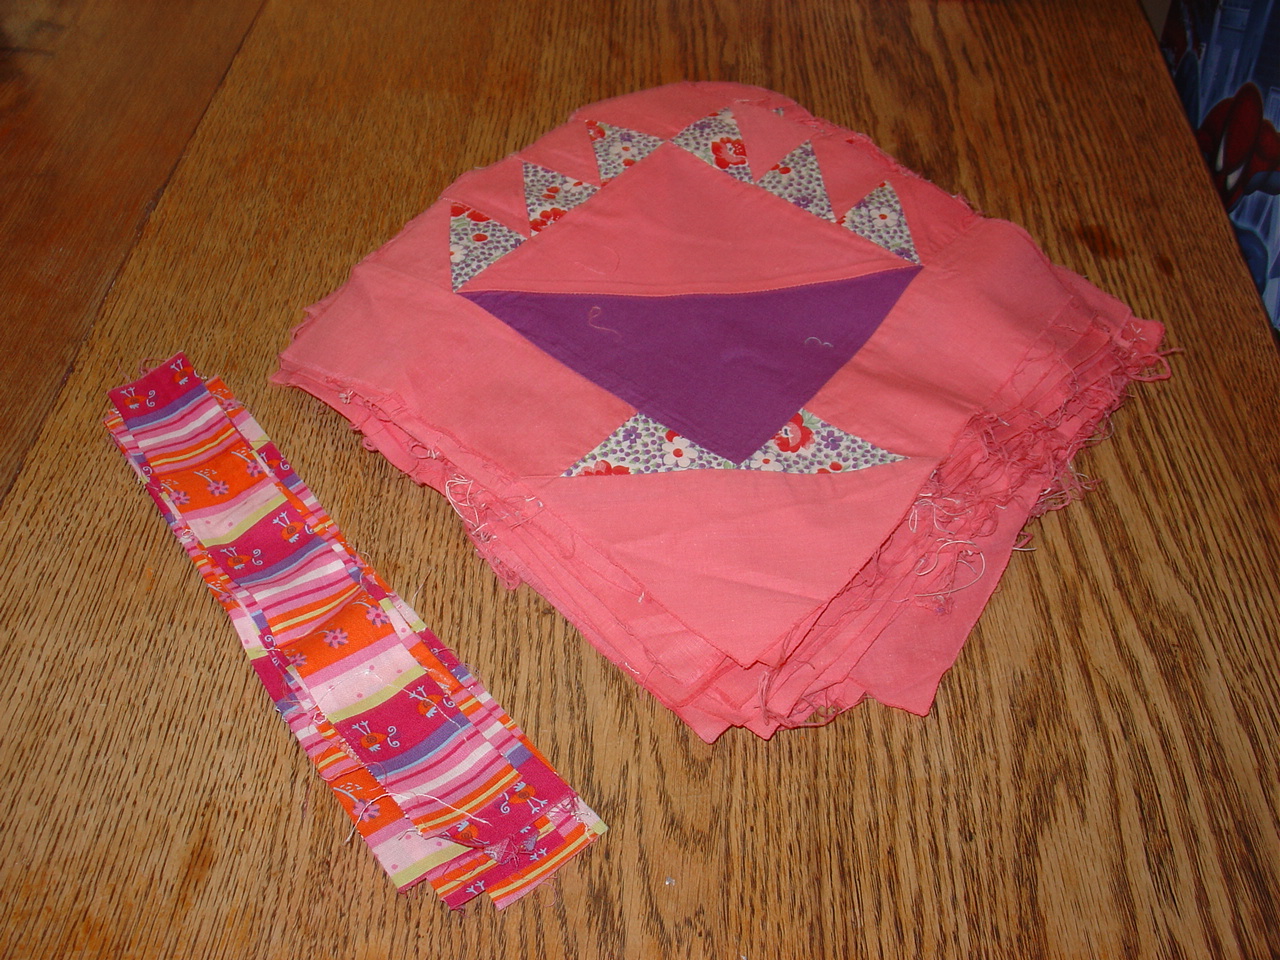
These pink baskets are an Ebay find from way back.  The print fabric in the small triangles is probably from the 1940s.  Somebody had started adding sashings to them in the 1960s or 1970s, and had finally given up.  I had always meant to take the sashings off.  This was something I could do flat on my back.  Now they're ready for the next step, when I'm ready for them.
Ripping was useful, but not that satisfying.  I like making things.  So my next project was embroidery.

This set was also a Ebay find.  The blocks were tinted on the background, and the first owner did the outline embroidery.  Of the 18 blocks, 12 were completely finished, and 6 needed the black embroidery done.  This kept me busy off and on for a couple of days.
Using Rose Werner's excellent site, I found out these blocks were offered to the public by the Vogart company in fall 1946/spring 1947, and were sold at Woolworths. The quilting lines are still on the blocks.  I will probably set them with solid blue alternate squares.
Now what?  On to applique!
I had several projects to choose from, but decided to work on my Ohio Rose.
More stuff from Ebay!  Many years ago, around Valentine's day, a seller offered what he/she called heart shaped quilt pieces.  As soon as I saw the pictures, I knew what they were--the pieces for an Ohio Rose quilt from the Mountain Mist pattern (#20).  The pieces were cut and hand basted, ready for applique, except there were no green pieces and no white background squares.  Nobody bid except me, and I got them for $10.00.  They sat in the box for a long time, until I bought a used copy of the pattern, also on Ebay.  The pattern also contained the templates, cut from an old cardboard box of crackers.  Handwritten on the pattern in pencil is:  "Here is one I offer if you can use it.  I won't I know the way my arm been.  Lola".

I always like to take a handwork project on vacation, so I worked up a few blocks when we went to Florida last August.  I had to supply the green solid and cut those pieces from the template, plus the white for the background.  Miraculously, there are exactly enough of the pink pieces for the twelve blocks the pattern calls for.  I found vintage thread in my collection to match the colors fairly well.  I had 3 blocks finished when we got back, and that's all the further I got.
Yesterday, I made a block from start to finish.  I finally went to bed and left taking out the basting for this morning.

My applique is not perfect, of course, but I am enjoying it.  It will be a pretty quilt someday.  And only 8 more blocks to go!


Look what my friend Debbie sent me!  Hexies, cut from some of our favorite reproduction fabrics, plus the papers to sew them English paper piecing style!  She even sent the pattern, so I can add to it.  She is always so thoughtful.
I'm getting better every day.  My doctor and I are going to work on strengthening my bones, probably with medication(s).  I'm going to start a water exercise class at the Y next week, plus just spend some time walking around the park near our house.  Whatever I can do to make progress, I will do.
As I heal, I will stitch by hand.  I won't be flying along at my usual pace.  But the time will not be wasted.  I'm going to spend some time taking care of me.  I'm letting this experience teach me what is important, and what isn't.
Many thanks to everyone who has been so kind to me.


Friday, July 5, 2013

Strawberry Festival Quilt Documentation


Every year during Strawberry Festival, we document quilts at the Wisconsin Museum of Quilts & Fiber Arts in Cedarburg, Wisconsin.  I have the honor to be the Documentation Chair, which basically means I get things ready and keep things going through the day.  
I got there early, before the museum opened, and spent some time taking pictures outside.  Above is the museum entrance (there's a handicap ramp on the side).

It wasn't so long ago that the barn pictured above was all we had of the museum, before it was restored and remodeled.  For years we held our documentations in this barn.  I would unlock the padlocks when I arrived, stomp and holler a little to warn the critters (like mice and frogs and snakes), and open the big sliding door on the other side.  We had electricity, which meant lights and an old refrigerator, but the barn always had to be cleaned a day ahead, and items left out tended to be a little damp the next day.  If it rained, water came in the open door.
I don't miss those days.  We now have a modern building, much better lighting, real restrooms (not port-a-potties) and even air conditioning.  I am grateful every day for all the volunteers who worked for so many years to make this museum a reality, and all those who are still working every day to keep it going.
The quilts at this year's Strawberry Fest were wonderful.  We saw 5 log cabin quilts of different varieties, 3 crazy quilts, 3 embroidered quilts (from the same family), 2 wholecloth and 1 almost wholecloth (it had a border), plus nine patch, Dresden plate, basket, 8 pointed stars, and many others.  Lots of different historical time periods were represented as well, from the 1840s to just last year.  Our largest group was made in 1930-1949, which is no surprise since we always see lots of quilts from that huge quilt revival.  But we also saw 6 quilts in the 1876-1900 range and 6 more from 1950-1975.
Here are some of the quilts brought to be documented:
A log cabin, the courthouse square variety.

Here's a detail.  Such great old fabrics.

Here's an interesting novelty technique.  The quilt is made of triangles which are sewn "quilt as you go" style.  The quilter cut a square of fabric and another square of flannel.  She folded the fabric around the flannel (which serves as batting), sewed it shut, and quilted it.  Then she whip stitched finished triangles together.

This photo shows the back, where you can see the whip stitching.

A wonderful log cabin in the barn raising setting.

A pair of quilts donated to a local museum.  The pattern is pineapple log cabin.


This is an original!  The maker appliqued her son's toddler clothes to a background square, and used the quilt as you go technique to quilt them.  As an added surprise, on the back of each square is appliqued the back of the outfit!  She didn't finish it until he had graduated from high school.

A wonderful scrap quilt.

A mostly-silk log cabin.

Almost a wholecloth quilt, this is stunning when hung.

Signed and dated in embroidery, this quilt was made in 1895.

An embroidered State Birds quilt, with only 48 states.  (This helps with dating!)


An amazing Dresden Plate quilt, in very good condition.

A beautiful embroidered quilt, in perfect condition.  The owner even has the booklet the pattern came from.

Stunning!  Tiny blocks with more than 20 pieces in each one.


Here's a detail of the quilt above.  Sadly, nothing is known of the maker.

Over the course of two days, we documented 30 quilts.  I am now in the process of scanning the forms and sending copies of them to the owners.
No matter how many times we do this, we always see something different.  Each quilter takes this art form, and makes it her own.  And this infinite variety is what makes this work so interesting.
Eventually, all these quilts and more will be on the Quilt Index website (www.quiltindex.org).
As an extra bonus, a famous quilter stopped by on Sunday (June 23) to watch.  It was Victoria Findlay Wolfe, and she mentioned us on her blog!  Here's the link:
Have you had your quilts documented?  I have to admit, I've only had one of mine done!