Friday, June 24, 2016

Treadling Barefoot

Last Friday, I went to the Wisconsin Museum of Quilts & Fiber Arts for the annual rummage sale.  As you can see, it was a beautiful day.
I lined up with the other ladies (they were all ladies at first), and when the doors opened at 10:00, we all hurried in to look for treasure.
Here's what I found!  All the fabric, etc. sold at the sale is donated by people who don't want it anymore.  Buyers get the fabric, and the museum gets the cash.  Win, win, win.
My split personality must be obvious from this photo.  I've got a big pile of 1800s reproductions next to a big pile of brights.  There is some flannel here, too, and Christmas prints.  Hey, I love everything.
My "finish" this week is a top made from a panel that had been donated to our quilt group.  See the border on the left side?  There was one just like it on the right.  I cut it off before I took this picture.
Now I've added those side borders to the top and bottom, to make this quilt rectangular instead of square.
This panel has been around for awhile!  Thankfully, Christmas doesn't go out of style.

Joan L., one of the ladies in charge of charity quilts in our group, had packaged this panel with some red Christmas print intended to be used for the backing.  I used it for borders, so I'll have to look for another backing.  There might be some fabric around here somewhere.
Look what's on the original border--a little black hand crank sewing machine.  Now that says Merry Christmas to me.
There's another one on the center of the panel, with a big red bow.
It was fun to sew along, making this top, with my bare feet on the cast iron treadle.  It's really summer now.  In the winter I need my socks for treadling, or sneakers and socks on very cold days.  But in summer, the cool metal feels good on a hot day.
I got the binding on the Farewell to Downton Abbey quilt.  I went with a solid red, to bring out the reds in the prints.
Here's the label!  I bought a panel of Downton Abbey labels a couple of years ago.  The others are more generic, but I like this one with the drawing of Highclere castle.

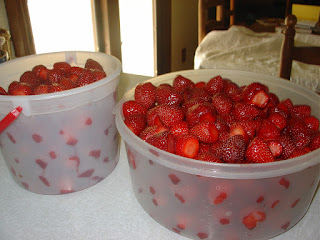
Another one of my favorite things about summer is picking strawberries.  I did that this morning, and got them cleaned as soon as I got home.  Now I need to make jam, and strawberry sherbet, and freeze some to eat in the winter.  There's a quilt that needs some work, but it will have to wait.

I wish you all the joys of the season this week.

I'm linking up with Crazy Mom Quilts.


Friday, June 17, 2016

What the Four Patch is Going On Here?

So I finished these two baby quilts this week.
This one has a cute owl print for the main fabric.
These are two more of the "baby shower table cover quilts".
The second one has an adorable whale print.

Notice anything?  Of course you do!  Both quilts were made with exactly the same pattern.  I was in a hurry to use up these fabrics, so I cut myself a kit of each one, based on the Quilts for Kids patterns.  These quilts are going to Quilts for Kids to cheer up little ones in hospitals.  (To find out more about Quilts for Kids, click here .)
I can't even remember how many 4 patch quilts I've made for Quilts for Kids, starting from a kit they sent me years ago.  So I wasn't worried about repeating myself.  After all, charity quilts are meant to be made quickly.  I'm not doing art here.
But here's a top I finished last weekend:

The first blocks of this quilt were made from 4 patches I found in a bag in the closet, where I had stashed them a few years ago.  They didn't necessarily match, but that was okay.
 I put four 4-patches together.  When I used up the blocks from the closet, I made more from my box of bright colored 2.5 in. squares.
It was fun mixing and matching them.  These new blocks were mostly just 2 fabrics, light and dark.
Some of the fabrics have special meaning.  The sail boat fabric here was left over from the quilt I made for my first grandson nearly 11 years ago.  There are scraps in here of fabrics from several quilts I have made for all four of my grandchildren.
I'm keeping this quilt at my house, for sleep overs.

It occurred to me to worry a little when I found myself sewing so many 4 patches.  I've been quilting for 40 years.  I know and love lots of other patterns.  What the four patch is going on here?

There is a lot to be said for the 4 patch.  It is probably the simplest quilt block anyone could make.  There are only 4 pieces, all exactly the same size, and only 3 seams.  It's got great diagonal movement, depending on how you place the colors.  


 Generations of children have learned to sew quilts by starting with a four patch. The four patches in the quilt above may very well have been made by a mother and daughter back around 1900.  I found them in an antique store and set them into the quilt above.  Some were well sewn by hand, and some had to be reinforced with machine stitching before I could use them.

Double 4 patch is just as easy, with a few more pieces.  And now you can chain fabrics or colors from corner to corner.
I even made this top from pieces I left out of a Bonnie Hunter mystery quilt.  (It's not quilted yet, though.)

I don't really know why I'm stuck in Four Patch Land at the moment.  But now that I know where I am (like on a map where it says You Are Here) I can take a look around and find my way to Somewhere Else.

Wonder where that will be?

I'm wishing you great journeys this week, in quilting and otherwise.


Saturday, June 11, 2016

Getting Ready for Grandma Daycare

Here's our new grand baby Adam, three weeks old today.  Isn't he amazing?  After all these years, I still can't get over the miracle of new life.
We were lucky enough to babysit him yesterday evening while his mama and big brother went to a movie and his daddy hooked up a new washer and dryer.
When my daughter goes back to work, we'll be babysitting for real, so I am trying to get ready for Grandma (and Grandpa) daycare.  The pack and play is ready, with a new mattress (meant for a pack and play and very firm), and I've learned how to make fitted sheets for it.
This one is stretch knit, in a jungle print similar to his quilt.
Here's the stack of what I've made lately.  The crumbled-up thing in front is another stretch knit sheet.  I never can fold these, it just doesn't happen. 
I made six more burp cloths, using flannel and terry cloth.  When I ran out of blue terry cloth, I bought a fluffy white towel and used that.  It should soak up a lot of whatever.
I don't usually worry about having receiving blankets on hand.  As I recall, they were fairly useless when I had my kids.  We didn't swaddle then, and when my oldest grandson was born nearly eleven years ago we just could not figure out how to do the swaddling thing.  Wrap here, tuck there, and somehow or other the baby's feet were always hanging out at the end.  Now there are specially made swaddling sleepers, and they are super easy to do, like stuffing the kid into a soft little burrito.
I did want a few of these blankets, though, because it's summer, and even here in Wisconsin we eventually use the air conditioning.  A light blanket made of a single thin layer of flannel is just the ticket.
I had these receiving blankets in my stash, from a box I bought on Ebay.  This was a box lot of problems/mistakes from a factory.  Over the years, I've used most of this stuff to make quilts, but these two blankets were nearly whole, so I didn't cut into them.  All they needed was a little trimming and hemming, so I finally did that.  The colors are not especially fashionable, but I don't think little Adam will care.
Lastly, I made 10 of these flannel cloths.  I'm going to try being Eco-Grandma, and use cloth wipes instead of disposable.  (We'll see how this goes.)  They are also good for wash cloths, and to place in a strategic place when changing a boy's diaper.  When my daughter saw them yesterday, she was interested in them, so I gave her half the stack.
I dipped into my "weird" flannel stash for some of these.  Another Ebay find from way back when, these squares were already cut from some vintage flannel prints.  Lots of babies, and storks, but thankfully no clowns.  (My daughter is creeped out by clowns.)
I won't say we're totally ready yet.  I still need to get a bottle warmer and a base for the car seat, and probably some more binkies in case we lose one.  (The Binkie Crisis was almost a daily occurrence when Adam's brother was a baby.)   I should make at least one more fitted sheet, because I know you can run through more than a couple in a day. 
Only 3 weeks left!  Time to get to work!
Thank goodness there's always a dog around to help!

I wish you joy, this week and always.


Friday, June 3, 2016

Farewell to Downton Abbey

Like just about everybody else in almost the whole world, I loved Downton Abbey.  My friend Debbie introduced me to it at a mini-retreat we had at her house a few years ago, and I was hooked.  So of course it was sad to see the series end last February.  But it's a good excuse to make a quilt!

Here it is, laid out flat.  It's quilted!  Not bound yet, but I'm still dithering about a color.  Right now I'm thinking red.
I knew the end was coming, so for Christmas I ordered myself a packet of the Downton Abbey fabrics.  It was nearly half price--what a deal.  I had lots of fun piecing the blocks. 
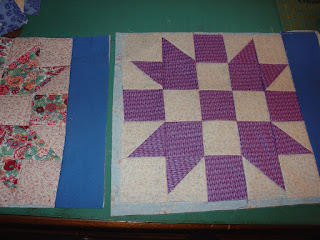
I chose the pattern from The Ladies Art Company catalog of 1928.  The time period was almost right for the dates the show portrayed (1912 to 1926).  The block I chose was called Sisters Choice.  I've always liked that block, plus the name really went with what Downton Abbey was about.  The show centers around the choices sisters Mary, Edith, and Sybil make, good and bad, and how that affects everyone around them.
I added seams in 4 places to the block above to make it easier to piece, and I made my blocks 10 in. square, so each segment finished at 2 in.

Here's the first block.  I was using the Singer 9W then.  I later switched to a different treadle machine when the 9W developed some minor problems.
All the blocks are different, although fabrics are repeated.  In addition to the official Downton Abbey prints, I scrounged up fabrics from everywhere to fit the color scheme and the time period.  The print above is from my thirties scraps.  The prints we think of as 1930s were actually begun in the 1920s, so I used them.
Of course I included Liberty of London fabrics!  The Crawley girls would definitely have shopped there. 
Here's another Liberty print.  I love them so much I can hardly bear to cut them.
I don't often do a pieced border, and it was a little scary, but it turned out okay, I think.
Here's the back, a thirties style print from Connected Threads.
This is a quilt-as-you-go quilt.  Once I had the blocks pieced, I added sashings to all but six of the blocks (the ones on the ends of the rows) and layered them with batting and backing into the stack you see above.  The backing is cut about an inch larger all around than the block section.
After a few disasters (such as the Terrible Quilt from 2 post ago), I learned how to quilt by the block and end up with a decent quilt.  Warning--it involves hand sewing!  But not a huge amount.  For machine quilting, I use my Pfaff electric sewing machine with a built-in walking foot.

Here's how I make my quilt-as-you-go quilts:
For the first block in each row, I just quilt it.  Because I'm going to "sew and flip" the seams surrounding this block, I can quilt right up to the edge if I want to.
Here's the back, all quilted.  I use old fashioned 100% cotton batting, so I quilt closely.  I just like that look anyway.
When the quilting is done, I very carefully trim away the excess batting and backing.
Here I'm ready to add the next block section. 
I stitch the second block section to the first quilted piece through all 4 layers.
I use a quarter inch seam, just like always.  Because there are sashings, there are no seams to match.
Next I add the backing, sewing over the same seam.  You could add both of these pieces at the same time, but I'm just trying to be careful.
Now I lay the batting piece on top of the backing.  Notice--I'm NOT catching the batting piece in the seam.  I find that makes bulky seams.  Since I am going to do lots of quilting, I am not worried about the batting shifting. 
Now I take the whole thing to the ironing board.  Here's where having 100% cotton batting helps.  I press the newly attached sections away from the seam with the iron.  (No poly, no melting!)  I do this on the front and on the back.  I want the piece to be smooth and flat, and ready for quilting.
Now I quilt the next block.  I probably should have quilted the sashing first, but at this point I hadn't decided what to quilt in the sashings so I left it for later.  In the end I just did a "railroad tracks" quilting, a quarter inch from the seams.
Here's the second block trimmed, and the third block ready to add.
Once the rows are done, I do a more traditional quilt-as-you-go joining.  I add the long sashing piece on the front of the first row and the backing for the sashing on the back of the first row, just like joining the sections above.  Then I add the front sashing ONLY to the next row.  I lay in a strip of batting, and pin the backing over the seam.  Here's where I hand stitch.  I SHOULD HAVE TAKEN PICTURES OF THIS STEP, SORRY.
The only hand stitching I do is to sew down the backing of each sashing strip.  In this quilt, there were 5 of these (6 rows of blocks).  Each of these seams is the width of the quilt.
After the sashing was joined between the rows, I quilted it (just the simple railroad tracks again). 

Just for fun, I timed myself.  I took me approximately 9 minutes to quilt each block.  There were 5 blocks in each row, so 45 minutes quilting, plus some time trimming and pressing.  I could easily quilt a row in an hour.  I didn't time how long it took to do the hand sewing.  Mostly, I just had it on the kitchen table and worked on it while supper cooked, etc.

The borders are joined sew-and-flip style.  To get this right, I ran down to my basement bookcase and got this book:
Machine Quilting in Sections, by Marti Michell.  I found this to be extremely helpful when adding multiple borders.  Basically, I added the first border plus all the batting and backing needed for all the borders together in one step.  Then I added the next two borders.

So now for the binding, and then the label!

I still miss Downton Abbey on Sunday nights.  Sure, some of the story lines were silly (Mr. Bates AND Mrs. Bates suspected of murders???), but for the most part it was extremely well done, historically accurate, and compelling television.  I don't think a quilt like mine would ever have graced a bed upstairs, but it could have been made by one of the servants from the scraps of everyone's clothing.  Maybe Mrs. Hughes, or Anna, or Baxter could have sewn it.  Hmm, Baxter seems to know her way around a sewing machine.

I wish you the joy of quilting this week.