Showing posts with label quilt as you go tutorial. Show all posts

Friday, July 8, 2022

Quilt As You Go, No Handwork: A Tutorial

 Welcome to Treadlestitches!

I do most of my own quilting on a domestic machine.  Baby quilts are easy!  For larger quilts, I either quilt a simple grid, or use a quilt as you go technique.

I started these blocks in Feb. 2021, as part of the Rainbow Scrap Challenge.  The pattern comes from Bonnie Hunter's Carolina Christmas in her book Scraps and Shirttails II, and is called Poinsettia Star.  The poinsettia "petals" were in the color of the month.  In October, once the blocks were done, I had to figure out how I wanted to quilt them.

I didn't make a top first, because I was going to quilt in sections.  I laid all the blocks out in 7 rows of 6 blocks each.

I made sashing strips from squares to go between the blocks and rows, and then I laid out the sections.  The center 3 rows are divided into 3 small sections of six blocks each.  The top 2 rows, plus sashing, are a section, as are the bottom 2 rows.  (Please excuse the bad lighting!  The sun was very bright that day.)

Also, not shown in the photos, I cut backing and batting for each section.  These pieces are just pinned together to keep them straight, NOT BASTED YET.

In this technique, you work from the center out.  I layered the center section with batting and backing, spray basted it, and quilted it.  In some places, I quilted right up to the edge.

One of the reasons I wanted to use this method was because I wanted to do outline quilting, rather than a grid.  Outline quilting, that is, following the seams of the piecing, was often done on quilts long ago, and seems appropriate for a reproduction quilt.  I quilted inside and outside each of the "petals", and around the edges of the blocks. 

This is the completed first section.

Now what?  

The basic principle of this particular version of quilt as you go is this: 

If you add an unquilted piece to a quilted piece, you don't need to do any hand sewing.

Here's how this works.


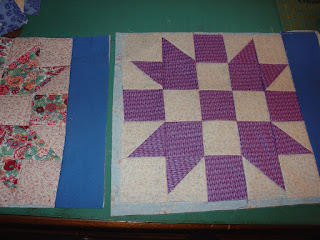
I'm going to sew the unquilted section on the left to the quilted section on the right.  The unquilted section has now had the blue border attached to it.  Please note, the unquilted section does not yet have batting or backing attached.  The quilted section has been trimmed on the edge that will now be sewn.

I lay the unquilted section face down on the quilted section, and stitch a quarter inch seam.  It's helpful to have a built-in walking foot for this.

I press this seam toward the newly added section with a hot iron.  You want the seam to lay flat, with no puckers. 

Then I add the backing piece, right side down, to the backing of the center section, also with a quarter inch seam.  I press this seam also.

Here's what it looks like on the back.  As you can see, I'm using different toile prints for the backing. 

Now I add the batting between the two layers I just added.  I use basting spray to spray just the batting, and then smooth the pieces over it.  I do the back first, then the top, but it would work just as well the other way.

Now I'm ready to quilt the second section.  So I do!  I'm leaving the border to be quilted last, when all the sections are done.

Here's what it looks like on the back, after quilting.

So that's the technique:  For each section, add the top, add the backing, add the batting, quilt the new section.  And repeat.

Now for some time lapse photography (well sort of).

Section 3 added, middle 3 rows complete.

Section 4, the top 2 rows, added, then quilted.

And the last section, the bottom two rows added.

Once all the sections were together and quilted, I marked and quilted the borders.  I used a wavy stencil, and marked with a chalk pounce.  It reminds me of a waving flag.

 The binding is a red patriotic print, also sewn on completely by machine.

Because I'm quilting from the center out, the sections are easier to maneuver.  As the quilt grows, I'm always working on the outer edges.  It can get a little tight at times turning the quilt to outline the piecing, but it's still easier than doing the whole quilt at once (ask me how I know!). 

I definitely don't mind doing handwork, but it's nice not to have to worry about it.  It makes the process go faster.

I wouldn't use this method for every quilt, but it's handy to know, especially for medallion style quilts.

Is this helpful?  If you have questions, I'll be happy to answer.

Happy Quilting!

Sylvia@Treadlestitches


Friday, January 1, 2021

Quilt by the Block Tutorial: Quilts with Sashing, Part One

 Welcome to something new, a Treadlestitches tutorial on quilting by the block. 


 If you follow this blog, you know that I do a lot of quilt-as-you-go.  This just means I quilt my quilts in sections, rather than as one whole unit.  These techniques have been around a long time, at least a hundred years, and can be done by hand or by machine.  I choose to quilt my sections by machine.

The technique I'm showing here requires some hand work, as do most quilt as you go methods.  This particular tutorial shows how I quilt by the block on a quilt with sashing between the blocks.

Here's why I quilt this way.

1.  It's much easier to quilt something small than something big.  I don't have to worry about how much throat space my domestic sewing machine has (or doesn't have).

2.  I can easily turn the block while I'm quilting, to do any sort of design I like.  Many of my quilts are reproductions, and quilt as you go makes it possible to do old fashioned outline quilting or stitch in the ditch, or even fancy motifs.  (Not too fancy--I don't free motion quilt.  I'm using my Pfaff's built-in walking foot.)

3.  Quilting by the block is much easier on me physically than quilting a large quilt.

 So that's the why!  Now for the how.

Step One:  Make quilt blocks. (No problem!)  Size doesn't matter, but larger blocks will be a more efficient use of materials.  My blocks in this tutorial are 12 in. finished.

Step Two:  Decide on a sashing fabric, and a width for it.  My sashes in this example are 2 in wide finished.

Step Three:  Cutting.  

A.  Cut the sashings and cornerstones from your preferred fabrics, just as you would do for any other quilting method.  In this example, I cut my sashings 2.5 in. wide and 12.5 in. long.  The cornerstones are 2.5 in. squares.

B.  Cut the batting.  When I quilt these blocks, I will be quilting each block plus one sashing as one unit.  I cut the batting the finished size of the unit.  In this case, that's 12 in. x 14 in.  The exception is the last block in each row, which does not have a sashing.  I cut a 12 in. square of batting for that unit.

I don't want the batting to be caught in the seam, because of the thickness it causes.  This is why I cut it to the finished size of the unit.

Batting scraps are ideal for this method.  Long strips of batting will be needed for the sashing rows between the block rows, as well as the borders.  We will cut that later.

C.  Cut the backing.  More backing is needed for this method than is used if the quilt is quilted in one piece.

This is where my way differs a little from other instructions.  I cut the backing sections for most of the blocks 14.5 in. wide (exactly what you need for a 12 in. finished block and a 2 in. finished sashing), but I cut them 15.5 in. long.  This makes what I call a "shirt tail".

Here's the backing,  right side up.

 Backing pieces for the last block in each row are cut 12.5 in. wide and 15.5 in. long.

Step Four:  Sewing Sashings

In each of my rows, there are five blocks and four sashing strips.  Before I start quilting, I sew a sashing strip to each block in the row, except for the last block.  I do NOT join anything else together.  I end up with a pile that looks something like this:

I make the sashing and cornerstone rows just the same as I would do for any other quilt.

Step Five:  Layering

I lay the backing piece wrong side up, and place the batting piece on top of it.

It's hard to see in this photo, but the batting is narrower than the backing.  (Remember, I'm trying to keep the batting out of the seam.)  The extra backing below the batting is the "shirt tail".  This will become the backing for the sashing row later on.  (Don't worry about this now.)
 

The block plus sashing unit is ready to go on top, and the first block in the row is ready to quilt!

Step Six:  Quilting

Now for the fun part!  Quilt the first block in the row anyway you like.  You can baste it first if you like, with pins or spray.  Sometimes I just press it well and go straight to quilting.  Warning:  Do NOT baste any other quilt blocks in the row yet!!

Here's another warning:  You can quilt up to the edge of the BLOCKS, but do not quilt the right edge of the sashing, where my little scissors are pointing.  This must remain loose to attach the next unit.  

To attach the next block-sashing unit:

Here's what the first unit looks like, with the sashing edge pulled back.  You can see all 3 layers--sashing, batting, and backing.

I sew the sashing from Block #1 to Block #2, raw edge to raw edge.  I do not catch anything else in the seam.

I press the seam.  Just a reminder, the second block is not quilted yet.

Here's what it looks like on the back.  The next step is to sew the backing for Block #2 to the backing from Block #1.

Again, there are only two layers to this seam--the backing from Block #1 and the backing from Block #2.  (By the way, I'm sewing this seam on my treadle.  All the quilting is happening on the Pfaff.)

This is what it looks like opened up.  Block #2 is on the left, folded out of the way.  Now it's time to lay in the batting for Block #2.

Like this!

And then smooth over Block #2, which is now ready for basting and quilting.

This is what it looks like on the back.  I press both front and back to make sure everything is smooth and lying flat.
 

Now I can quilt the first sashing.  For this quilt, I'm running a line of serpentine stitch about a quarter inch from the seam, where my little scissors are pointing.  You can also see I've gotten ahead of myself and quilted the second block.

From here on out, you just repeat these steps.  

1.  Quilt the block, leaving the sashing unquilted.

2.  Attach the next block to the front only.

3.  Attach the backing for the next block to the back only.

4.  Press the seams.

5.  Lay in the batting.

6.  Baste (if desired).

7.  Quilt the block.

When you finish the row, all the blocks and sashings will be quilted, and there will have been no hand work at all.  (It's coming!  But not yet.)

Adding the Sashing Row

The last thing to do to complete the row is to add the sashing row to it.  In this example, I have six rows, but will only be adding sashing rows to five of them.

In this photo, I have laid the sashing and cornerstones row right sides down against the quilted row, and pinned it.  Note the "shirt tail" backing fabric on the far right.  It needs to lay there just like that.

I am sewing through 4 layers here--the 3 layers of the quilt plus 1 layer of sashing row.

After the row is sewn, I press the seam away from the blocks.  Did you notice the edge of the shirt tail extending beyond the sashing row?  It is larger on purpose.

Do Not Quilt the Sashing Row Yet!!!

Part Two of this tutorial will cover sewing the rows together (with some dreaded hand work) and adding borders.

Thank you for reading through this!  I hope it makes sense.  I am far from a pro at writing instructions!  If there is anything you have a question about, please ask in the comments and I'll address it. 

Happy Quilting!

Sylvia@Treadlestitches


Friday, June 3, 2016

Farewell to Downton Abbey

Like just about everybody else in almost the whole world, I loved Downton Abbey.  My friend Debbie introduced me to it at a mini-retreat we had at her house a few years ago, and I was hooked.  So of course it was sad to see the series end last February.  But it's a good excuse to make a quilt!

Here it is, laid out flat.  It's quilted!  Not bound yet, but I'm still dithering about a color.  Right now I'm thinking red.
I knew the end was coming, so for Christmas I ordered myself a packet of the Downton Abbey fabrics.  It was nearly half price--what a deal.  I had lots of fun piecing the blocks. 
I chose the pattern from The Ladies Art Company catalog of 1928.  The time period was almost right for the dates the show portrayed (1912 to 1926).  The block I chose was called Sisters Choice.  I've always liked that block, plus the name really went with what Downton Abbey was about.  The show centers around the choices sisters Mary, Edith, and Sybil make, good and bad, and how that affects everyone around them.
I added seams in 4 places to the block above to make it easier to piece, and I made my blocks 10 in. square, so each segment finished at 2 in.

Here's the first block.  I was using the Singer 9W then.  I later switched to a different treadle machine when the 9W developed some minor problems.
All the blocks are different, although fabrics are repeated.  In addition to the official Downton Abbey prints, I scrounged up fabrics from everywhere to fit the color scheme and the time period.  The print above is from my thirties scraps.  The prints we think of as 1930s were actually begun in the 1920s, so I used them.
Of course I included Liberty of London fabrics!  The Crawley girls would definitely have shopped there. 
Here's another Liberty print.  I love them so much I can hardly bear to cut them.
I don't often do a pieced border, and it was a little scary, but it turned out okay, I think.
Here's the back, a thirties style print from Connected Threads.
This is a quilt-as-you-go quilt.  Once I had the blocks pieced, I added sashings to all but six of the blocks (the ones on the ends of the rows) and layered them with batting and backing into the stack you see above.  The backing is cut about an inch larger all around than the block section.
After a few disasters (such as the Terrible Quilt from 2 post ago), I learned how to quilt by the block and end up with a decent quilt.  Warning--it involves hand sewing!  But not a huge amount.  For machine quilting, I use my Pfaff electric sewing machine with a built-in walking foot.

Here's how I make my quilt-as-you-go quilts:
For the first block in each row, I just quilt it.  Because I'm going to "sew and flip" the seams surrounding this block, I can quilt right up to the edge if I want to.
Here's the back, all quilted.  I use old fashioned 100% cotton batting, so I quilt closely.  I just like that look anyway.
When the quilting is done, I very carefully trim away the excess batting and backing.
Here I'm ready to add the next block section. 
I stitch the second block section to the first quilted piece through all 4 layers.
I use a quarter inch seam, just like always.  Because there are sashings, there are no seams to match.
Next I add the backing, sewing over the same seam.  You could add both of these pieces at the same time, but I'm just trying to be careful.
Now I lay the batting piece on top of the backing.  Notice--I'm NOT catching the batting piece in the seam.  I find that makes bulky seams.  Since I am going to do lots of quilting, I am not worried about the batting shifting. 
Now I take the whole thing to the ironing board.  Here's where having 100% cotton batting helps.  I press the newly attached sections away from the seam with the iron.  (No poly, no melting!)  I do this on the front and on the back.  I want the piece to be smooth and flat, and ready for quilting.
Now I quilt the next block.  I probably should have quilted the sashing first, but at this point I hadn't decided what to quilt in the sashings so I left it for later.  In the end I just did a "railroad tracks" quilting, a quarter inch from the seams.
Here's the second block trimmed, and the third block ready to add.
Once the rows are done, I do a more traditional quilt-as-you-go joining.  I add the long sashing piece on the front of the first row and the backing for the sashing on the back of the first row, just like joining the sections above.  Then I add the front sashing ONLY to the next row.  I lay in a strip of batting, and pin the backing over the seam.  Here's where I hand stitch.  I SHOULD HAVE TAKEN PICTURES OF THIS STEP, SORRY.
The only hand stitching I do is to sew down the backing of each sashing strip.  In this quilt, there were 5 of these (6 rows of blocks).  Each of these seams is the width of the quilt.
After the sashing was joined between the rows, I quilted it (just the simple railroad tracks again). 

Just for fun, I timed myself.  I took me approximately 9 minutes to quilt each block.  There were 5 blocks in each row, so 45 minutes quilting, plus some time trimming and pressing.  I could easily quilt a row in an hour.  I didn't time how long it took to do the hand sewing.  Mostly, I just had it on the kitchen table and worked on it while supper cooked, etc.

The borders are joined sew-and-flip style.  To get this right, I ran down to my basement bookcase and got this book:
Machine Quilting in Sections, by Marti Michell.  I found this to be extremely helpful when adding multiple borders.  Basically, I added the first border plus all the batting and backing needed for all the borders together in one step.  Then I added the next two borders.

So now for the binding, and then the label!

I still miss Downton Abbey on Sunday nights.  Sure, some of the story lines were silly (Mr. Bates AND Mrs. Bates suspected of murders???), but for the most part it was extremely well done, historically accurate, and compelling television.  I don't think a quilt like mine would ever have graced a bed upstairs, but it could have been made by one of the servants from the scraps of everyone's clothing.  Maybe Mrs. Hughes, or Anna, or Baxter could have sewn it.  Hmm, Baxter seems to know her way around a sewing machine.

I wish you the joy of quilting this week.