Showing posts with label shoo fly quilt. Show all posts

Saturday, December 26, 2020

Rainbow Scrap Challenge Quilts, 2020

Welcome to Treadlestitches!

It's the very last Saturday of 2020 (thank goodness!), and Angela has asked us to share our RSC projects for the year.  This is my little stack above.  The only one finished is my Shoofly quilt, made in 1800s reproduction fabrics. 

I have three basic categories of scraps:  1800s repros, 1930s repros plus vintage fabrics/feedsacks, and bright colored newer fabrics, which includes lots of novelty prints.  For the last few years, I have tried to make three RSC quilts, one in each scrap category.  I say "tried" because other projects always seem to invite themselves along for the ride.

This year was no different.  I started out with 3 quilt ideas--the Shoofly, a 1930s house quilt, and a bright colored quilt from a Kim Brackett pattern called Text Me A Quilt.

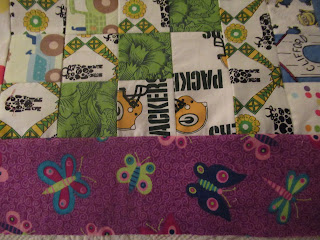
I put the borders on the Text Me A Quilt top yesterday.  It's a large quilt (for me), 76 in. x 86 in., seen here on a queen sized bed.

The border is a print I've used lots of times on kids' quilts.  The prints is butterflies, appropriate for this year since butterflies stand for hope.  This will be a donation quilt.

The 1930s house quilt is in progress.  I'm quilting it by the block (tutorial to follow, hopefully soon).  The first two rows are quilted, and ready to be joined together.  It's actually fun to quilt this way.

The last RSC quilt for 2020 didn't get started until the year was half over.  My daughter's maternity leave was extended due to the pandemic, and since she didn't need me to babysit I spent some time cleaning up old projects in the basement.  I came across this partial top I had bought at a flea market years ago.

It looked like a rainbow!  How could I not include it?  
There was no way to match the old sashing, so I took it apart and changed the layout.
And that's my last RSC quilt for this year, a double nine patch set with a green solid.  I will quilt this one myself, and we will probably keep it.
 
Of course I'm thinking ahead to next year.  How about you?
 
I just want to say "Thank you!" to Angela for hosting the RSC and keeping things going, with her busy teaching schedule and the pandemic besides!  Making colorful quilt blocks and sharing them has been a mood lifter through this whole year, and I really look forward to Saturdays, when I can see what everyone else has been up to.
 
And now for a little Christmas cheer.
Here's Little Buddy, showing off a paper airplane he and Grandpa made.


And here are all 3 of my buddies, wearing the hats I knit for them.  

We had a little celebration Christmas Eve with the people in our bubble, and a quiet Christmas at home yesterday.  In the morning, I took a virtual trip to Jane Austen's house in England HERE.
I especially enjoyed section entitled The Twelve Days of Christmas, which has short readings from Ms. Austen's books and letters, plus recipes and Christmas traditions.  

Have a lovely weekend, and stay safe!

Thanks for reading,

Sylvia@Treadlestitches

Linking up with Angela at So Scrappy, Home of the Rainbow Scrap Challenge 
and Cynthia at Oh Scrap.


Saturday, November 21, 2020

More Fan Quilting

 Welcome to Treadlestitches!

We have had a lovely fall here in Wisconsin, with some unexpected warm days even in November.  No snow yet, or at least no accumulation, which is good news for my husband as he finishes the leaf raking.  We're getting used to freezing temps at night, and frost on the grass in the morning.

Does anybody else remember when these little round dolls were trendy?  I bought this Pilgrim pair at a craft fair, probably in the 1990s.  They seem a little silly now, but they're a cheerful part of our Thanksgiving holiday..

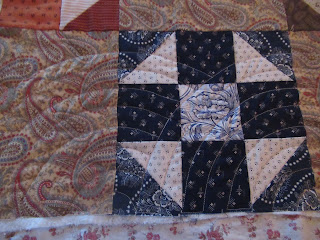
Last week, I showed how I'm using this template (above) to quilt a Baptist fan pattern on my Shoofly quilt, one of my Rainbow Scrap Challenge quilts for this year.  Today, in response to a reader question, I'm going to show how I position the template.

 Traditionally, these fan designs, which mostly date from the mid to late 1800s, are marked on the quilt top completely ignoring the piecing.  It can be difficult to decide where to mark.  In the old days, the ladies often marked as they quilted, which can lead to some dead ends and strange arcs.  (The photo above is from an excellent article about the history of fan quilting.  Click HERE to read it.)

I needed a more organized approach, so here's what I came up with. 

The template is 8.5 in. square, with lines drawn for the quarter inch seam allowance on the sides.  My blocks finish at 9 in. square. 
Step #1:  On the first block of the row, I positioned the template on the right, with the template's seam allowance line lined up on the seam line between this block and the block below it.  I marked this, and quilted it.

Step #2:  Next, I lined up the template's center line with the seam allowance between the first block in the row and the second (the paisley square).  I marked those lines.  The lines on the right of the line only needed to be marked until they touched the quilting already done on the first block.

Before I could go to the machine, I needed to finish marking the paisley square.  To do that, I positioned the template with the bottom line on the seam line, and connected these new markings to the ones I had just done. Time to quilt!

Here's what it looks like quilted.  As I go down the row, I just keep repeating step #2.  I only do step #1 with the first block in each row.

There is a slight gap in the quilting between one row and the next.  I may fill in with arcs later, but it's only about 1.5 in. at the widest, so I may just leave it.

 I knew when I started that I wanted to try to line up the quilting with the piecing.  That's what made all the problems with the marking, because the lines had to show up on light, dark, and medium fabrics.  Another way to do fan quilting would be to mark it on the BACK of the quilt, which would make marking much easier, since you would usually only have one backing fabric to contend with.  But then you'd have to think of another way to anchor your lines.  (Maybe a striped backing?  Or basting lines? Hmm...)

Two of the three sections are quilted, and I hope to finish the last one today.  Then I'll be joining them together, and adding borders.

I am not letting this messy little boy anywhere near my quilts!  Little Buddy loves blueberries (can you tell?).  He had a day off from preschool this week, and we made blueberry pancakes for lunch.  There were plenty of berries left over for eating and apparently for squishing.  (You should have seen his hands!)  It's a good thing kids are washable.

Happy Thanksgiving this week to all who celebrate.  It will be different for us this year, and strange to not have the whole family here, but we will manage.  The health and safety of each one of us is important enough to do whatever we can to help.  I'm looking forward to next year, when we can put the virus behind us.

Stay safe, and thanks for reading.

Cheers,

Sylvia@Treadlestitches
 
Linking up with:
Angela at So Scrappy  
Cynthia at Oh Scrap


Saturday, November 14, 2020

Adventures in Fan Quilting

 Welcome to Treadlestitches!

This week, I tried to learn something new.

It's actually something old--fan quilting.  We mostly call it Baptist Fan now, but that term is relatively recent.  In the late 1800s, when the quilt above was probably made, they may have just called it fan quilting or shell quilting.  (Click HERE for a great article on fan quilting.)

Many years ago, I made a Churn Dash quilt and hand quilted the fans.  I used a string and a piece of chalk to mark the arcs just like they did the in old days, which sometimes turned out okay and sometimes was a mess.

This is the finished quilt.  I think it should be have been more closely quilted.

I have a friend who is very good at doing fan quilting, free-hand, on her long arm machine.  She quilted this star quilt for me.

I've often wondered if I could do this kind of quilting on my domestic machine.  I don't do free motion quilting (yet?), but it seemed like these would be easy curves I could sew with Mrs. Pfaff's built-in walking foot.

So I bought this template.

It's called Around the Block, by June Tailor.  It's a hard plastic template, which should hold up well, and I liked all the lines for positioning it.  I decided to try it on my Shoofly quilt, one of my Rainbow Scrap Challenge quilts for this year.  The blocks were already set with paisley squares, and divided into 3 sections of 3 rows each, spray basted to the batting and backing.

I was ready to get started, but I had one BIG problem.  If you use a template, you have to mark the quilt.  I dug out all my marking tools.

The chalk pounce worked fine, but the marks wore off as I was quilting.  The template's channels were too narrow and deep for my marking pencils.  Or chalk markers.  Or soap slivers.   They were obviously designed for those special quilt marking pens or markers.

I needed the marks to be visible on dark fabrics, light fabrics, and the paisley squares between the blocks.  The blue marker did okay on the light fabrics, but was invisible on the dark fabrics and blended in to the paisley.

I was tearing my hair out.  Did I need two markers, one light and one dark?  What if one kind needed to be removed by washing and the other by pressing with an iron?  It would be easy to mix that up and end up with permanent marks on the quilt.  I bought several markers, and kept trying (and failing).  Until I finally tried the purple disappearing marker.

Eureka!  It works!  I haven't used these kinds of markers in a long time, just for fear the marks wouldn't come out, but desperate times call for desperate measures.  The purple is visible even on the dark fabrics, and shows up very well on the paisley.  And so far, the purple is disappearing nicely after the quilting is done.  I will be sure to wash the quilt as soon as I get it finished.

Once I solved the marking problem, the quilting was actually easy.   One section is done, and I'm working on the second section.

Here's what it looks like on the back.

So that's what I'll be doing this weekend.

I dug out another of my home made kits to use as leaders and enders while I'm setting the Text Me A Quilt blocks into rows.  It's a double 4 patch, made from mostly reproduction 1800s scraps.  Once I get the small squares into 4 patches, I have to choose a pair of large squares to go with them to finish the block.  I found myself singing the Matchmaker song from Fiddler on the Roof as I did this.   (Matchmaker, matchmaker, make me a match ...!)  When I was a teenager, my entire family performed in a local production of the musical, and it was fun to remember it.

I'm setting the 4 patches so the light fabric chains across the block.

Little Buddy asked me to take his picture with his new "friends".  He's adopted these bears who have been living in our basement for years.  The little one belonged to his big brother, now a teenager, and the big one was his mother's.  He snuggles with them for his naps.

It's colder here this week.  Thank goodness we have quilts to keep us warm!  Have a lovely week, and stay safe.

Cheers for reading,

Sylvia@Treadlestitches 

Linking up with:
Angela at So Scrappy
Cynthia at Oh Scrap


Saturday, September 19, 2020

A Pieceable Week

 Welcome to Treadlestitches!

It has been a pieceable week here.  I've been using my red scraps to make blocks for my Rainbow Scrap Challenge quilts.  Wanna see what I've been up to?

For these house blocks, I'm combining feed sacks, vintage fabrics, and 1930s reproductions.  The pattern is called Home Made, and can be found in American Patchwork and Quilting magazine issue #162, Feb. 2020.  It was originally designed to be made from flannels.

This one is made of feed sacks, except for the windows and the door, which are repros.
 

Next up, shoofly blocks made from 1800s reproduction scraps.

The center square of this block is cut from a toile fabric, and has been in my 3.5 in. squares box for a very long time.  It's oriented oddly, but I like it anyway.


Lastly, I made seven Text Me A Quilt blocks.  The pattern is from Scrap Basket Bounty, by Kim Brackett. 

It's funny how many novelty prints are one-way designs.  Most of the darker red prints weren't, but five out of seven of the light backgrounds were one way.
The original quilt used text prints for the backgrounds.  I actually had one this time.  It says "You're My Type".

This block has a secret!  I'm running out of lots of these light print scraps (it's a miracle!), so I had to substitute a different dog print to finish this block.  It's in the three squares in the middle row--can you see it?  Just a fun little surprise for someone with sharp eyes.

It's hard to believe, but we are getting to the end of the year for the RSC.  Next month is our last month, and then we start putting the blocks together to finish what we started.  I have 4 quilts going this year.  Why on earth do I always make so many Rainbow Scrap Challenge quilts?  Must be because it's fun.

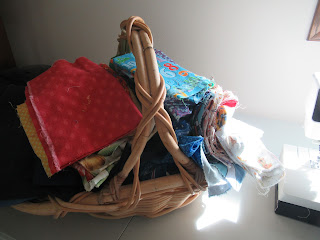
It could also be because it uses up scraps!  In other years, I would have been to several quilt shows and rummage sales, and would be incorporating new scraps I bought into the stash.  (Yes, I actually buy other people's scraps!)  This year, I've been using yardage more of the time, which tends to MAKE scraps, like the ones crammed into the basket above.

It was long past time to straighten this out.  These are what I call my big bright scraps--smaller than fat quarters but larger than the largest strips I save.  I organized them by color and rubber banded them together.  Now I can see what I've got, and easily grab any particular color.  I've done a similar thing for my 1800s reproduction scraps.

Nearly every year, my friend Deb C. and I go to a quilt show in Madison.  Here's us there last year, back when we all did everything in real life.


You might be surprised to know we went again this year.  But this year, it was Virtual.

It was definitely different, but still great.  We each viewed the quilts on our computer/tablet in our own homes, and talked on the phone as we did.  Serious social distancing.

If anyone had overheard us, I'm sure it would have been hilarious.  We were two old ladies trying to navigate some very sophisticated software.  I veered off a time or two and got lost.  We were clicking on these circles on the floor (we called them donuts) that moved us from quilt to quilt, and trying to find our way through a rotating map that made us just a little queasy.

There are some pluses to virtual quilt shows.  No one is standing in front of the quilt you want to look at.  You can zoom in on the pictures if your device allows.  There were even videos from some of the quilt makers explaining their techniques or inspirations.  No need to look around for a vacant chair when you need a rest, you're already sitting in it.  Cups of tea are handy and won't spill on the quilts.  And if you feel like making some slightly bitchy comments (like, why did that quilt get a ribbon when the other amazing one didn't?) no one can hear you except your friend.  

I did miss the real vendor booths.  The online vendor mall was just not the same.


The show went live Sept. 10-12, the usual dates when it's in person.  Amazingly, the show is still online.  I logged in this morning, and all the features seemed to still be there.  It also looks as though you can still register (which just means getting a log in).  If you'd like to check it out, go to quiltshow.com.  (If you try this, please let me know if it works for you.)

There are links at the show to talks/lessons given by some of the teachers.  I enjoyed the one by Weeks Ringle on Palette Building and also Sensational Quilts for Scrap Lovers by Judy Gauthier.  To get to these videos, click the schedule link at the top of the screen and scroll down. 

If you go, please consider donating to support the show.  Just click the Support Us link at the top of the screen and donate online.  The quilt show is PBS Wisconsin's largest fund raiser.

BTW, the quilt above was the winner in the Kids Quilt Challenge, made by quilters under the age of 15!

I can't close today without mentioning the loss of Justice Ruth Bader Ginsburg.  My mom and I have loved her for years.  Mom sent me the bobble head above for my birthday some years ago, and it lives in my kitchen window.  We chuckled together about the Notorious RBG.

Justice Ginsburg is someone all Americans can be proud of.  Her courage, tenacity, humor, and above all her kindness to everyone, including those with whom she disagreed, make her loss very hard to bear.  She will continue to be a role model, and will have an important place in our history.

Have a good week, everyone, and stay safe.


(Does this look weird?   The hand in the middle holding Baby Buddy is Grandpa's.)

Sincerely,

Sylvia@Treadlestitches

Linking up with:

Angela at Superscrappy (home of the Rainbow Scrap Challenge)
Cynthia at Oh Scrap 


Saturday, July 18, 2020

Blue Prints

Welcome to Treadlestitches, a blend of old and new.  Here's what's new--dark blue shoofly blocks for one of my Rainbow Scrap Challenge quilts.
I'm using 3.5 in. strips from my "parts department" to make these blocks.  The center of this one is a random square leftover from something I don't even remember.  (Does this happen to you?)  I think it kind of looks like the plant in Little Shop of Horrors.  "Feed me, Seymour!" 
This time the center is baseball.  I apologize for the light level in the photos--I just couldn't get it right this morning.
This one was my test block, to see if I liked making these Shoofly blocks with the lights and darks in this position.  (Yep, I liked it.  It also uses more dark fabric than light, which is perfect for my scraps.)
And my favorite of this bunch.  The lighter triangles are leftovers from my tablerunner, and the center is from my Obama quilt.  The word Hope is prominent on this square.  Hope is what we need right now.

So that's the blocks made from new fabric.  I'm also working on "recycling" a partially finished quilt top (click HERE for more info--scroll down past the house blocks).  I got a little bit done on that this week.
These are the blue blocks.  I wasn't working on this project when the RSC started, so I'm catching up on light blue plus medium/dark blue.  As I rip the blocks out of their previous setting, I'm sewing them together with white squares to make Double Nine Patch blocks.
Some of these old prints are a hoot.  Blue cherries?  Tied with a gingham ribbon?
I think they may have made a reproduction of this print, or something similar.
This fabric is in several of the little blocks.  What do you think it's supposed to represent?  Is it a window (but not attached to a house)?  Or maybe a phone booth?  I think it looks a bit like the Tardis in Dr. Who.  And what about the background--is it a quilt pattern?  Whatever it's supposed to be, I think it's perfectly weird and I'm glad to have it.
This block is new.  I had to make a couple more, to replace some with really bad stains.  (How does a quilt block from an unfinished quilt get stained?  Was the fabric stained before she cut the pieces?)  Not weird, but it blends in.
Production has slowed to a crawl in my sewing room this week.  I usually sew for a half hour or thereabouts in the morning, but I wasn't able to do that every day, and having the kids full time is an adjustment I'm still making.  I just have to keep reminding myself that I don't have any deadlines, and things will get done "all in good time".

We have had some good times this week!
Our oldest daughter came by with her two kids.  I'm calling them Mr. H and Miss E.  Mr. H is camera shy, so getting pictures of him is a challenge.  Miss E and Little Buddy had lots of fun on Miss E's splash pad.
Check out this band of brothers!  Big Buddy turned 15 this week (I can't even believe it!).  Their mom got them to pose like this.  Little Buddy is goofy as always, and Baby Buddy is just happy to be here.

I'm happy to be here, too!  For the week ahead, I am wishing you hope and joy, wherever you find it.
Cheers for reading,
Sylvia@Treadlestitches

Linking up with:
Angela at Soscrappy
Cynthia at Oh Scrap

Addendum:  The Obama Quilt
I thought I had blogged about this quilt before, but I must have finished it before I started blogging.  Anyway, here are some photos.

The center is a printed square portrait of President Obama I bought at a quilt show, not long after the election.  Doesn't he look young here?  The cornerstones are the fabric I used in the shoofly block.
Each star has a detail from the president's life or an accomplishment as president, written inelegantly in permanent ink by me.
In 2008, there were Obama prints in the local fabric shop (like the Yes We Can/Hope fabric in the cornerstones).  I used the one above for the top and bottom border.  It's kind of crudely printed, but I don't care, it's part of history.
Here's the back, a flag print.
This square celebrates the repeal of Don't Ask, Don't Tell.  The bottom red fabric is a reproduction print named for Sally Hemmings, Thomas Jefferson's slave and the mother of five of his children.

The election of the first African American president is one of the most momentous historical events of my lifetime.  So of course I made a quilt about it!  By the way, we don't use this quilt.  I put it on the bed in the extra room sometimes, especially when we have an election.