Tuesday, November 26, 2013

Turkey Tracks

This is a photo of my great-grandparents, taken around 1914, so almost 100 years ago.  We called them Grandma Bess and Poppy, but their names were William and Bess (Miller) Risley.  The little boy on Poppy's lap grew up to be my grandfather Richard Risley.  The baby is his little sister Mabel.
Poppy got a job on the railroad, where he worked until he retired.  They lived on a small farm near Petersburg, Indiana.  He and Bess had seven children.  Two died as infants, and the other five lived to adulthood.
I was lucky enough to know them later in their lives.  I just barely remember the farm, and Poppy building me a wooden swing to hang from a tree.  We used to go to their house for Sunday dinner in the summer.  Grandma would be cooking happily in the kitchen, laughing and visiting with the women.  Poppy loved playing with wind-up toys with the kids.

Grandma Bess made quilts.  Piles and piles of quilts.  She quilted three quilts every winter.  And all the stitches in the quilts were by hand, including piecing the borders and backing.  It was something she loved to do.  She had a sewing machine, first a treadle that was eventually passed to my grandmother, and then a small black electric that might have been a Singer featherweight.  She used the machine for making clothes, and made the quilts by hand. Poppy would sometimes tease her about buying new material and cutting it up to sew it back together.

This is more what they looked like when I knew them.

When she died in 1969, the family members were allowed to choose the quilts they wanted, by turns.  My grandmother brought home several quilts that were more recently made (1960s).  She was disappointed not to get a red and white cherry basket quilt that she admired.  I've often wondered what it was like.
We slept under those quilts for years.  And my mom washed them (a LOT) in the washing machine.  When they started to get worn, she tried mending them, and eventually gave up and put them away.  When I began to be interested in quilts, Mom gave them to me.  You can see the batting coming through in some of the squares.
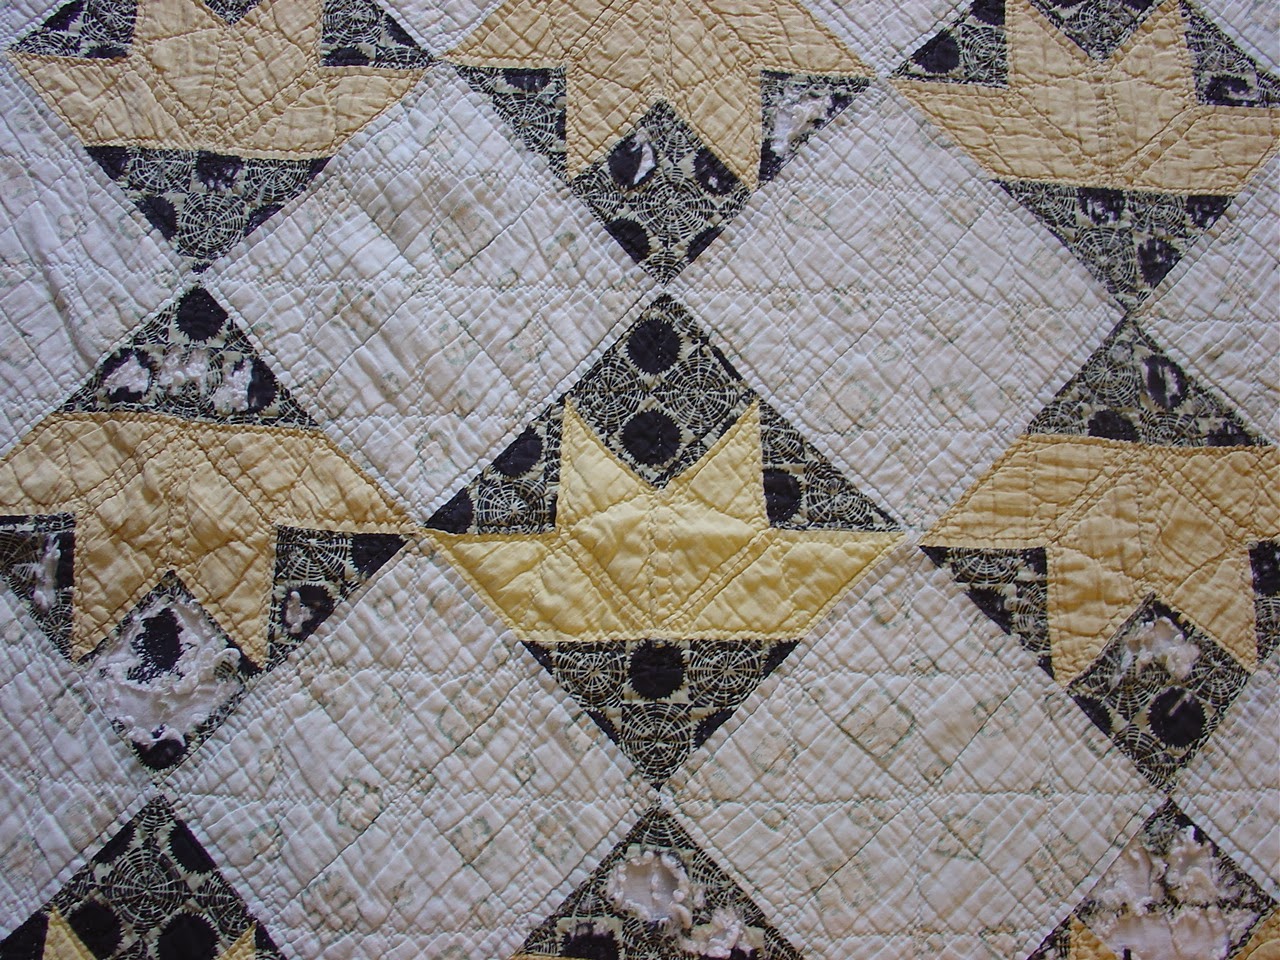
This one was called Turkey Tracks.  It's not the pattern we usually think of by that name.  It does look like the track a turkey makes, though.
We know what Grandma called it, because she embroidered the name and the date she finished it on the back.  I only have one of her quilts that doesn't have this.  She never added her own name, however.  It could be for religious reasons, or just that she was a modest person.
Here's the quilt laid out.  Unlike some of her earlier quilts, this is not a scrap quilt.  The fabrics would have been purchased just for the quilt.  By this time in her life they were living in town, just the two of them, and she would have had more time for quilting.
The blocks themselves are made like sections of North Carolina Lily (Brackman 765 covers most of the variations).  Gotta love that wild black print!

The border treatment is unusual.  I wonder if she was experimenting.  It seems like there should be another black print square on the lower border, but she put a background square there instead.  Did she run out?  Or did she want a sort of floating look?
The worn places don't show up as much when the quilt is stacked, or draped over a chair.  I love to run my hands across the softness of it, and think of family memories.
May the Thanksgiving holiday bring the joy of new memories to you and your family and friends.

P.S.  I'm not decorating for Christmas until Friday, but the Christmas cactus is going ahead without me!


Tuesday, November 19, 2013

Quilt of Honor---Free Pattern

I started this quilt last Monday, in honor of Veterans Day, and just finally finished the top today.  I wanted to show my appreciation, even in a small way, to our service men and women for their dedication to our country.
I come from a military family--Army, Air Force, Navy, Coast Guard, Marines.  I was born in Ft. Knox, KY while my father was in Air Force basic training  in Texas, and my mother was staying with her parents.  My granddad was an army sergeant. 
Today's soldiers deserve everything a grateful country can provide for them, especially respect for their service and sacrifices.
For my quilt, I knew I wanted to use scraps for at least part of it, and of course the color scheme was set--red, white and blue.
If you'd like to make a quilt like this, I'll give you the directions as I go along.  You'll need some basic knowledge of piecing and cutting.
First, I made 20 nine patch blocks.  Each block was made of 4 light print squares (all the same, usually), 4 blue squares (ditto) and 1 red square for the center.  The squares were cut 3.5 in., so the blocks finished at 9 in. square.  You could strip piece these, but I didn't.
These were fun and easy to make, but a little blah.
So I added star sashing in red.
That's better!
The sashings are 3.5 in. wide (cut).  Connector corners are used to make the star points.  These are made from 2 in. (cut) squares.  You need a total of 31 sashes cut 3.5 in x 9.5 in.  Of these, 14 will have star points on only one end.  (Check out the top row and the ones on the sides.)  These will need 28 red 2 in. (cut) squares.  There will be 17 sashes with star points on both ends.  These will need 68 red 2 in. (cut) squares.
To make the connector corners, crease a red square in half on the diagonal.  Lay it on one corner of the sashing piece with the crease going from the center of the sashing to the outside.  Sew on the crease, or just inside it.  Trim and press.  Instead of a crease, you could use a marked line.
Marcia Hohn of Quilters Cache has a good tutorial on making these, which she calls Morning Star sashing:
 http://www.quilterscache.com/M/MorningStarQuilt.html
You will also need 12 red squares for the star centers.  These are cut 3.5 in. square.
Got all those pesky sashes done?  Now lay it all out and assemble the rows.
I added 2 borders, partly because I think most quilts look better with borders, and partly because I wanted to make the quilt a little bigger.  The inner border is cut 2 in. wide.  The outer blue star border is cut 3.5 in. wide.  This is a lap-sized quilt, finishing at 54 in. x 66 in.
I will be sending this top off soon to be quilted by a volunteer long arm quilter, and then given to a veteran.
This is my first Quilt of Honor, but it won't be my last.  One of the benefits of doing this has been finding good fabrics for quilt of honor quilts in my stash.
Here I have them sorted and folded in a basket, ready for the next quilt.  I will probably mix in some other fabrics from my stash or my scraps, but these are definitely patriotic and will be a good start.

I used up some more of my 3.5 in scraps in this quilt, even though I only used red, white, and blue.  After dumping everything out on the table, I was able to put in back in neatly, like this:
I don't think I'll ever really use up my scraps completely, but they're great to work with, especially when they're organized.  Thanks, Bonnie Hunter, for the inspiration.
If you'd like to make a Quilt of Honor, here's the web site with the instructions/rules, etc.
Quilt of Honor Quilters

May God bless all our veterans.


Tuesday, November 5, 2013

Quiltmaking By the Book

As a former librarian, I must admit--I love books.  Computers, too, of course, but there's something about curling up on the couch with a new book full of beautiful photos.  I have a large collection of quilting books, from state quilt history books to the newest techniques and patterns.  But when it comes to actually making a quilt, I often fall back on traditional patterns and my scraps.  The books are more for inspiration.
Except recently, when I was inspired to make quilt tops from two terrific books.

This quilt is called "Joy in the Morning", and the pattern is from S is for Scraps:  18 Great Quilts by Gayle Bong.  It's the first quilt in the book.  I passed it over at first, and bought the book for a different quilt pattern, but when I saw how easy this one was, I had to make it.
I bought the book at Half Price Books--a lucky find!


The original quilt was set with a screamingly bright yellow, which I replaced with a turquoise blue.  I knew I would have lots of yellow scraps in my quilt, and not a lot of turquoise.  The original was also much smaller.  I made 56 blocks (7 x 8) instead of 30.  I added a border of squares to the outside of the quilt after the solid border.
My first thought was to use up the 3.5 in. squares I had left from other kid quilt projects, but of course I had to cut even more (this always seems to happen).  Now that it's done, I think I have just as many squares as when I started!  I only used what I had on hand, however, for the whole quilt top. 

I needed to make it at least a twin size, because this quilt is for our charity work at Ties That Bind Quilt Group.  We're making quilts for people who have been homeless, who are now being helped into housing.   They will get to keep the quilts no matter what happens.  I hope this one goes to a child who will love and use it.

 Do you ever check out a book from the library, and then not want to take it back?  That's the problem I'm having with this book:  Dessert Roll Quilts:  12 Simple Dessert Roll Quilt Patterns by Pam and Nicky Lintott.
You probably already know dessert rolls are sets of 5 in. wide strips sold in coordinating patterns and colors in quilt shops.  Once again, I had my mind on a different quilt, when I noticed how easy this one was:
It's called Highland Fling, and all of the pieces for each block are cut from 5 in. strips.  (Seriously.  The triangles too.)  Some patterns with tilting squares are very wasteful, having you make the block on the square and then cut it "crooked".  This one doesn't waste a thing, so of course fabric hoarders like me can love it.

The fabrics were picked out by our wonderful charity quilt chairs, Colleen and Joan L., and put in a shoebox for someone to take home.  I've been trying to figure out what to do with them for months.  I wanted something that would show off their pretty prints.  Great job on the colors, ladies!
All these cherries reminded me of Door County, and that reminded me of dairies, so I added the cow fabric.  It's a cute print by Luella Doss that I've been cherishing for years.  Luella has been involved with the Quilt Museum since the beginning as one of the founding mothers.  It's because of her that I first became a volunteer.
This quilt is also for our charity project.  I'm thinking about making another one in different colors, for me.

Because these are copyrighted designs, I can't pass along the patterns (sorry).   But if you see these books somewhere, like the library or the bookstore, they are definitely worth having/borrowing.  And don't worry, Germantown quilters, I WILL return the book to the library.  Really.  There are a couple more patterns I want to try out first, though.  And did I mention there are recipes?

May all your days be pieceful.


Wednesday, October 30, 2013

Emma Paul's Quilt

As some of you know, I'm the documentation chair for the Wisconsin Museum of Quilts & Fiber Arts.  I've been working hard to catch up with entries lately, now that I can work comfortably at the computer for longer periods of time.  I thought you might like to see some of the beautiful quilts we have documented and are entering into the Quilt Index.
This beautiful scrap quilt belongs to the New Berlin Historical Society.  According to the former owner, when Emma Stickels Paul was 21 years old, in 1862, she made this quilt in Mukwonago, Wisconsin.
The quilt is hand pieced and hand quilted.  We've identified the pattern as Brackman #2050, which has the name Indian, given to it by "Nancy Page" in the 1930s.  We really have no idea what Emma called the pattern.  The backing is unbleached muslin.  The binding is the same green as the sashing and borders, applied separately.
There are floral shapes quilted into the center squares, which are hard to see.  On this square there is a tiny spider web embroidered in white cotton.  We thought it might be a darn, but it isn't--there is no hole.
This is the most interesting find on the whole quilt:  the letter "A" embroidered in chain stitch with white cotton on one of the center squares.  Did Emma make it for someone whose name started with an A?  Or was Emma even the maker of the quilt?  Could the A stand for someone else who made the quilt?  Or someone who helped?
The donor of the quilt inherited it from his mother, who acquired it from Emma's husband.  The donor was Emma's nephew.
It would be fun to trace the genealogy of the family.  The date of 1862 seemed right to those of us who saw it in person, which included 3 AQS certified quilt appraisers.
Wouldn't this be a fun pattern to sew?  I think I'd make it as an 8 in. block, with a 4 in. center square, four 2 in. squares for the corners, and 8 triangle/squares that finish at 2 in.
If you made the center square 6 inches, and the squares and triangle/squares 3 in., you'd have a 12 in. block.
I'll be entering this quilt into our section of the Quilt Index in the next few days.  We already have 448 quilts entered.  If you'd like to see them, or any others, just point your browser to
http://www.quiltindex.org
Happy quilting!


Thursday, October 10, 2013

Feed Sack Pinwheel Tutorial

I'm having fun making these blocks with feed sack squares left over from the Flying Squares Quilt.  I thought I'd share it in case anyone else would like to make one.

Here's a simple block to make with feed sacks and solid cottons.  It finishes 8 in. square.
For each block:
Cut 4 2.5 in. squares of print feed sacks, 2 of each print, and make a four patch.
Cut 4 rectangles from the white feed sacks, each measuring 2.5 in. x 4.5 in.
Make 4 triangle-squares that finish 2 in., using your favorite method, from white feed sacking and a solid color that goes with the print feed sacks.  I like to use the Easy Angle tool and cut the triangles from 2.5 in. strips.  Then I sew them together in pairs.

Here are all the pieces laid out, with the four patch sewn.

Now the triangles are sewn into squares.

Next, sew the triangle squares onto one end of the rectangles, as shown below.
Here's the block laid out, ready to sew.  As with the flying squares, the first seam is a partial seam, then all the other rectangles are added.  Finishing the partial seam is the last step in finishing the block.
And that's that!

It is so much fun choosing which solid color to use in each block.  I have a big scrap bag of solids to root around in.  The solid colors can really change the look of the block.

Have fun!


Wednesday, October 9, 2013

Fall Harvest

In the fall of 2003, I participated in a Treadle On block exchange, which resulted in the quilt above.  The rules were a little unusual.  We made blocks in 3 different sizes--12 in., 9 in., and 6 in. finished.  We could use any leaf pattern we liked, with the leaves in fall colors.  The backgrounds were to be dark, like the forest floor.  And of course, all the blocks were to be sewn with treadle or hand crank sewing machines.
Waiting to get my "squishy" (technical term for the package of blocks) in the mail was like waiting for Christmas when I was six.  It was so worth it!  The variety of blocks and prints was wonderful.  It was fun laying them out on the floor and fitting them together.  I added a few blocks with light backgrounds to jazz it up a bit.   I made lots of flying geese for the border on my Minnesota A, looking out the dining room window. 
It's been 10 years now, and I can hardly believe it's passed so quickly.  My favorite time to work on this quilt was in the fall.  It was hard to make myself do the quilting any other time.  I just finally finished the quilting last year.
I'm including a few more pictures.  If you see a block you made, could you let me know?  I once had a list of all the participants, but I'm afraid it disappeared.  I know Windy Cindy made the pink batik blocks.


I'm finding that I really love the color orange!  Maybe it's just this time of year, but I'm seeing orange everywhere and really enjoying its mellow brightness.

These pumpkins are garden "volunteers".  Their seeds were in the compost, and the vines came up everywhere.  The big green one is slowly turning orange.  I bought the butternut squash at the farmers market.
I'm still working on the feedsack pinwheels, and I will post a tutorial shortly.  Even there, I'm finding bits of orange.
Here's hoping you are enjoying this season too.

Monday, September 23, 2013

Around My Kitchen Table

I had a wonderful weekend.  It started on Friday, with a visit from a friend.  She brought a lovely old hand crank sewing machine, which had been cleaned and oiled beautifully by her husband.  In short order we got it sewing and winding bobbins.  It made a wonderful stitch.  Not bad for something over a hundred years old.
I sewed along with my Jones handcrank (made in the 1920s, I think), making 4 patches from feedsack squares.
I started out using up scraps from my last feedsack project, the flying squares quilt.  In that quilt, all four squares were different.  In this quilt, I'm using two each of two prints.  It was fun figuring out the combinations.  Some are pretty and some are, well, not.
Here's the block the 4 patches will be part of.  It's a pinwheel block, #1121 in Barbara Brackman's Encyclopedia of Pieced Quilt Patterns.  I changed it a little, to make fewer seams.  Doing so made it another block that needs a partial seam.  If you'd like the pattern, leave a comment, and I'll write it up.

The most fun was just spending the day sewing together, catching up and chatting.  We worked in the kitchen, because I'm not really set up to work in the basement with anybody else.  I need to change that, I think.  Although it was very convenient being near the food and beverages.

That evening we ate supper at the kitchen table and visited together.  Then my husband and grandson watched a movie and my friend and I just talked.  And laughed.

On Saturday we had a family birthday party for my youngest daughter.  We brought in lots of chairs and packed around the table, and I bet they heard the laughing in Milwaukee.  We did this at lunch and again at dinner, with a changing cast of characters.  After dinner we played a charades game.  More laughing, more fun, more sharing, around the kitchen table.

Sunday was a quieter day.  Since I already had everything I needed for sewing handy, I set up again on the kitchen table, and finished the 4 patches.  Then I started working on a charity quilt.  My friend had given me a huge batch of 2.5 in. strips, cut from pillow panels.  She had sewn lots of the strips into sets of 3, so it was easy for me to press, cut, and assemble 9 patch blocks.  I'm wondering how many quilts I can make out of these strips.

I learned so much this weekend.  My friend's insight into how to solve some of my quilting problems has made me think.  I learned more about her life and the place quilting has in it.  I learned that I can happily let go of stuff I've kept for years if it goes to a good place.  And I'm trying not to worry so much about having the house "perfect" before I invite anyone over.  Getting older is teaching me that life is NOW.

So thanks for coming over this weekend, family and friends.  You are more than welcome here.  I love to see you around my kitchen table.

Isn't this a great quilt top?  Thanks, Joey!