Showing posts with label free quilt pattern. Show all posts

Friday, September 22, 2017

Scrappy Chevrons

Hello!  Welcome to my blog!  Fall is in the air here in Wisconsin, so I'm taking some pictures outside before the snow starts to fly.
Today's finish is a scrappy chevron quilt.  I just can't resist chevrons.  It must be something about the cheerful ups and downs.  This quilt will be donated to a local family in need.
I got started on this completely by accident.  It's really the fault of Angela at soscrappy for hosting the fabulous Rainbow Scrap Challenge.
One set of my blocks for the challenge this year are little houses.  I'm cutting the roof pieces for the houses from 3.5 in. strips, like this:
I use my Companion Angle ruler, as you can see.
Just one problem...
There's a triangle left over on the left, and the strip now has an angle.  Not to worry, I can fix that!
Using my Easy Angle ruler, I cut a triangle from the strip, and made sure the first triangle is perfect.  Now I've got a roof for my house block, a straight strip to go back in the 3.5 in. box, and 2 extra triangles.
What can I do with the extra triangles?
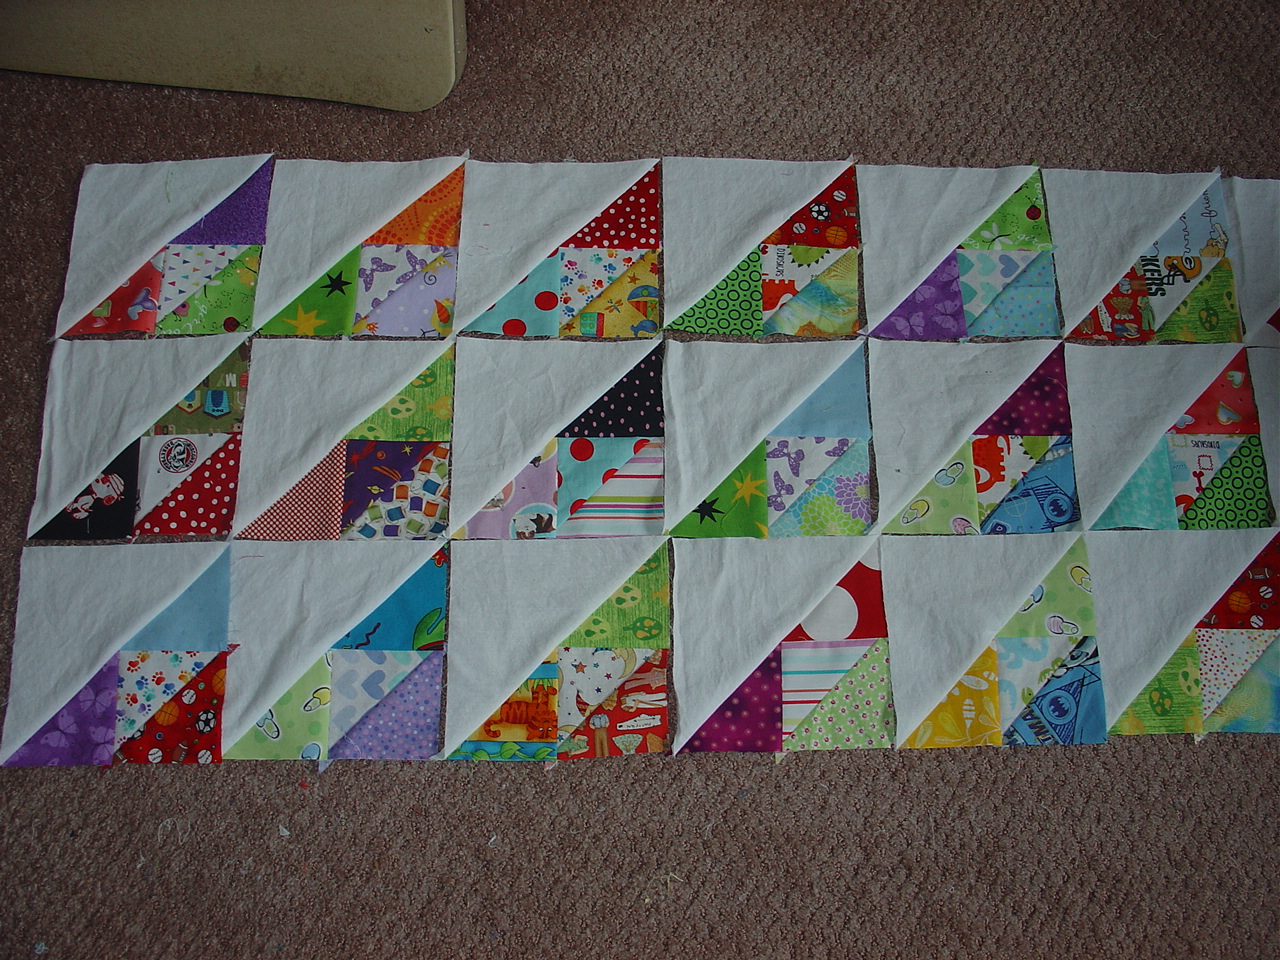
How about this?  I can sew a dark print to a light print to make a square.  Then I can add two more dark triangles to make a larger triangle.  Adding a plain white triangle makes this a 6.5 in. (6 in. finished) block.  So each block uses 3 scrappy dark triangles and 1 light one.  Since the roof pieces for my houses are all dark, this worked out.  I just had to cut mostly light pieces.
I was thinking about setting them like this, but then the Chevron juju took over.
Here are all the blocks, 99 of them, to go 9 across and 11 down.
And here's the finished quilt, laid out on the floor.
If you'd like to make one of these, here's the recipe.
For each block, cut 1 light and 3 dark triangles from a 3.5 in. strip with the Easy Angle ruler (or any other ruler that works).
Sew a light triangle to a dark triangle to make a square.
Add a dark triangle to the top of the square. It should be touching the light triangle, and the right angle should be on the right.
Add a dark triangle to the left side of the square.  It should also be touching the light triangle, and the right angle should be on the right.
Cut white triangles from a 6.5 in. strip with the Easy Angle or other ruler.
Add the pieced triangles to the white triangles to make a 6.5 in. square.
(It works best to press after each of these steps.)
Make 99 blocks.
There are two kinds of rows that make up the quilt, row A and row B.  For row A, arrange the blocks so that the white triangles form a larger triangle, like the bottom row on the quilt above.
For row B, arrange the pieced triangles to form larger triangles across the row.
Alternate the rows in the quilt.  You can start with either one.  I started with an A row, so I made 6 A rows and 5 B rows.  If you start with a B row, make 6 B rows and 5 A rows.
I added 3.5 in. wide borders (because that was all I had of that wonderful fabric!).
The finished quilt should be roughly twin-sized, about 60 in. wide x 72 in. long.
I quilted it simply, up and down across the quilt, with the presser foot against the seams.  I added a row of quilting in the plain white areas using the quilting guide attachment to keep it straight.  Well, mostly straight.  The binding is red bandana print, just for fun.

BTW, here's the house block I was making:

 Why on earth didn't I buy more of that gorgeous orange?
 Have a lovely pieceful week!
Cheers,
Sylvia@Treadlestitches
Linking up today with
Busy Hands Quilts
Crazy Mom Quilts
Can I Get A Whoop Whoop


Friday, March 25, 2016

Joy of Springtime

Here is the picture postcard out my window this morning.  Not November, not January, March.  Late March.  This is springtime in Wisconsin.
Yesterday's storm coated the trees with ice, which is very pretty, but not good for the trees.  Thankfully it's melting today in the sunshine.
You can see the sun reflecting on my newest quilt top, which I'm calling Joy of Springtime.  It was pieced on my Singer 66 treadle sewing machine.
Here's the whole quilt, laid out on the floor.  It's a two-block quilt, consisting of 4-patches and a square we sometimes call Broken Dishes.
I made all the blocks for this quilt from my 3.5 in. scrap strips, with white 3.5 in. strips added for the triangles.
Here's the recipe:
Cut 3.5 in squares from scraps in matching pairs.  You will need 100 pairs, to make 50 blocks.  The blocks measure 6 in. finished (6.5 in. unfinished).
For each broken dishes block, use your favorite method to make 4 squares consisting of two triangles each, one scrap and one white.  I used the Easy Angle ruler, so I could cut the triangles from the 3.5 in. strips I already had.  Make 49 blocks.
Arrange the finished blocks in 11 rows of 9 blocks each, alternating the 4 patches and broken dishes blocks.  As you can see in the photo, I started with a 4 patch in the odd numbered rows and a broken dishes block in the even rows.
I added a 5 in. finished (5.5 in. cut) green border on each side.
The finished top measures approximately 64 in. x 76 in., making it roughly a twin sized quilt.
My quilt will be given to a homeless shelter in my area.  The people who receive these quilts get to keep them.  I'll be handing the top off to be quilted by the wonderful ladies in our group who have long arm machines.  When it's done, I'll bind it, and it will be off to warm someone.
I did finish a couple of things this week.  It's still Babymania around here.
I made a little striped sweater, toddler sized, for the new baby.  Fun to knit, but weaving in all those ends took almost a whole evening.  Next I think I need to knit a baby blanket.  (That will take a lot longer.)
I also used some of my ridiculously large stash of cute flannel to make some burp cloths.
This is a commercially-made burp cloth from Carters, that someone gave my daughter.  It's a little the worse for wear, which is normal for a burp cloth.  The center is one of those pre-folded cloth diapers.  I used it for an idea of size.
To make these, I cut a piece of flannel 10.5 in. x 17 in.  I also cut a piece of terry cloth the same size.
Here's the back.  Nothing could be simpler than these things.  I just put them right sides together, and sewed them around the edge, leaving an opening for turning.  Then I turned it right sides out, pressed it, pinned the opening shut, and top stitched around the whole thing.  I used a decorative stitch on my electric machine.
These were so fast and easy it was hard to stop making them!  Here's one with Winnie the Pooh flannel.
Check out this cute fabric!  It was a remnant at the fabric store.
And of course, cars and trucks.

In spite of recent weather, it really is springtime, even here.  The plants and trees will survive the snow, and bloom.  We'll walk outside without our winter coats, and the farmers markets will open again.
In the meantime, it's a good day to sew.
Enjoy the sunshine!


Tuesday, March 31, 2015

Half Log Cabin Quilt Block Tutorial

So much strippy fun this week!  I'm making half log cabin quilt blocks, from 1.5 in. strips.  I started these as leaders and enders, but they have a way of breaking out and becoming the main project.
In the last blog post, I showed a picture of the overflowing drawer these strips usually live in.  Since then, I have divided them into dark and light strips, and put them in baskets.  The strips on the desk are shorter ones, to use first.
Think I'll have enough strips?  When I took this picture, I had already made 75 blocks.
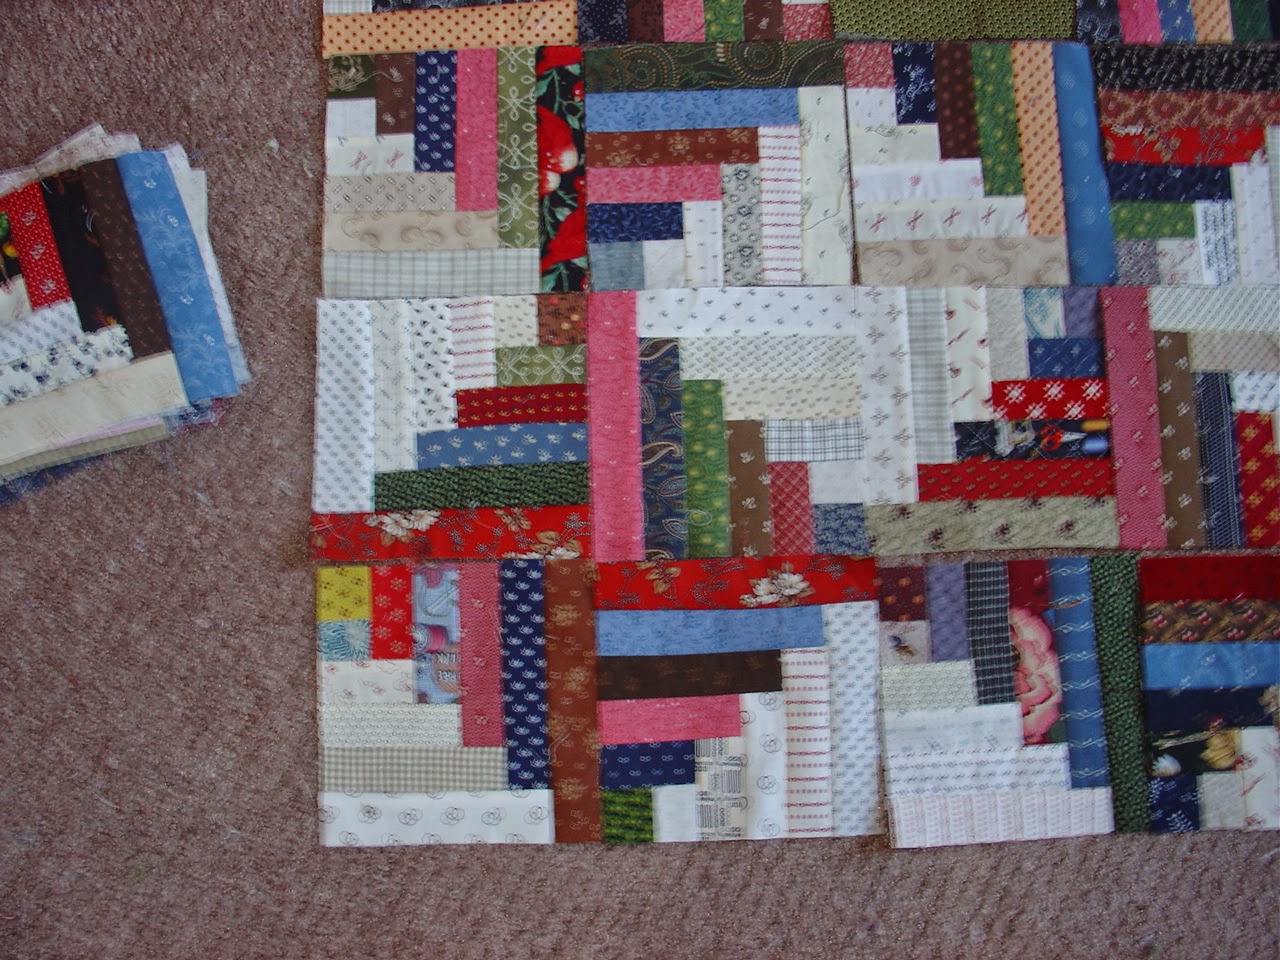
This is what the blocks look like.  There are 5 light strips and 6 dark strips.  The blocks measure 6.5 in. if you sew them perfectly.  Mine are not all perfect, so I'm trimming them all to 6.25 in. to match the smallest ones.
Here's the layout I decided on--Sunshine and Shadows.  There is not much seam matching in this layout, and I've always wanted to make one like this.
This is a closeup.  I will probably move these around a lot before I finally settle on which block goes where.  Just looking at this photo makes me want to switch some of them.   Right now I see a lot of pink in the blocks, which kind of surprised me.
I consulted a couple of books before deciding how to sew these.  My method is a lot like how I sew string blocks, and is a fun way to work if you like scraps.
Okay, here we go.
Half Log Cabin Block Tutorial
Step 1:  Sew two 1.5 in squares together.  One square is light, and the other is dark.  Easy peasy.
You can sew strip sets if you want to have several blocks with the same centers.  I didn't, so I cut squares.  Press toward the darker square.  Press after each addition.

Step 2:  Add a dark strip to the side of this unit.  Put the pieced unit face down on the dark strip, with the light square at the top, and sew.  Press toward the new strip.

Trim the strip even with the pieced unit.  I use (gasp) scissors and eyeball it.  You could use a rotary cutter if you like.  You will be doing this with each strip added from now on.

Step 3.  Now add a light strip to the pieced section.  Lay it out like this, put the pieced section down on top of the strip, and stitch.  Press and trim.

You will be repeating these steps over and over.  Be careful, and keep the seam ripper handy--it is very easy to get mixed up.
Step 4:  Add another dark strip.
Here's how the block should look each time you add a dark strip.  Notice where the first dark square is. (It's the one with the dots.)

Step 5:  Adding a light strip.  Notice where the beginning square is here?  The blocks should always be in this position when adding a light strip.


Naturally, I'm chain sewing the blocks, but I like to have ten or so of them going at a time, at different stages.  I don't want any of my blocks to be exactly the same, so I don't add them to the same strips of light and dark.   I take the blocks to the iron after each round, and I add in new ones to replace ones I've finished.


When I trim a strip, if there is only enough left for a 1.5 in. square, I put those pieces in this little basket on the treadle cabinet.  Then I can pull pieces from here to cut for the center squares.  (If the trimmed piece is smaller than a 1.5 in. square, I actually throw it away!)

Here's our block, all finished.  I have pressed it, and trimmed it to size.
And here's the back, with the seams all pressed toward each new strip as added.
You could just keep going, if you wanted larger blocks.  I kind of like these little ones.  I think I'll need at least 120 of them for a twin sized quilt.

In other news, UFO#4 is pin basted and ready to quilt.  If I could just stop sewing these half log cabin blocks...

Spring is trying to break through today, and the dog and I need a walk.
Have a wonderful week!


Monday, February 23, 2015

Variations

This is a quilt we recently added to the Quilt Index. The owners think it was made by Margaret Wisher, possibly in Dubuque, Iowa.
Something about this quilt inspired me.  The red is still so vivid, although the triangles, stem, and leaves have faded from the original green to tan.  We see this fading often in quilts made in this time period.  The green synthetic dye is sadly unstable.  The quilt dates to around 1875.
It's really unusual to see this kind of block set on the straight, rather than on point.
When we documented it, we could not find an exact pattern match among the thousands of quilt patterns in our reference books.  It's similar to one called English Ivy (Brackman #1330), but it's not exactly the same.  It's a variation.
Variation is a useful term in documenting quilts.  Quilt makers are endlessly inventive.  Sometimes variations happen because we're trying to replicate something we saw somewhere, and it comes out differently than we expected.  Or we start out to copy a pattern, and then think, what if I changed this or that?  We add seams, and leave them out.  We change the colors, or reverse background and foreground.  We change the size or the set.
This is my variation of this variation.  One of the other names for the English Ivy pattern is Clover Blossom.  I'm calling my variation Red Clover.

One of the things that drew me to this quilt was the ease of drafting the pattern.  The original English Ivy pattern is much more difficult, with several sizes of triangles.  This version is just squares and half-square triangles, with a bit of machine applique.

I mostly left the colors the same, although I used print fabrics instead of solid colors.  I did change the small squares in the corners.
This is what the block would have looked like if I put the green squares on the corners, like the original, instead of background squares.  I just think it looks kind of clunky.
I also left out the leaves, just for simplicity's sake.
My version is a 12 in. square (finished) block.  The original blocks measured around 9 in. square, which I didn't know until I had drafted my version and made the first block.
I made 12 blocks, which will make a relatively small quilt.  Here's how I'm going to set it:
I'm using a three strip sashing of solid red, green print, and solid red.  The cornerstones are nine patch blocks.
This is an old, classic set.  I'm pretty happy with it, especially the vividness of the red.  I've been so drawn to red lately.  Wonder if it's because it's still so wintery outside, with white snow everywhere and bare branches on the trees?

Here are the directions, if you would like to make my version of this block.

Red Clover Quilt
12 in. block (finished)
To make one block:
You will need 2 half square triangles made from red print and background fabric, that measure 4 in. square finished.  I made these using the Easy Angle.  I placed a strip of background fabric face down on a strip of red print fabric, each 4.5 in. wide, and cut the triangles with the Easy Angle.
You will also need 13 half square triangles made from green print and background fabric, that measure 2 in. finished.  I made these by placing a strip of background fabric face down on a strip of green print fabric, each 2.5 in. wide, and cut the triangles with the Easy Angle.
You can make the triangle squares any way you like, as long as they end up measuring the same.
That takes care of the triangles!
You also need:
From background fabric, cut:
1 square 6.5 in. x 6.5 in.
2 squares 2.5 in. x 2.5 in.
From red print fabric, cut
1 square, 4.5 in. x 4.5 in.
From green print fabric, cut
1 rectangle, 2 in. wide x 10.5 in. long (this is the stem).
It looks like quite a pile, but it goes together easily.
First, sew all your triangles.  This is the most time consuming part of the block, and it really doesn't take that long.  Just chain them through, and press toward the dark.
Next, take the stem piece, fold it right sides together, and stitch.  Press the seam to the back of the stem, so it cannot be seen.  You can use applique bias bars, a thin piece of cardboard, or just moosh it.  I mooshed it.
Now pin the stem diagonally across the 6.5 in. background square, and top stitch on both sides, using green thread.  I'm using my chain stitcher here, so I don't have to keep changing thread on my treadle.  It also helps that I didn't have to wind a bobbin.  This is a good project for using two machines, one threaded with green and one with neutral for piecing.  ( I knew I collected all those machines for a reason!)

Now lay out the block.  A lot of it is already done.
I made this block in quarters.  The lower right quarter, with the stem, is already done.
Here I'm sewing the upper right quarter.  I sew the two triangle squares on the right together, then add them to the large triangle square.  I then sew the triangles on top to each other, and add the background square.  The last seam joins these sections.
The lower left quarter is sewn the same way.
Be careful!  These sections are not identical.  (This is why I lay the blocks out next to the machine.)
The upper left section is sewn in pretty much the same way.

Once you've got these sections sewn, you just join them together.
I used a variety of different reds and greens, to make it sort of scrappy. 
The sashing strips are cut 1.5 in. wide and 12.5 in. long.  The nine patch corner squares are made from 1.5 in. squares, and the nine patch finishes at 3 in. square.  I suppose you could strip piece them, but I find that it wastes fabric, so I just cut the squares.
I'm hoping to work on this quilt today, to get all the sashing and cornerstones made and decide on an outside border.  I finished the leaders and enders 4 patch blocks yesterday, so I guess today I'll work on a charity quilt as a leaders and enders project.  It's amazing what we can get done this way.

Keep warm, and keep sewing!