Showing posts with label chevron quilt. Show all posts

Friday, September 22, 2017

Scrappy Chevrons

Hello!  Welcome to my blog!  Fall is in the air here in Wisconsin, so I'm taking some pictures outside before the snow starts to fly.
Today's finish is a scrappy chevron quilt.  I just can't resist chevrons.  It must be something about the cheerful ups and downs.  This quilt will be donated to a local family in need.
I got started on this completely by accident.  It's really the fault of Angela at soscrappy for hosting the fabulous Rainbow Scrap Challenge.
One set of my blocks for the challenge this year are little houses.  I'm cutting the roof pieces for the houses from 3.5 in. strips, like this:
I use my Companion Angle ruler, as you can see.
Just one problem...
There's a triangle left over on the left, and the strip now has an angle.  Not to worry, I can fix that!
Using my Easy Angle ruler, I cut a triangle from the strip, and made sure the first triangle is perfect.  Now I've got a roof for my house block, a straight strip to go back in the 3.5 in. box, and 2 extra triangles.
What can I do with the extra triangles?
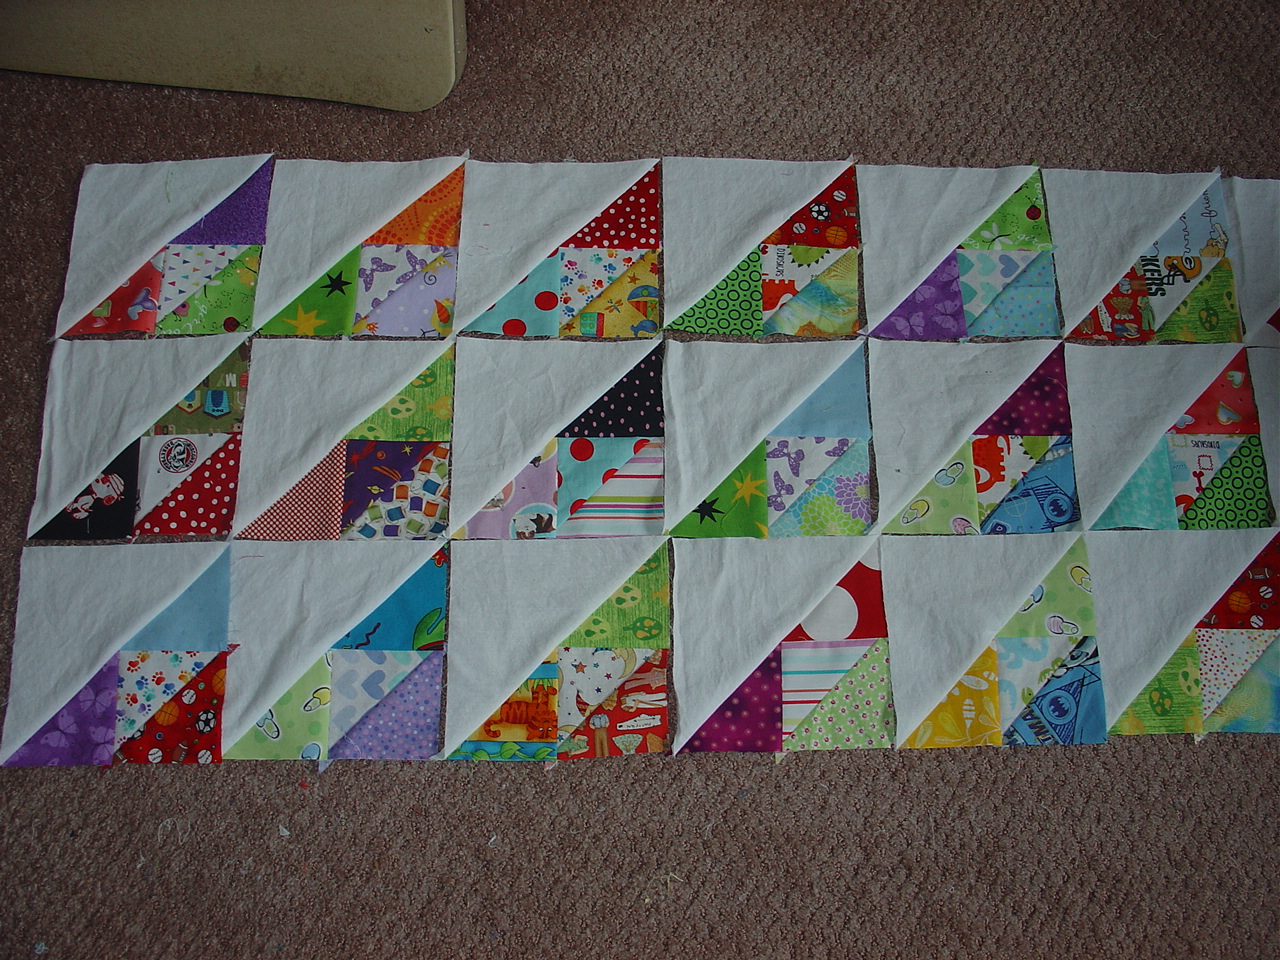
How about this?  I can sew a dark print to a light print to make a square.  Then I can add two more dark triangles to make a larger triangle.  Adding a plain white triangle makes this a 6.5 in. (6 in. finished) block.  So each block uses 3 scrappy dark triangles and 1 light one.  Since the roof pieces for my houses are all dark, this worked out.  I just had to cut mostly light pieces.
I was thinking about setting them like this, but then the Chevron juju took over.
Here are all the blocks, 99 of them, to go 9 across and 11 down.
And here's the finished quilt, laid out on the floor.
If you'd like to make one of these, here's the recipe.
For each block, cut 1 light and 3 dark triangles from a 3.5 in. strip with the Easy Angle ruler (or any other ruler that works).
Sew a light triangle to a dark triangle to make a square.
Add a dark triangle to the top of the square. It should be touching the light triangle, and the right angle should be on the right.
Add a dark triangle to the left side of the square.  It should also be touching the light triangle, and the right angle should be on the right.
Cut white triangles from a 6.5 in. strip with the Easy Angle or other ruler.
Add the pieced triangles to the white triangles to make a 6.5 in. square.
(It works best to press after each of these steps.)
Make 99 blocks.
There are two kinds of rows that make up the quilt, row A and row B.  For row A, arrange the blocks so that the white triangles form a larger triangle, like the bottom row on the quilt above.
For row B, arrange the pieced triangles to form larger triangles across the row.
Alternate the rows in the quilt.  You can start with either one.  I started with an A row, so I made 6 A rows and 5 B rows.  If you start with a B row, make 6 B rows and 5 A rows.
I added 3.5 in. wide borders (because that was all I had of that wonderful fabric!).
The finished quilt should be roughly twin-sized, about 60 in. wide x 72 in. long.
I quilted it simply, up and down across the quilt, with the presser foot against the seams.  I added a row of quilting in the plain white areas using the quilting guide attachment to keep it straight.  Well, mostly straight.  The binding is red bandana print, just for fun.

BTW, here's the house block I was making:

 Why on earth didn't I buy more of that gorgeous orange?
 Have a lovely pieceful week!
Cheers,
Sylvia@Treadlestitches
Linking up today with
Busy Hands Quilts
Crazy Mom Quilts
Can I Get A Whoop Whoop


Friday, February 24, 2017

The Waiting Room

I have visited a few waiting rooms lately, while getting some routine appointments out of the way.  Most of them have been surprising comfortable, with magazines definitely younger than my children, and (mostly) music that doesn't make you want to jump off a building.  And I haven't really had to wait very long.  A couple of times I barely got settled before they called my name.
This is the quilt waiting room in my sewing room annex, aka the closet.  Some of these "patients" have been waiting a long, long time.

I usually don't let the guilt of UFOs get to me.  I tell myself this is my hobby, not my job, and I can go with the flow, piecing whatever takes my fancy.  But once in a while, common sense has to break through.
I can't use and enjoy ANY of these quilts, and neither can anybody else, until they are finished.

Maybe if I just get started, I could make a dent in this backlog.
So what about the baby quilts, and the small quilts?  I can easily quilt those myself on my Pfaff.
How many could there be?

There were TEN of them.  Seriously.  They're not even pictured above.  Almost all of them are donation quilts.
So first I finished this one:
It's a Chevron pattern, made with HSTs.
Here's a detail.  Some of these fabrics are from the yardage I used for tablecloths at my grandson's baby shower last April.
The back was more of the fabric from the shower.
Here's a closeup, kind of bleached out from the sunlight.  Each square has a zoo animal or two.  These fabrics can be hard to use on the front of the quilt because the printed lines are rarely straight, but it works nicely as a back.
I finished an almost identical quilt late last April.  I modified a pattern from the Moda Bakeshop, which you can find HERE.

One down, 9 to go.
You might need your sunglasses for the next one.
This red, blue, and yellow quilt has been hanging around the quilt waiting room for about a year.  I used a Quilts for Kids simple pattern which you can find HERE as a pdf.
The main fabric is this blue bug print, complete with realistic bugs.  I also found some other bug prints to go with it.  Most of these fabrics were purchased second hand.
I marked the quilting lines with soap, which worked well.  I quilted in the ditch between the blocks, and then did this diagonal grid over the top.
The back is a sports print.  This quilt will be donated to a child who likes sports and bugs.

So that leaves 8 more small quilts to finish.
I spray basted these 4 last night after supper.  Yes, that's more of the bug print on the bottom quilt, but it's a different quilt.  I think there is still more of that fabric in the basement.
These 4 will be the next to be quilted.

And then what?
And then these 4!  All four of these have a backing, but no batting.  When I get the first batch done, I'll cut all 4 battings at once from a large batt, and spray baste these little quilts.

I'm fired up now, and ready to get stuff quilted.  I don't know how long this mood will last, so I'd better get back to the machine.  I've got bobbins to wind and stitching to do.

And when I finish these, there are the (gulp!) big quilts!

Happy stitching!
Sylvia at Treadlestitches

I'm linking up with Myra at Busy Hands Quilts and Amanda Jean at Crazy Mom Quilts this week.


Friday, April 29, 2016

Chevron Quilt Finish

Last Saturday was a beautiful day here.  I'm getting in the mood for spring cleaning, and washing some of the quilts we use most often.
I spent some of the weekend making this Chevron quilt top, inspired by a pattern from the Moda Bakeshop called Scrumptious Scrappy Chevron Picnic Quilt, made by Rhonda of Patchwork Sampler.
(Click here for the free pattern link).
I changed the pattern, of course, because somehow I never can quite make myself follow all of any quilt's directions.  I made the quilt baby-sized, and instead of squares pieced from rectangles between the chevron rows I just added strips.

The blocks are made from 4 half square triangles of prints with white.  There are 16 blocks in my quilt.  Below you can see the very basic quilting.

When I got the top finished, I laid out a queen sized Warm and Natural batt, and laid the backing for this quilt, plus 3 other small quilts, on it.    (The blue fabric on the left is on the back of the Chevron quilt.  The print is a one-way design of Winnie the Pooh, writing about friendship.)
I then cut them out.  This didn't waste much batting at all--there was only a short strip left over to go in the scrap batting bag.
On Monday, I made the binding from the same fabric as the borders, and sewed it together on my trusty Singer.
On Tuesday, I finished the quilting and added the binding by machine.  For quilting and binding I used my Pfaff electric.  I once used a Davis VF for that job, but I had some serious tension issues and finally had to give it up.
So here's my finish for the week, a Chevron quilt made from fabrics we used for tablecloths at the baby shower.  There are lots of animal prints here, which I hope will be cheerful for a baby and the baby's family.
There are lots of uses for clothespins besides hanging out the wash!  Instead of a fancy book holder, I use clothespins to hold cookbook pages open when I'm cooking or baking.  Here I'm making granola from one of my favorite cookbooks:

The Homemade Pantry, by Alana Chernila.  You can find her blog at Eating From the Ground Up.

Use what you've got, I always say.  And, if you can, make it yourself!

Have a lovely week, whatever you do.