Here is the picture postcard out my window this morning. Not November, not January, March. Late March. This is springtime in Wisconsin.
Yesterday's storm coated the trees with ice, which is very pretty, but not good for the trees. Thankfully it's melting today in the sunshine.
You can see the sun reflecting on my newest quilt top, which I'm calling Joy of Springtime. It was pieced on my Singer 66 treadle sewing machine.
Here's the whole quilt, laid out on the floor. It's a two-block quilt, consisting of 4-patches and a square we sometimes call Broken Dishes.
I made all the blocks for this quilt from my 3.5 in. scrap strips, with white 3.5 in. strips added for the triangles.
Here's the recipe:
Cut 3.5 in squares from scraps in matching pairs. You will need 100 pairs, to make 50 blocks. The blocks measure 6 in. finished (6.5 in. unfinished).
For each broken dishes block, use your favorite method to make 4 squares consisting of two triangles each, one scrap and one white. I used the Easy Angle ruler, so I could cut the triangles from the 3.5 in. strips I already had. Make 49 blocks.
Arrange the finished blocks in 11 rows of 9 blocks each, alternating the 4 patches and broken dishes blocks. As you can see in the photo, I started with a 4 patch in the odd numbered rows and a broken dishes block in the even rows.
I added a 5 in. finished (5.5 in. cut) green border on each side.
The finished top measures approximately 64 in. x 76 in., making it roughly a twin sized quilt.
My quilt will be given to a homeless shelter in my area. The people who receive these quilts get to keep them. I'll be handing the top off to be quilted by the wonderful ladies in our group who have long arm machines. When it's done, I'll bind it, and it will be off to warm someone.
I did finish a couple of things this week. It's still Babymania around here.
I made a little striped sweater, toddler sized, for the new baby. Fun to knit, but weaving in all those ends took almost a whole evening. Next I think I need to knit a baby blanket. (That will take a lot longer.)
I also used some of my ridiculously large stash of cute flannel to make some burp cloths.
This is a commercially-made burp cloth from Carters, that someone gave my daughter. It's a little the worse for wear, which is normal for a burp cloth. The center is one of those pre-folded cloth diapers. I used it for an idea of size.
To make these, I cut a piece of flannel 10.5 in. x 17 in. I also cut a piece of terry cloth the same size.
Here's the back. Nothing could be simpler than these things. I just put them right sides together, and sewed them around the edge, leaving an opening for turning. Then I turned it right sides out, pressed it, pinned the opening shut, and top stitched around the whole thing. I used a decorative stitch on my electric machine.
These were so fast and easy it was hard to stop making them! Here's one with Winnie the Pooh flannel.
Check out this cute fabric! It was a remnant at the fabric store.
And of course, cars and trucks.
In spite of recent weather, it really is springtime, even here. The plants and trees will survive the snow, and bloom. We'll walk outside without our winter coats, and the farmers markets will open again.
In the meantime, it's a good day to sew.
Enjoy the sunshine!
Friday, March 25, 2016
Friday, March 18, 2016
Big Scraps, Little Scraps
I can't believe how long it's been since I last posted. I don't have any real excuse, just the busyness of everyday life. Plus I've been working on family genealogy, which is exciting but very time consuming.
I thought I'd share with you today some of what I've been working on.
Here are some things I finished:
We've got a new grandbaby coming in May, so I've been using up some of my vast flannel stash making receiving blankets. These are about a yard square, and double sided. I can't wait to wrap the little guy in one of them.
I've also been knitting up a storm. These are two baby sweaters, laid out on one of the receiving blankets. I'm working on sweater #4 now. Stop me before I knit again!
In spite of appearances, I have also been getting some quilting done, although nothing is finished yet.
I'm calling this quilt Big Scraps, Little Scraps. I was inspired to make it by two things: my friend Joey, and my basket of little scraps less than 2 in. square.
When Joey was here last fall, she showed me how she sews scraps together to make bigger pieces, kind of like Bonnie Hunter's crumb quilts. (Check them out: Crumbs, Crumbs, Crumbs.)
I have just not been able to do this. I didn't like the process, and I especially didn't like my results (Joey's were great!). I'm a librarian. I like order. I can't do random. And I can't waste anything either.
But--I CAN make log cabin blocks. (In fact, I love it!) Most of my scraps were rectangles, so I sewed them together and added more rectangles, working roughly around the block, to end up with not-really-log-cabin centers for my stars. When I needed longer pieces, I either sewed two little ones together end to end, or raided the string basket.
The squares are on point in this block. I added triangles for the star points and background squares, and made 9 in. finished blocks.
All of this came from my stash. Next I raided my drawer of 2.5 in. strips, and surrounded each block with them, which made the blocks 13 in. finished.
On to the quilting! I quilted each block separately, by machine, adding the next block, batting, and backing as I went. This method allows me to easily do outline quilting, which sets off the blocks. Once they were joined, I quilted the strips, just sewing next to the seam, using the presser foot as a guide.When each row was quilted, I added the rows together, sewing by machine on the top and by hand on the back.
Here's where I am today, sewing down the last seam on the back. I used my big scraps for the backing of each square. This used up lots of fabric, and I didn't have to buy a backing. (The seam ripper is there for a reason. I messed up one of the seams on the top, and had to fix it.)
Here's what it looks like on top.
I still have to add the borders and quilt them, and then bind it. I've got the borders picked out from my stash, and they will be different on the front and the back. I'm also leaning toward binding the quilt with more of the 2.5 in strips.
So how's that for scrappy?
In other news, this is my current piecing machine. Check out the amazing decals! It's a Singer 66, with Egyptian decals, made no later than 1909. I have had lots of trouble this year with my old machines, although I still love them. This is the third head I've had in the treadle since January, but I think third time is the charm. She runs smoothly, spins great bobbins, and is a work horse for my piecing. So far, so good.
Spring is coming, which will bring sunshine and gardening and hanging out the wash, and a new baby! What could be better?
Keep smiling, keep quilting.
I thought I'd share with you today some of what I've been working on.
Here are some things I finished:
We've got a new grandbaby coming in May, so I've been using up some of my vast flannel stash making receiving blankets. These are about a yard square, and double sided. I can't wait to wrap the little guy in one of them.
I've also been knitting up a storm. These are two baby sweaters, laid out on one of the receiving blankets. I'm working on sweater #4 now. Stop me before I knit again!
In spite of appearances, I have also been getting some quilting done, although nothing is finished yet.
When Joey was here last fall, she showed me how she sews scraps together to make bigger pieces, kind of like Bonnie Hunter's crumb quilts. (Check them out: Crumbs, Crumbs, Crumbs.)
I have just not been able to do this. I didn't like the process, and I especially didn't like my results (Joey's were great!). I'm a librarian. I like order. I can't do random. And I can't waste anything either.
But--I CAN make log cabin blocks. (In fact, I love it!) Most of my scraps were rectangles, so I sewed them together and added more rectangles, working roughly around the block, to end up with not-really-log-cabin centers for my stars. When I needed longer pieces, I either sewed two little ones together end to end, or raided the string basket.
The squares are on point in this block. I added triangles for the star points and background squares, and made 9 in. finished blocks.
All of this came from my stash. Next I raided my drawer of 2.5 in. strips, and surrounded each block with them, which made the blocks 13 in. finished.
On to the quilting! I quilted each block separately, by machine, adding the next block, batting, and backing as I went. This method allows me to easily do outline quilting, which sets off the blocks. Once they were joined, I quilted the strips, just sewing next to the seam, using the presser foot as a guide.When each row was quilted, I added the rows together, sewing by machine on the top and by hand on the back.
Here's where I am today, sewing down the last seam on the back. I used my big scraps for the backing of each square. This used up lots of fabric, and I didn't have to buy a backing. (The seam ripper is there for a reason. I messed up one of the seams on the top, and had to fix it.)
Here's what it looks like on top.
I still have to add the borders and quilt them, and then bind it. I've got the borders picked out from my stash, and they will be different on the front and the back. I'm also leaning toward binding the quilt with more of the 2.5 in strips.
So how's that for scrappy?
In other news, this is my current piecing machine. Check out the amazing decals! It's a Singer 66, with Egyptian decals, made no later than 1909. I have had lots of trouble this year with my old machines, although I still love them. This is the third head I've had in the treadle since January, but I think third time is the charm. She runs smoothly, spins great bobbins, and is a work horse for my piecing. So far, so good.
Spring is coming, which will bring sunshine and gardening and hanging out the wash, and a new baby! What could be better?
Keep smiling, keep quilting.
Tuesday, February 2, 2016
Living in the Past
One of our most famous quilt historians is Barbara Brackman. Her Encyclopedia of Pieced Quilt Patterns is used as the definitive reference for most of the quilt documentation projects which are digitized at the Quilt Index. She also has a terrific blog. Here's the link: Barbara Brackman's Material Culture
I had been neglecting my blog reading for a while, and just stumbled across something wonderful last November. It was Barbara Brackman's Stars in A Time Warp Quiltalong. It started in January of 2015, and featured a post per week on different fabrics and prints in quilt history.
It was like taking an in-depth class, for free! Each week participants made 6 in. star blocks using reproduction fabrics of the type featured in the blog post.
Since I started late, I could progress through the lessons at my own pace. I rooted through all my scraps and yardage, looking for just the right pieces. I unearthed fabric from the basement, digging for treasure. My sewing room looked like a bomb went off.
And here is the result:
This is quilt #1. It's a medallion set, with most of the fabrics reproducing the earlier part of the 19th Century. The center is the bird block at the top of this post. The bird is a reproduction of a chintz made by John Hewson of Philadelphia.
It's not a big quilt, which would have been more typical of this time period, but it fits a twin bed.
It was so much fun choosing the fabrics! The center of the star above came from a scrap of curtain fabric I bought at a flea market.
Many of these fabrics have been in my repro stash for years.
This border is from 2000!
So that's the first quilt. Here's the second one:
It was hard to get it all in one photo. There are borders on all four sides, BTW.
Most of these reproduction fabrics copy the last half of the 19th Century. I tried to use 4 fabrics in each block for the sake of variety.
The center of the blue block above is a toile with scenes from the life of Abraham Lincoln. The fabric in the corners of the Lincoln star shows clasped hands and says The Union For Ever.
Stars in A Time Warp is still up! Here's the link: Stars in A Time Warp
So how am I going to quilt them? I think I want quilting designs that work with the time periods. Got any ideas? I'd love to know what you'd do. Leave a suggestion in the comments.
In other news, there's a "new" old sewing machine in my sewing room.
This is my Singer 9W. She's been on a shelf in the basement for a few years, waiting for her turn to get back to work.
I had of course cleaned and oiled her and got her sewing when I first bought her, but this is her real shake-down cruise.
The Singer 9W is a sort of hybrid between a Wheeler and Wilson and a Singer. In fact, she mostly takes after the Wheeler and Wilson side. Singer took over the Wheeler and Wilson factories after they went out of business in 1905, and produced the 9W until around 1913. So my machine is at least 100 years old.
The good news is, she works very well! She has a nice consistent stitch, and so far not a smidge of tension troubles. However, there are some things that I'm having to get used to. For instance, the hand wheel turns AWAY from you, like a White, not like a Singer. And the bobbins are very interesting.
The Singer 9W takes a round, flat bobbin. This shows it in place.
This is what it looks like when you take the bobbin out. It's hard to see here (not a good photo), but the bobbin goes in on a little lever, which you close when the bobbin is in place.
Winding the bobbins is a tad primitive. You guide the thread onto the bobbin with your fingers, moving it gently back and forth to fill the bobbin evenly. It reminds me of the Singer model 12 in this aspect.
In the photo above, you can see two bobbins on the machine bed. The nearer one is an old bobbin, original to the machine. I have 2 old bobbins, plus some newer ones originally made for a Featherweight. Some of the Featherweight bobbins work, and some don't, because they are just a tiny bit too big to go in the machine.
I'm a 21st Century woman, and I really wouldn't have it any other way. I like being able to vote, having better health care, occasional airplane travel, radio, television, telephones, indoor plumbing, oh, yes, and the internet. But it's fun to wander through the past and discover how things used to be. And if it involves sewing and quilts, sign me up!
Happy Quilting!
Friday, January 22, 2016
Key West Butterflies
Does it count as a finished quilt if I don't have the binding sewn down yet?
This is my butterflies quilt. I finished the quilting, made the binding, and machine sewed it on yesterday, and will be sewing it down by hand this weekend.
(I'm linking up with Crazy Mom Quilts today. There's a link back at the end of the post.)
I call it Key West Butterflies because I appliqued a lot of these on a trip to Florida in 2014. (I did a post about it called Back from Margaritaville)
Each butterfly is surrounded by a row of squares, cut from vintage fabrics. Half of the butterflies are appliqued on white squares, and half are on blue. They fly in different directions.
I think this orange one is my favorite.
I bought the butterflies on Ebay years ago. They were just the butterfly shape, which had been cut out and embroidered, and the edges were basted under. There were no backing squares. Most of the fabrics in the butterflies are from the 1940s through the 1960s.
Here's the back! Each of the 20 squares was quilted separately on the machine. I used vintage fabrics for the backs and old fashioned cotton batting.
Most of the fabrics on the back are just vintage cottons, but a couple are from feedsacks.
This pink print with the enormous blueberries (?) was a skirt I bought in an antique store.
It's about time I finished this! It has been languishing for months.
I'm looking forward to watching some PBS mysteries while I sew the binding down, and then get a label sewn on.
I'm having such a good start to this new year. I hope you are too!
Back to Crazy Mom
This is my butterflies quilt. I finished the quilting, made the binding, and machine sewed it on yesterday, and will be sewing it down by hand this weekend.
(I'm linking up with Crazy Mom Quilts today. There's a link back at the end of the post.)
I call it Key West Butterflies because I appliqued a lot of these on a trip to Florida in 2014. (I did a post about it called Back from Margaritaville)
I think this orange one is my favorite.
I bought the butterflies on Ebay years ago. They were just the butterfly shape, which had been cut out and embroidered, and the edges were basted under. There were no backing squares. Most of the fabrics in the butterflies are from the 1940s through the 1960s.
Here's the back! Each of the 20 squares was quilted separately on the machine. I used vintage fabrics for the backs and old fashioned cotton batting.
Most of the fabrics on the back are just vintage cottons, but a couple are from feedsacks.
This pink print with the enormous blueberries (?) was a skirt I bought in an antique store.
It's about time I finished this! It has been languishing for months.
I'm looking forward to watching some PBS mysteries while I sew the binding down, and then get a label sewn on.
I'm having such a good start to this new year. I hope you are too!
Back to Crazy Mom
Tuesday, January 19, 2016
With A Little Help From My Friends
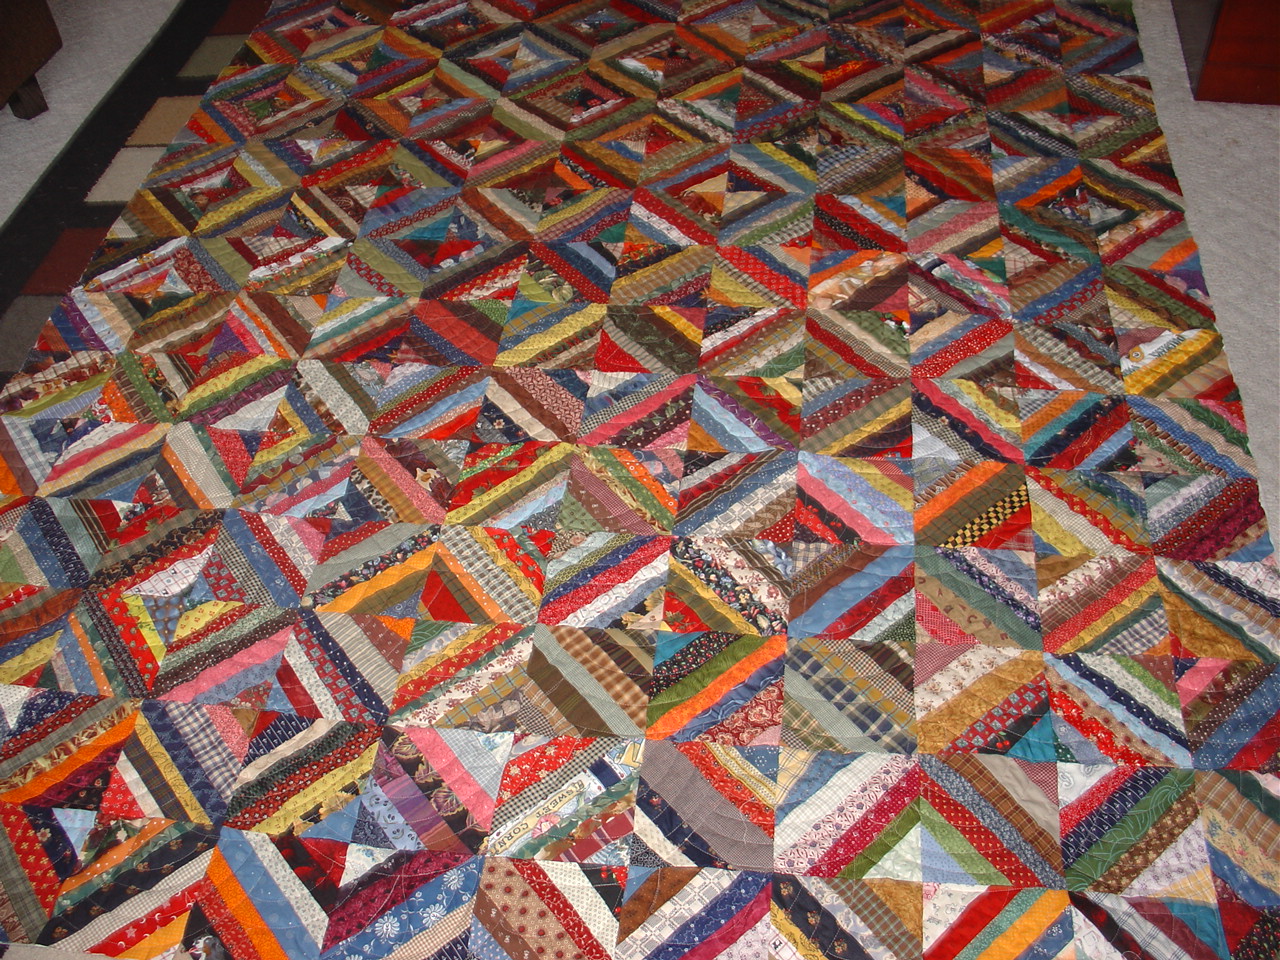
This is my string quilt. I made the top over a year ago (as described in this post). It has bits and pieces of so many memories--quilts made and used, quilts given away, shopping trips with friends, scraps of fabric and time. There are even 3 blocks in the quilt that were made by my friend Debbie for her own quilt. She gave me the extras and lots of plaid scraps.
My cat and I are looking at it here. I LOVE it! (Mr. Biddy is also giving it his seal of approval.)
Here's the back of the quilt, made from orphan blocks and random fabrics. My friend Joey and I made up the backing together, and Joey did the quilting. Can you see it in this picture? She did a Baptist fan over the whole top. She does this freehand on her long arm. It is amazing, and exactly what I was envisioning for this quilt.
I have since bound and labeled the quilt. I can't stop running my hands across it.
Here's the label. It's part of my New Years Resolution, to label the quilts I make this year.
Ties that Bind Quilters may remember this quilt. Louanne S. led us in a mystery quilt, with one clue per month, in 2014.
I chose the spools fabric first (it was a Connecting Threads print), and then chose the other fabrics based on the colors in the print. I really liked this quilt, even though these are not my usual colors.
But it didn't come to life until Joey quilted it!
Look at these beautiful feathers, done with variegated thread!
And check out how it turns the corner! It is just so wonderful!
Both of these quilts would still be just tops, hanging in my sewing room closet, if it wasn't for Joey. This is the first time anyone else has quilted anything for me, and I could not be happier.
I bound it in a bright green, and sewed on the label. The quilting looks even better from the back!
Yesterday was a busy day, but it was also Martin Luther King Day, so I made time to work on a little quilt for charity. (I think I'm going to try calling them "giving quilts" this year.)
I quilted and bound this baby quilt, all on the sewing machine. The top was hanging in the closet, waiting for me.
I have made quilts in this pattern lots of times. It's sort of my go-to pattern when I just want to sew something. I call it Evelyn's Quilt, since I made it first for my granddaughter Evelyn.
Click here to go to the free pattern.
I quilted a diagonal grid as well as a horizontal one. My quilting is SAD compared to Joey's.
Here's the back of the quilt, a Winnie the Pooh print I got at a sale for $1.00 per yard. I think I have enough to back at least one more quilt.
The redwork quilt sits on my kitchen table, where I can quilt whenever I have a few minutes between cooking and laundry, etc. The masking tape is working out for quilting lines without having to mark them.
I'm hand quilting diagonal lines through each square. When those are done I'll tackle the sashing and border. The lines are 1 3/8 in. apart.
This is one of the best of the squares--a mule and two dogs. The embroidery is mostly chain stitch. Blue lines are visible on some of the blocks. Either the original quilter bought the blocks ready-stamped or stamped her own with a transfer pattern.
I like this one, even though it is very simple. I believe it was traced from a rooster cookie cutter. I'll have to look for one of these the next time we go antiquing.
My life has really been enhanced by my quilting friends, and I bet yours has, too. Let's remember to appreciate them this week.
Stay warm!
My cat and I are looking at it here. I LOVE it! (Mr. Biddy is also giving it his seal of approval.)
Here's the back of the quilt, made from orphan blocks and random fabrics. My friend Joey and I made up the backing together, and Joey did the quilting. Can you see it in this picture? She did a Baptist fan over the whole top. She does this freehand on her long arm. It is amazing, and exactly what I was envisioning for this quilt.
I have since bound and labeled the quilt. I can't stop running my hands across it.
Here's the label. It's part of my New Years Resolution, to label the quilts I make this year.
Ties that Bind Quilters may remember this quilt. Louanne S. led us in a mystery quilt, with one clue per month, in 2014.
I chose the spools fabric first (it was a Connecting Threads print), and then chose the other fabrics based on the colors in the print. I really liked this quilt, even though these are not my usual colors.
But it didn't come to life until Joey quilted it!
Look at these beautiful feathers, done with variegated thread!
And check out how it turns the corner! It is just so wonderful!
Both of these quilts would still be just tops, hanging in my sewing room closet, if it wasn't for Joey. This is the first time anyone else has quilted anything for me, and I could not be happier.
I bound it in a bright green, and sewed on the label. The quilting looks even better from the back!
Yesterday was a busy day, but it was also Martin Luther King Day, so I made time to work on a little quilt for charity. (I think I'm going to try calling them "giving quilts" this year.)
I quilted and bound this baby quilt, all on the sewing machine. The top was hanging in the closet, waiting for me.
I have made quilts in this pattern lots of times. It's sort of my go-to pattern when I just want to sew something. I call it Evelyn's Quilt, since I made it first for my granddaughter Evelyn.
Click here to go to the free pattern.
I quilted a diagonal grid as well as a horizontal one. My quilting is SAD compared to Joey's.
Here's the back of the quilt, a Winnie the Pooh print I got at a sale for $1.00 per yard. I think I have enough to back at least one more quilt.
The redwork quilt sits on my kitchen table, where I can quilt whenever I have a few minutes between cooking and laundry, etc. The masking tape is working out for quilting lines without having to mark them.
I'm hand quilting diagonal lines through each square. When those are done I'll tackle the sashing and border. The lines are 1 3/8 in. apart.
This is one of the best of the squares--a mule and two dogs. The embroidery is mostly chain stitch. Blue lines are visible on some of the blocks. Either the original quilter bought the blocks ready-stamped or stamped her own with a transfer pattern.
I like this one, even though it is very simple. I believe it was traced from a rooster cookie cutter. I'll have to look for one of these the next time we go antiquing.
My life has really been enhanced by my quilting friends, and I bet yours has, too. Let's remember to appreciate them this week.
Stay warm!
Subscribe to:
Posts (Atom)