This is a quilt we recently added to the Quilt Index. The owners think it was made by Margaret Wisher, possibly in Dubuque, Iowa.
Something about this quilt inspired me. The red is still so vivid, although the triangles, stem, and leaves have faded from the original green to tan. We see this fading often in quilts made in this time period. The green synthetic dye is sadly unstable. The quilt dates to around 1875.
It's really unusual to see this kind of block set on the straight, rather than on point.
When we documented it, we could not find an exact pattern match among the thousands of quilt patterns in our reference books. It's similar to one called English Ivy (Brackman #1330), but it's not exactly the same. It's a variation.
Variation is a useful term in documenting quilts. Quilt makers are endlessly inventive. Sometimes variations happen because we're trying to replicate something we saw somewhere, and it comes out differently than we expected. Or we start out to copy a pattern, and then think, what if I changed this or that? We add seams, and leave them out. We change the colors, or reverse background and foreground. We change the size or the set.
This is my variation of this variation. One of the other names for the English Ivy pattern is Clover Blossom. I'm calling my variation Red Clover.
One of the things that drew me to this quilt was the ease of drafting the pattern. The original English Ivy pattern is much more difficult, with several sizes of triangles. This version is just squares and half-square triangles, with a bit of machine applique.
I mostly left the colors the same, although I used print fabrics instead of solid colors. I did change the small squares in the corners.
This is what the block would have looked like if I put the green squares on the corners, like the original, instead of background squares. I just think it looks kind of clunky.
I also left out the leaves, just for simplicity's sake.
My version is a 12 in. square (finished) block. The original blocks measured around 9 in. square, which I didn't know until I had drafted my version and made the first block.
I made 12 blocks, which will make a relatively small quilt. Here's how I'm going to set it:
I'm using a three strip sashing of solid red, green print, and solid red. The cornerstones are nine patch blocks.
This is an old, classic set. I'm pretty happy with it, especially the vividness of the red. I've been so drawn to red lately. Wonder if it's because it's still so wintery outside, with white snow everywhere and bare branches on the trees?
Here are the directions, if you would like to make my version of this block.
Red Clover Quilt
12 in. block (finished)
To make one block:
You will need 2 half square triangles made from red print and background fabric, that measure 4 in. square finished. I made these using the Easy Angle. I placed a strip of background fabric face down on a strip of red print fabric, each 4.5 in. wide, and cut the triangles with the Easy Angle.
You will also need 13 half square triangles made from green print and background fabric, that measure 2 in. finished. I made these by placing a strip of background fabric face down on a strip of green print fabric, each 2.5 in. wide, and cut the triangles with the Easy Angle.
You can make the triangle squares any way you like, as long as they end up measuring the same.
That takes care of the triangles!
You also need:
From background fabric, cut:
1 square 6.5 in. x 6.5 in.
2 squares 2.5 in. x 2.5 in.
From red print fabric, cut
1 square, 4.5 in. x 4.5 in.
From green print fabric, cut
1 rectangle, 2 in. wide x 10.5 in. long (this is the stem).
It looks like quite a pile, but it goes together easily.
First, sew all your triangles. This is the most time consuming part of the block, and it really doesn't take that long. Just chain them through, and press toward the dark.
Next, take the stem piece, fold it right sides together, and stitch. Press the seam to the back of the stem, so it cannot be seen. You can use applique bias bars, a thin piece of cardboard, or just moosh it. I mooshed it.
Now pin the stem diagonally across the 6.5 in. background square, and top stitch on both sides, using green thread. I'm using my chain stitcher here, so I don't have to keep changing thread on my treadle. It also helps that I didn't have to wind a bobbin. This is a good project for using two machines, one threaded with green and one with neutral for piecing. ( I knew I collected all those machines for a reason!)
Now lay out the block. A lot of it is already done.
I made this block in quarters. The lower right quarter, with the stem, is already done.
Here I'm sewing the upper right quarter. I sew the two triangle squares on the right together, then add them to the large triangle square. I then sew the triangles on top to each other, and add the background square. The last seam joins these sections.
The lower left quarter is sewn the same way.
Be careful! These sections are not identical. (This is why I lay the blocks out next to the machine.)
The upper left section is sewn in pretty much the same way.
Once you've got these sections sewn, you just join them together.
I used a variety of different reds and greens, to make it sort of scrappy.
The sashing strips are cut 1.5 in. wide and 12.5 in. long. The nine patch corner squares are made from 1.5 in. squares, and the nine patch finishes at 3 in. square. I suppose you could strip piece them, but I find that it wastes fabric, so I just cut the squares.
I'm hoping to work on this quilt today, to get all the sashing and cornerstones made and decide on an outside border. I finished the leaders and enders 4 patch blocks yesterday, so I guess today I'll work on a charity quilt as a leaders and enders project. It's amazing what we can get done this way.
Keep warm, and keep sewing!
Showing posts with label chain stitch. Show all posts
Monday, February 23, 2015
Thursday, February 28, 2013
Civil War Quilt finished!
Huzzah! It feels so great to finish this quilt. I hand sewed the last seam on Tuesday night while watching TV, and inked on the inscriptions yesterday afternoon. It took a long time to decide what to write in each square. I included things like names of battles, etc., quotes from the time period (especially from President Lincoln), and some lines from songs popular with the Union troops. This is a Union quilt.
As you can see, it's a small quilt. The white area visible underneath it is another quilt with a purple binding. I'd guess this size would be called a lap quilt. If it was an antique, we might call it a hired man's quilt. During the Civil War, this kind of quilt was made for the cots the soldiers used in camp and hospital.
I learned a lot making this quilt. I was surprised that it feels like a "regular" quilt, even though it's actually 48 little quilts bound and sewn together.
Here's what I did on the back:
Each block is made separately, so I could choose whatever backing I wanted. I chose to make each vertical row's backing the same.
Now for the real test--I need to wash it! With all the antique fabric in the top, it will probably need to be washed by hand.
Some of my favorite quotes:
"Liberty and Union, Now and Forever, One and Inseparable!" Daniel Webster, 1830.
"At the judgement day, I want to be with Wisconsin soldiers." Gen. John Gibbon.
Now I get to pick a new project! This day just gets better and better.
Friday, February 8, 2013
Potholder Quilt Progress
Progress has been slow on the potholder quilt this week, due to me having a mild case of the flu. I felt like I just had a cold last Sunday, and was able to finish making, quilting, and binding all the blocks. It got worse all week til yesterday, when I started finally feeling better. I'm still taking it easy today.
I'm at the point of hand sewing the rows together. I have six of the eight rows sewn together as of this morning. Once I finish the other two rows I'll start sewing the rows to each other. When that's done, that's it! The sewing will be done!
If you're wondering about that weird roll of brown thread, I'm using up some thread that had a serious problem--the spool broke apart, I have no idea why. I've been saving it for hand sewing.
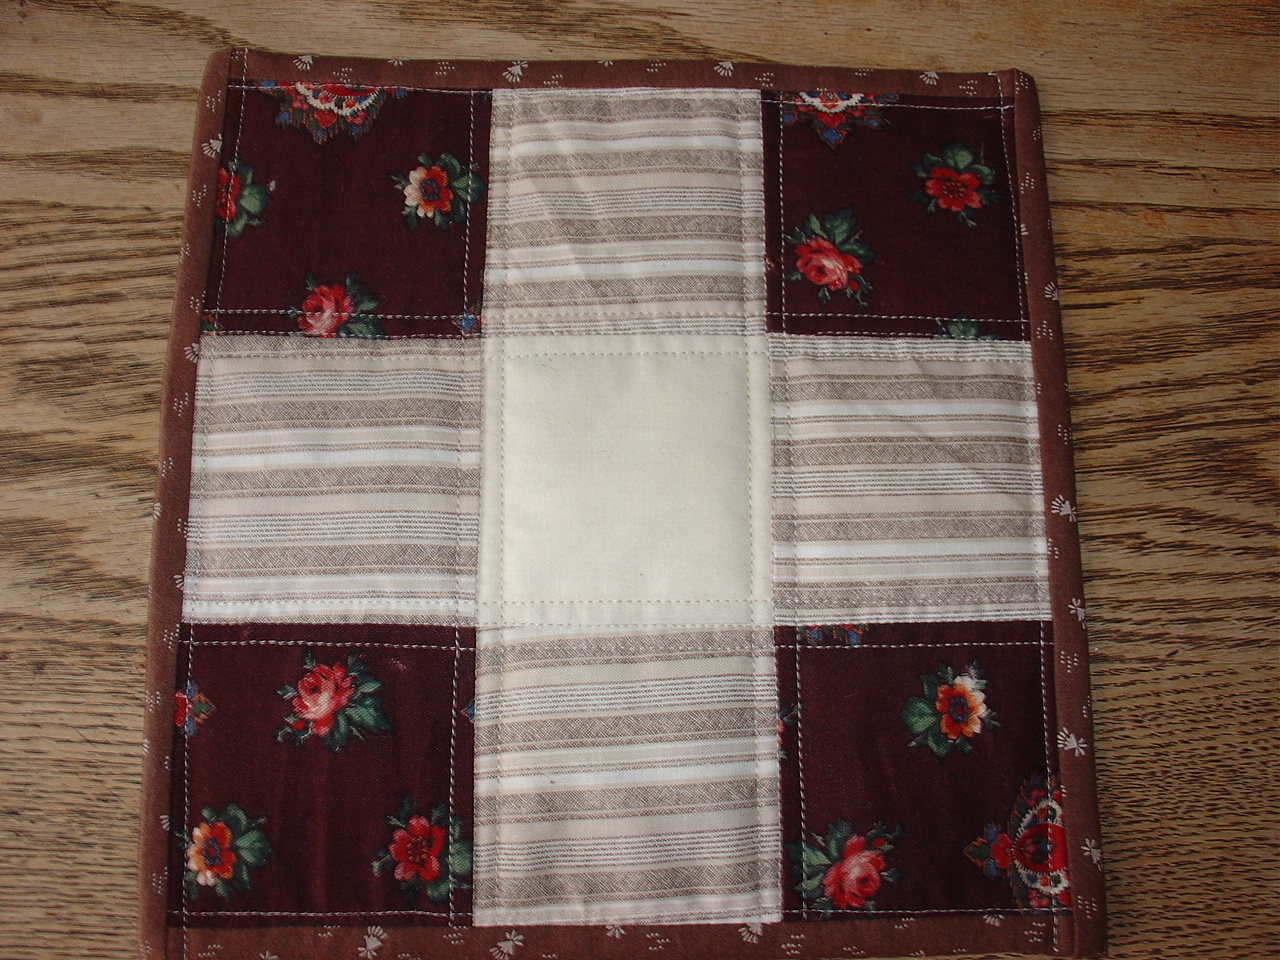
Here are the finished rows, laid out on the floor. It's not going to be a very big quilt. There are no borders, of course, and the blocks are about 9" finished.
You can see I still have the row markers pinned to the first block in each row. You can also see that I have used two fabrics for binding. I ran out of the first one, and just used another from my stash. This is what the ladies would have done during the Civil War (and even during the Depression). "Use what you have" wasn't just a good idea, it was a way of life.
The last detail of this quilt will be the inscriptions I will write in the center of each block. I'm doing research now, and thinking about what I want. Here's my idea for the first block:
This quilt is dedicated to the memory of the loyal hearts that saved the Union.
Overall, I'm happy with this quilt, although I've learned that I never want to go into the potholder making business. The chain stitching worked well, no problems, and of course the Davis VF made the quilting and all that binding lay flat. There's quite a lot of hand sewing, which I don't mind at all, especially as I recover from being sick.
I think I'll actually enter this quilt in the Sun Prairie show, instead of the Debbie's Challenge. Debbie isn't finished yet, and we have this idea of them hanging side by side. (Hi Debbie!)
What are you working on?
I'm at the point of hand sewing the rows together. I have six of the eight rows sewn together as of this morning. Once I finish the other two rows I'll start sewing the rows to each other. When that's done, that's it! The sewing will be done!
If you're wondering about that weird roll of brown thread, I'm using up some thread that had a serious problem--the spool broke apart, I have no idea why. I've been saving it for hand sewing.
Here are the finished rows, laid out on the floor. It's not going to be a very big quilt. There are no borders, of course, and the blocks are about 9" finished.
You can see I still have the row markers pinned to the first block in each row. You can also see that I have used two fabrics for binding. I ran out of the first one, and just used another from my stash. This is what the ladies would have done during the Civil War (and even during the Depression). "Use what you have" wasn't just a good idea, it was a way of life.
The last detail of this quilt will be the inscriptions I will write in the center of each block. I'm doing research now, and thinking about what I want. Here's my idea for the first block:
This quilt is dedicated to the memory of the loyal hearts that saved the Union.
Overall, I'm happy with this quilt, although I've learned that I never want to go into the potholder making business. The chain stitching worked well, no problems, and of course the Davis VF made the quilting and all that binding lay flat. There's quite a lot of hand sewing, which I don't mind at all, especially as I recover from being sick.
I think I'll actually enter this quilt in the Sun Prairie show, instead of the Debbie's Challenge. Debbie isn't finished yet, and we have this idea of them hanging side by side. (Hi Debbie!)
What are you working on?
Friday, February 1, 2013
Civil War Style Potholder Quilt
Below is the recent book that chronicles the known Union Civil War soldiers' quilts. If you are interested in quilt history, you will have heard of the authors Pam Weeks and Don Beld. Don also heads a group that makes quilts to honor fallen soldiers in our current wars.
I knew when I saw the exhibit that I wanted to try this potholder technique. Getting the book at Quilt Expo in September really reinforced that. Plus I bought two bags of old fabric at the New England Quilt Museum that day. They were in the consignment section. Some were pieces from old clothes or quilts, others were just scrap bag remnants. I separated them into late 19th-early 20th century and 1930s-1950s. I knew I wanted to use the oldest fabrics to make a potholder quilt.
My friend Debbie and I had a two-person retreat last weekend, while her husband was at a conference. We had a lovely time, sewing and visiting. Before I went, I had to decide what project to bring. The potholder idea popped up in my head again.
Most of my projects were at the quilting stage, and I didn't want to drag my quilting treadle to Madison. It probably wouldn't fit in the Mustang anyway. I knew I wanted to take a hand crank sewing machine, just because I hadn't done that for a while. My first thought was my Singer model 12, which would be appropriate for the time period of the fabrics and the design. The only problem with the model 12 (and with most hand cranks) is winding the bobbin. I enjoy sewing with the hand cranks, but winding bobbins is a pain. And if we were going to be sewing all weekend, I would need a lot of bobbins. I have a model 12 treadle, and I don't mind winding the bobbins on it, but I haven't used it for a while and it isn't running very smoothly yet.
My next thought--what about a hand crank that doesn't need a bobbin? What about my little Willcox and Gibbs?
I bought her several years ago on Ebay. The hand crank actually came from a guy in England. I got her up and running right away, but I had never made a project with her. Plus this was a chain stitch machine. Can you even make quilt blocks with a chain stitch machine? Would the seams pull out?
I thought about it for a while. Willcox and Gibbs sold sewing machines for over 100 years in this basic design. Most people made clothes with them. If the clothes didn't come apart, why would the quilt blocks? The seams would actually be protected inside the quilt, rather than rubbing against other clothes or skin.
In the end, I decided to live dangerously. Not only did I use the Willcox and Gibbs, I cut the pieces for the blocks from the old fabric I bought at the museum, plus other old fabrics in my collection. And I used some of my collection of old thread to sew with--the little wooden spools fit very well on the machine. I combined lots of old stuff that I love--sewing machine, fabric, thread, and quilt style.
I can't believe how well it all worked. The machine was easy to carry, and it was wonderful not having to worry about running out of bobbin. I bonded with the machine as I made the blocks. I even learned how to thread it without running for my copy of Charles Law. It was so quiet, we had no trouble talking over it or hearing Downton Abbey on the DVD player. I was almost sorry when I finished making the blocks.
Here's what I've got done so far:
The stack on the left is layered with a backing square and cotton batting (I'm using up the batting scraps!), ready to be quilted. The center stack is quilted, and just needs to be bound. I'm binding each side separately. According to the book, the blocks will be more square this way than if I bound all of it at once. We'll see how it turns out. The last stack is the finished blocks. It really does look like a stack of potholders.
I'm quilting and binding the blocks on the Davis Vertical Feed treadle, which works like a built-in walking foot. So far I have 12 blocks completely finished, out of an eventual 48.
Here are the 12, side by side. When I have them all done, I'll slip stitch them together by hand. Then I'll figure out what sort of inscription to put in the plain center squares of each block.
The slowest part is binding each square.
I started out by sewing the binding strips to the back and folding them to the front to stitch them down, like I do with charity quilts. There was no way I was doing all this binding by hand. I tried doing it the opposite way (front first, then back), and actually liked it better:
You can see the stitching, but it looks like the quilting.
This is definitely an unusual project, but I am having lots of fun with it.
Happy Sewing!
P.S. Click on the number of comments to leave your own comment.
Subscribe to:
Posts (Atom)